BMW X3 Service & Repair Manual: Installing cavity sealing (expanded)
NOTE: Carry over schematic diagram to the relevant vehicle type.
The following repair represents the procedure for an already expanded cavity acoustic baffle.
The cavity acoustic baffle remains on the body in this instance.
Before these work steps, prepare the new part so that it is ready to install (adapting, cutting to size, applying welding primer etc.).
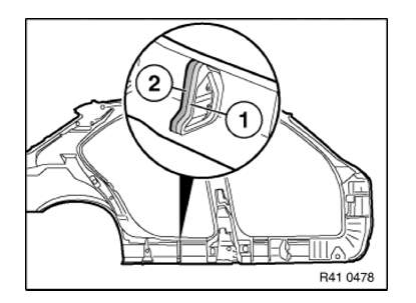
Clean contact surface (1) with cleaning agent R2.
Apply a bead (2) approx. 15 mm high of SEALANT D2 to contact surface (1).
If necessary apply sealant D2 somewhat thinner on each side, to prevent the sealant from running.
Fit, secure and weld up new part.
WARNING: Ensure adequate ventilation over entire processing period.
 Installing a cavity sealing with 2-component pu cavity foam
SOURCING REFERENCE for cavity foam HS1.
IMPORTANT:
The cavity foam may only be use for cavity sealing at the points at which cavity sealing is
...
 Installing cavity sealing (not expanded)
NOTE: Carry over schematic diagram to the relevant vehicle type.
The following repair represents replacement of a cavity acoustic baffle.
Bef ...
Other materials:
BMW X3 Service & Repair Manual > Front trim panel: Removing and installing front panel
Necessary preliminary tasks:
Remove FRONT BUMPER TRIM .
Unlock plug-in connector (1) for horn and disconnect.
Shown on left side, right side identical.
Open clutch (1) and detach Bowden cable for hood/bonnet release.
Release screw (2).
Unlock plug connection (3) for headlight and ...
BMW X3 Owners Manual
BMW X3 Service & Repair Manual
