BMW X3 (F25) Service & Repair Manual: Dash cowl
REPLACE THE A-PILLAR ON THE OUTSIDE LEFT IN THE AREA OF THE WINDSCREEN
Read contents of BODY, GENERAL.
Remove or cover those vehicle components in the repair area which are susceptible to heat or dust.
Use only approved SPOT-WELDING APPARATUS for repairs.
IMPORTANT: Operations on pyrotechnical devices may only be carried out by authorized experts.
Improper, unauthorized operations may result in serious dangers.
Unauthorized persons are strictly prohibited from performing any operations on this system.
WARNING: Read and comply with SAFETY INSTRUCTIONS for handling airbag modules and pyrotechnical belt tensioners.
Incorrect handling can activate airbag and cause injury.
A damaged head airbag must be replaced.
A damaged head airbag exhibits an impaired protective function and in extreme cases loses its protective function altogether.
Necessary preliminary tasks:
Disconnect BATTERY EARTH LEAD
Remove PANEL FOR ROOF PILLAR
Following new body parts are required :
- (1) A-pillar with entrance
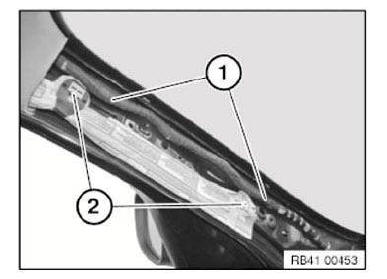
Removing the A-pillar in the area of the windscreen
Unclip wiring harness in these areas (1).
Undo airbag at the attachment points (2).
IMPORTANT: For the exact procedure, see repair instructions for REMOVING AND INSTALLING HEAD AIRBAG !
IMPORTANT: Risk of damage! Airbag must not be kinked or bent!
NOTE: Use protective sleeve (1) to protect the airbag.
Check protective sleeve for damage prior to use.
A damaged protective sleeve must not be used!
- (2) Velcro fastener
- (3) Loop
Push the protective sleeve (1) onto the airbag up to just below the roofliner so that the airbag is completely covered.
Fasten protective sleeve with Velcro fastener (2).
Secure protective sleeve with airbag against kinking.
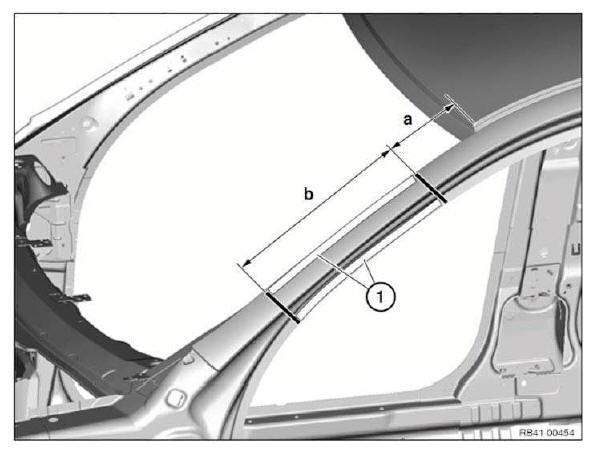
Mark severance cuts in accordance with specified dimensions and cut.
IMPORTANT: Cut outer panel only for following severance cuts.
Dimensions a = approx. 150 mm from roof edge.
Dimension b = approx. 340 mm below severance cut a.
Open welded connections in areas (1).
New part preparation
Mark severance cuts on new parts in accordance with vehicle and cut.
Prepare REINFORCEMENT PLATES at severance cuts.
Installing the A-pillar in the area of the windscreen
Install and weld new parts and reinforcement plates.
After completing welding work: Check airbag in area of protective sleeve for damage, REPLACE if necessary.
REPLACING OUTER RIGHT A-PILLAR IN AREA OF WINDSCREEN
Operation is identical to replacing "OUTER LEFT A-PILLAR IN AREA OF WINDSCREEN".
 Roof outer skin
...
 Front trim panel
NOTES ON THE REPAIR TECHNIQUE USED IN THE MAIN GROUP 41
Two different repair techniques are used in body repair.
These are welding and bonding/riv ...
Other materials:
BMW X3 (F25) Service & Repair Manual > DTC: SELF-DIAGNOSTICS DTCS
SELF-DIAGNOSTICS DTCS
SELF-DIAGNOSTICS DIAGNOSTIC TROUBLE CODE (DTC) LIST
DIAGNOSTIC TROUBLE CODE INDEX
DTC INDEX
...
