BMW X3 (F25) Service & Repair Manual: Shock absorber
- Information on replacing shock absorbers
- Removing and installing rear left or right spring strut shock absorber
- Replacing rear left or right spring strut shock absorber
Information on replacing shock absorbers
Situation: When a shock absorber is faulty on one side (leaking, noises, limit values exceeded on the shock tester), often both shock absorbers on the axle in question are replaced.
Effect: This is not necessary for technical reasons and causes the manufacturer not to recognize the unnecessarily removed shock absorbers as defective parts. Unnecessarily high costs for the customer can be avoided by replacing the shock absorber on one side only.
Procedure: If one shock absorber is damaged, it is only necessary to replace both shock absorbers when the car has driven in excess of 80 000 km.
Exception: On all M-GmbH models, when a limit value is exceeded on one side, it is still necessary always to replace both shock absorbers on the relevant axle.
Removing and installing rear left or right spring strut shock absorber
NOTE: With full spring deflection, the coil spring may touch the gaiter, depending on the design.
This is not a fault!

Necessary preliminary tasks:
- Remove luggage compartment trim panels .
- Secure spring strut against dropping.
- Remove CAMBER ARM.
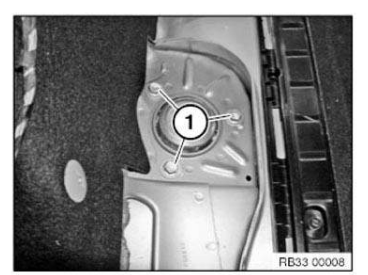
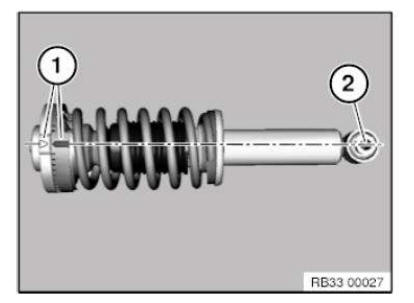
Release screw (1).
Installation note: Replace screws.
After completing work:
- Perform WHEEL ALIGNMENT CHECK .
Replacing rear left or right spring strut shock absorber
Special tools required:
- 31 3 340
- 31 3 341
- 31 3 353
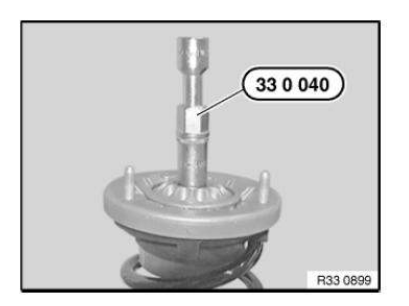
- 33 0 040
WARNING: Before using the special tool 31 3 340 take care to read through the Owner's Handbook! All the safety precautions and instructions contained in the Owner's Handbook must be strictly observed! Failure to observe these safety precautions and instructions increases the risk of serious physical injury, damage to your health and damage to property and equipment!
IMPORTANT:
- Prior to each use, check the special tools for defects, modifications and operational reliability.
- Damaged/modified special tools must not be used!
- No changes or modifications may be made to the special tools!
- These special tools are intended solely for the purpose of tightening and relieving cylindrical and tapered suspension springs.
- Keep special tools dry, clean and (down to the spindle) free from grease.
- Impact screwdrivers are prohibited!
- Do not compress coil spring to full extent.
IMPORTANT: When replacing the spring strut, replace the auxiliary damper as well!
Necessary preliminary tasks:
- Remove REAR SPRING STRUT SHOCK ABSORBER UNIT.
Removing:
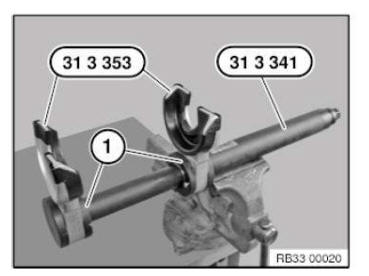
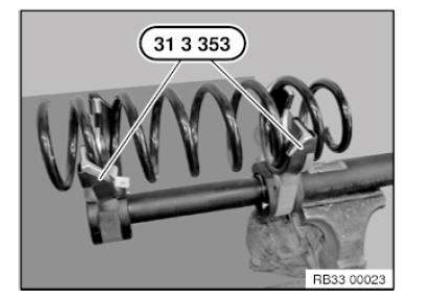
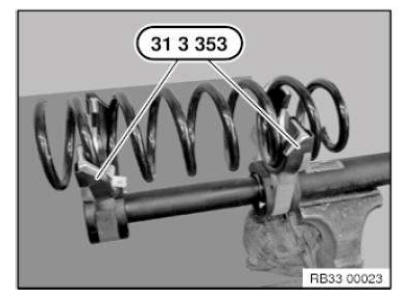
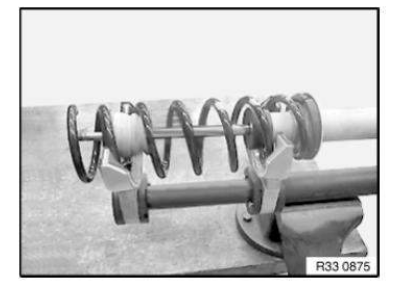
Clamp special tool 31 3 341 in vice.
Place special tools 31 3 353 . Retaining bolts (1) must be felt and heard snapping into place.
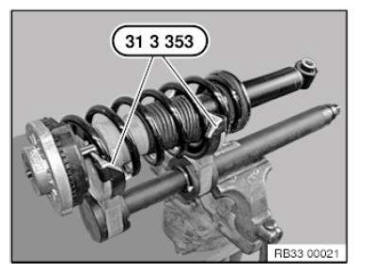
Clean coil spring to remove all coarse dirt and mount on special tools 31 3 353 .
WARNING: Coils of coil spring must be located completely in recesses of special tools 31 3 353! Compress coil spring until stress on piston rod is relieved.
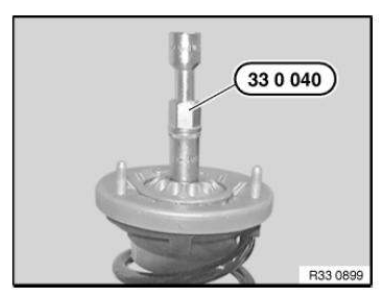
Release nut with special tool 33 0 040.
Remove spring pad with dust boot.
Remove shock absorber with auxiliary damper, protective tube and lower spring pad sideways from tensioned coil spring.
Impact screwdrivers are prohibited! Risk of damage inside the shock absorber!
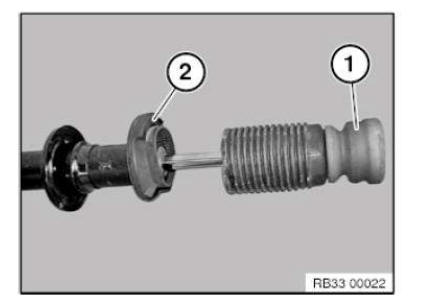
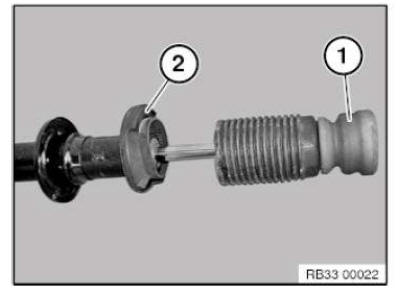
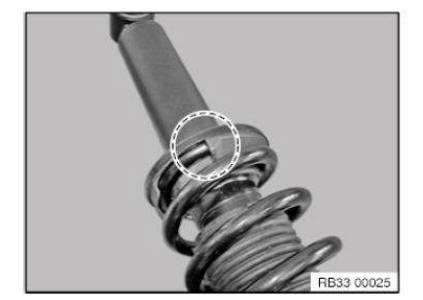
If necessary, remove auxiliary damper (1) with protective tube and spring pad (2) from spring strut.
Relieve tension on coil spring and remove from special tools 31 3 353.
Assembly:
WARNING: Do not compress coil spring to full extent.
Coils of coil spring must be located completely in recesses of special tools 31 3 353! Tension coil spring.
Check auxiliary spring (1) with protective tube and spring pad (2) for damage, replace if necessary.
Insert spring strut into tensioned coil spring.
IMPORTANT: Lower end of coil spring must rest on stop of spring pad!
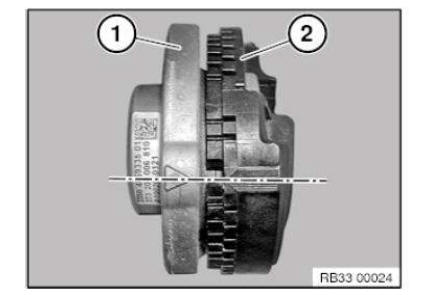
Check support bearing (1) and spring pad (2) for damage, replace if necessary.
IMPORTANT: The arrows on support bearing (1) and spring pad (2) must be aligned.
Mount support bearing and spring pad on piston rod.
IMPORTANT: Align support bearing and spring pad to end of coil spring.
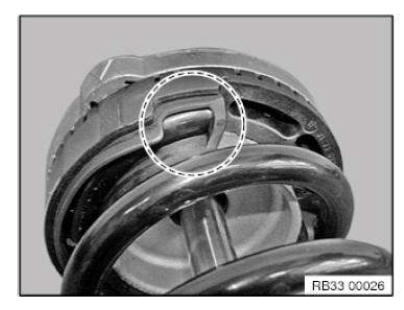
IMPORTANT: The marks (1) must be aligned with the hole in rubber mount (2).
Replace nut and tighten down with special tool 33 0 040 .
Relieve tension on coil spring.
Impact screwdrivers are prohibited! Risk of damage inside the shock absorber!
REPLACING REAR LEFT OR RIGHT THRUST BEARING FOR SPRING STRUT/SHOCK ABSORBER
Installation note:
1. All screws, nuts, bolts and hose clamps removed during the repair must be replaced.
2. Retaining elements on chassis and suspension and steering parts must be replaced.
NOTE: Procedure is described in Replacing rear left or right spring strut shock absorber.
 Wheel bearings
...
 With suspension
REMOVING AND INSTALLING/REPLACING REAR LEFT OR RIGHT COIL SPRING
Installation note:
1. All screws, nuts, bolts and hose clamps removed during the ...
Other materials:
BMW X3 (F25) Service & Repair Manual > Driveline+Axles: Specified grease
GREASE FOR PROPELLER SHAFT (FLEXIBLE COUPLING (RUBBER DOUGHNUT) CENTER
BEARING AND SPLINE END)
Use one of the following greases for greasing the propeller shaft center bearing or locating pin of the
transmission output flange and the splines of the propeller shaft spline end.
GREASE FOR PROPELLE ...
