BMW X3 (F25) Service & Repair Manual: Heater with operation
- Installing servodrive
- Removing and installing (replacing) control panel for heating and air conditioning system
- Removing and installing/replacing actuator drive for central kinematics (a/c control)
- Removing and installing radio and a/c control panel
- Removing and installing/renewing heating unit
- Removing and installing/replacing actuator drive for fresh/recirculated air flap
- Removing and installing/replacing footwell temperature sensor
- Removing and installing/replacing heater/air conditioner blower
- Removing and installing/replacing sensor for automatic recirculated air control (auc)
- Removing and installing/replacing servodrive for blending flap (left)
- Removing and installing/replacing servodrive for blending flap (right)
- Removing and installing/replacing servodrive for defrosting flap (right)
- Removing and installing/replacing ventilation temperature sensor
- Replacing actuator drive for rear compartment flap
- Replacing actuator drive of ventilation flaps
- Replacing controller for heating and air conditioning system blower
- Replacing evaporator temperature sensor
- Replacing heat exchanger
- Replacing servodrive for blending flap
- Replacing servodrive for footwell flap (automatic a/c)
- Replacing the button caps of the heating and air conditioning system control panel
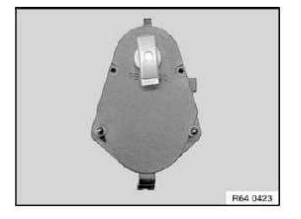
Installing servodrive
Installation: If necessary, align shaft of flap(s) to be actuated to position of servodrive to be installed.
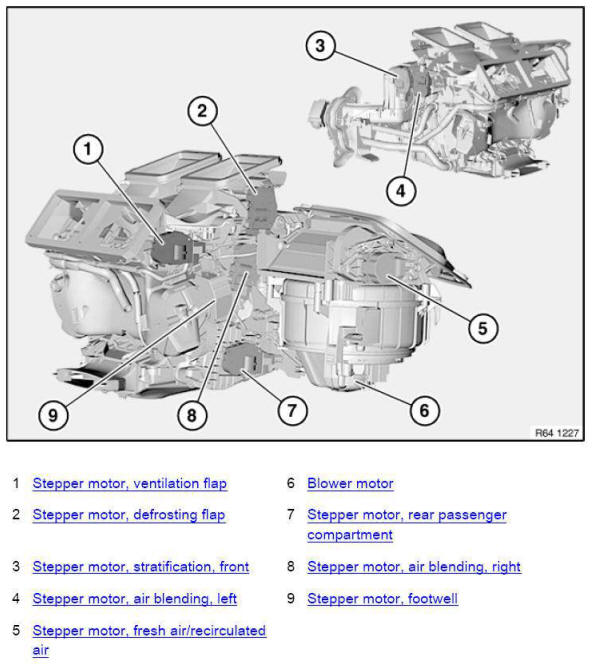
OVERVIEW OF ACTUATOR DRIVES ON HEATER/AIR CONDITIONER
Removing and installing (replacing) control panel for heating and air conditioning system
Necessary preliminary tasks:
- Remove RADIO AND A/C CONTROL PANEL
The following operation describes the replacement.
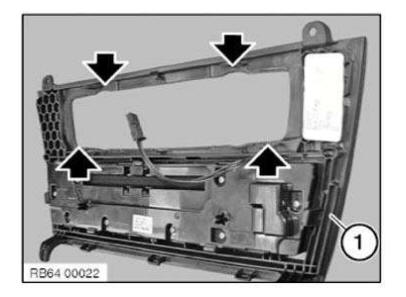
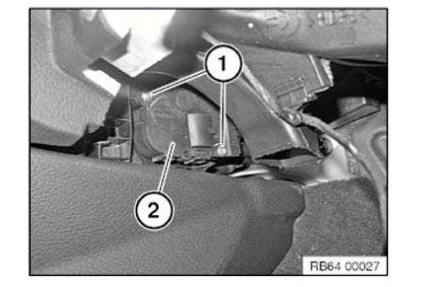
Disconnect plug connection (1).
Release retainers (3) on air conditioning control panel (2) by pressing the retaining tabs (3) inward with a suitable tool.
At the same time press IHKA controls (2) forward out of retaining frame and remove.
Installation note:
The air conditioning control panel (2) must be felt and heard to engage in the retaining frame.
Retaining lugs on trim cover (1) must not be damaged.
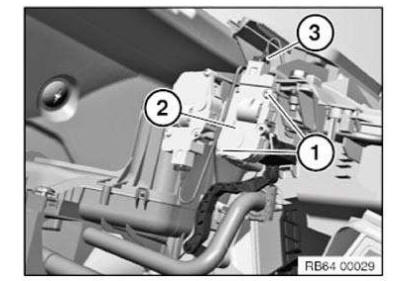
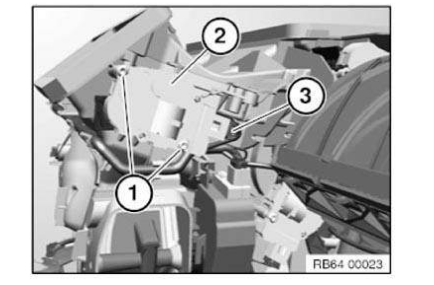
Removing and installing/replacing actuator drive for central kinematics (a/c control)
IMPORTANT: Servomotors must be readdressed in the event of replacement! Addressing can only be carried out with the BMW diagnosis system.
Service functions:
- Body
- Heating and air conditioning function
- Flap motors
- Readdress flap motors
Necessary preliminary work:
- Remove RIGHT GLOVE BOX WITH HOUSING
Release screws (1).
Detach actuator drive for central kinematics (2).
Unlock associated plug connection and disconnect.
Servomotors must be readdressed in the event of replacement! Addressing can only be carried out with the BMW diagnosis system.
Service functions:
- Body
- Heating and air conditioning function
- Flap motors
- Readdress flap motors
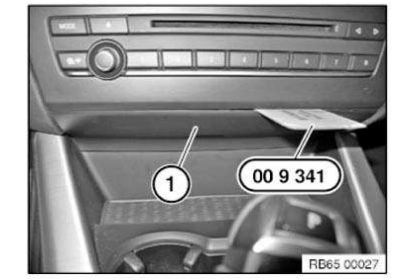
Removing and installing radio and a/c control panel
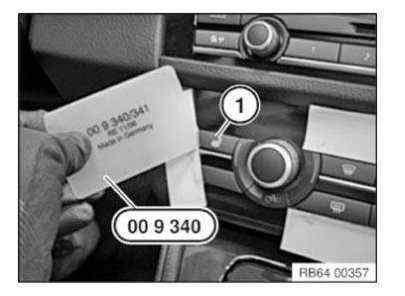
Special tools required:
- 00 9 340
IMPORTANT: Risk of damage!
A hard disk is installed in the Car Information Computer (CIC).
Carry out mechanical work on the CIC and adjacent components with care.
Avoid subjecting the CIC to vibration/shocks.
IMPORTANT: Read and comply with notes on protection against electrostatic damage (ESD PROTECTION) .
IMPORTANT: Carry out installation in a dust-free workshop area only.
To avoid damage, do not touch or dirty the display field.
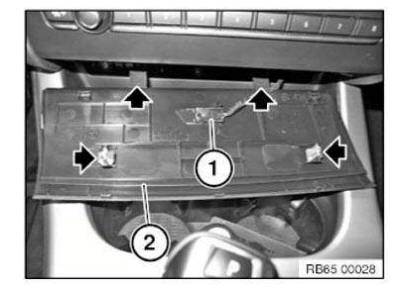
Necessary preliminary work:
- Remove DECORATIVE STRIP ON DASHBOARD IN MIDDLE
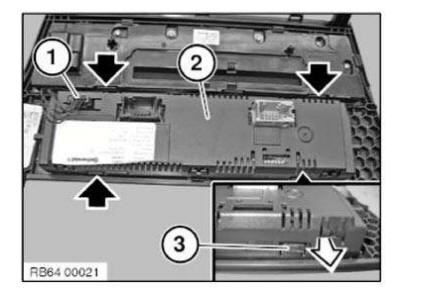
Insert special tool 00 9 340 (00 9 341) as illustrated.
Lever trim cover (1) slightly forward and unclip.
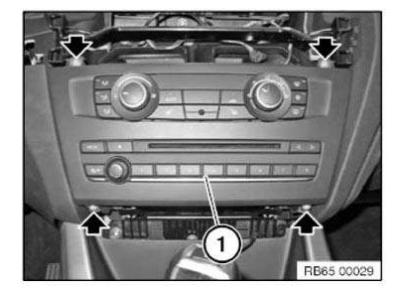
Unclip LED (1).
Remove cover (2).
Installation note: Retaining lugs and clips must not be damaged.
Release screws.
Remove control panel (1) towards front.
Unlock associated plug connections and disconnect.
Replacement: Carry out VEHICLE PROGRAMMING/ENCODING .
Removing and installing/renewing heating unit
WARNING: Danger of injury! Refrigerant circuit is under high pressure! Avoid contact with refrigerant and refrigerant fluid.
Read and comply with safety instructions:
- Handling R 134a (tetrafluorethane) refrigerant .
- HANDLING REFRIGERANT OIL
IMPORTANT: Risk of damage! Restart engine only when the air conditioning system has been correctly filled.
NOTE: If the air conditioning system is open for longer than 24 hours: replace DESICCANT INSERT FOR AIR CONDITIONING
Necessary preliminary tasks:
- Draw off AIR CONDITIONING SYSTEM
- Remove SUPPORT FOR DASHBOARD
- Remove expansion valve .
NOTE: Diesel vehicles only:
Disconnect positive line (1) and plug connection (2) at electric auxiliary heater (3)
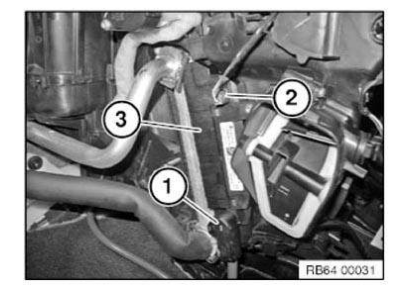
NOTE: Diesel vehicles only:
Fold back carpet in area (2).
Slacken nut (1).
Take off grounding cable (3).
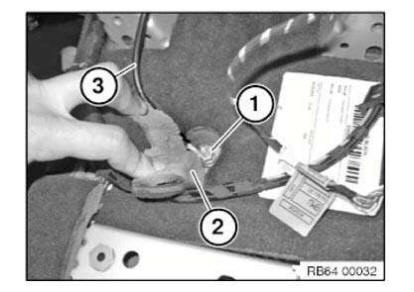
Release plug connection (1) at blower motor (2) and disconnect.
IMPORTANT: Make sure remaining coolant is removed completely.
Carefully blow through aluminum double pipe to remove remaining coolant from heat exchanger for heating system.
Installation note:
Vent cooling system and check on watertightness.
IMPORTANT: Risk of soiling by leaking coolant!
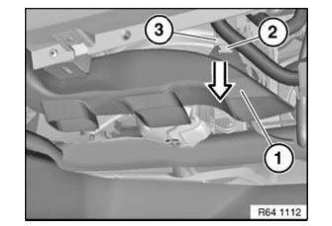
Remove heating and air-conditioning unit (1) from vehicle.
Installation note:
Make sure that blower housing (2) and sealing plates for media openings (4) in bulkhead (5) are fitted correctly.
Footwell ventilation ducts (3) must be fitted correctly in the corresponding connection piece (3).
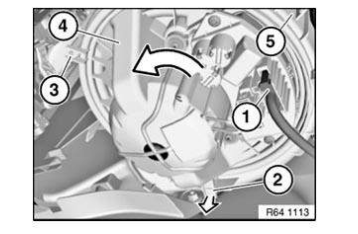
Installation note:
Mat (3) under the heating and air-conditioning unit must be correctly positioned and bonded onto the carpet.
Make sure condensate drain (1) is correctly seated on grommet (2) (see next operation).
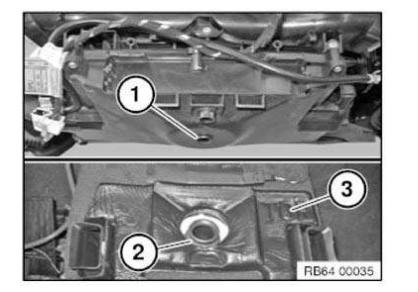
IMPORTANT: Risk of water damage in the passenger compartment!
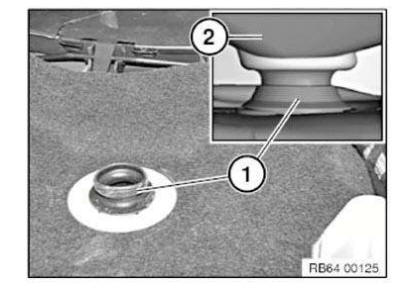
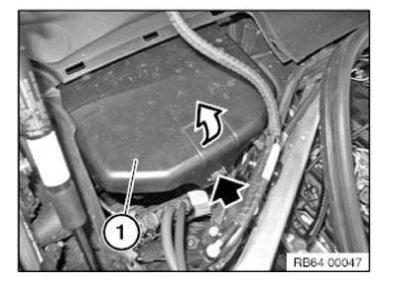
Installation note:
Before mounting the heater (2), spray grommet (1) with lubricant G13 (sourcing reference from BMW Parts Department).
Make sure condensate drain (2) is correctly seated on grommet (1).
Perform a visual inspection after installing the heater (2).
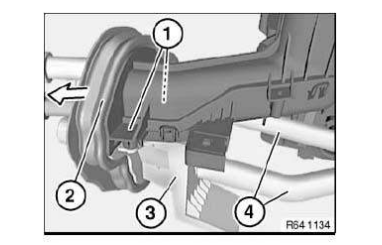
Removing and installing/replacing actuator drive for fresh/recirculated air flap
Necessary preliminary work:
- Remove RIGHT GLOVE COMPARTMENT WITH HOUSING
Release screws (1).
Detach actuator drive for fresh air/recirculating air flap (2) from heating/air conditioning unit.
Unlock plug connection (3) and disconnect.
IMPORTANT: Servomotors must be readdressed in the event of replacement!
Addressing can only be carried out with the BMW diagnosis system.
Service functions:
- Body
- Heating and air conditioning function
- Flap motors
- Readdress flap motors
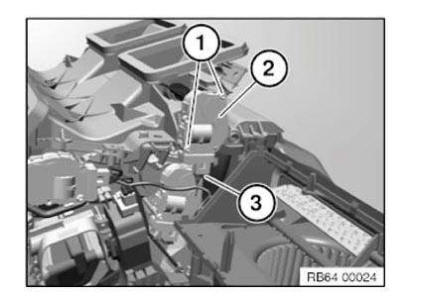
Removing and installing/replacing footwell temperature sensor
Necessary preliminary work:
- Remove SUPPORT FOR DASHBOARD
NOTE: For purposes of clarity, the following graphic shows the heater/air conditioner removed.
Remove temperature sensor (2) from air duct (1).
Removing and installing/replacing heater/air conditioner blower
Necessary preliminary work:
- Remove TRIM FOR INSTRUMENT PANEL AT BOTTOM RIGHT
Detach right footwell heating duct (1) in direction of arrow from retaining lug (3) and lay to one side slightly.
Installation note: Make sure clip (2) is correctly seated.
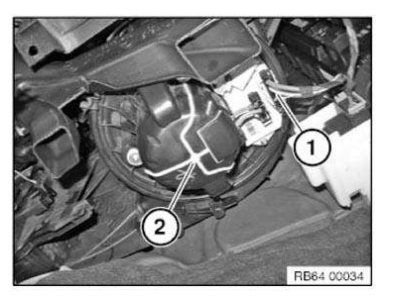
Unfasten plug connection (1) and disconnect.
Raise plastic lug (2) slightly and turn fan (4) in direction of arrow.
Remove fan (4) from fan shell (5).
Installation note:
If necessary, raise lug (3) slightly and screw in fan (4) anticlockwise.
Make sure fan (4) is correctly seated in fan shell (5).
Check exact position of lug (2).
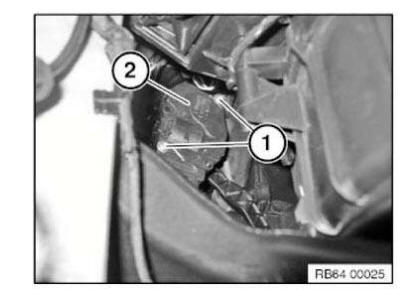
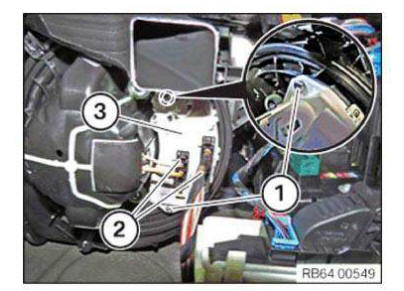
Removing and installing/replacing sensor for automatic recirculated air control (auc)
Necessary preliminary work:
- REMOVING and installing/replacing right microfilter housing cover
Remove filter cover (1) in direction of arrow.
Unfasten plug connection (2) and disconnect.
Unlock retaining tab (1) and remove AUC sensor.
Installation note: Retaining tab (1) on AUC sensor (2) must not be damaged.

Removing and installing/replacing servodrive for blending flap (left)
Necessary preliminary work:
- Remove SUPPORT FOR DASHBOARD
Release screws (1).
Remove actuator drive (2).
Unlock plug connection (3) and disconnect.
IMPORTANT: Servomotors must be readdressed in the event of replacement! Addressing can only be carried out with the BMW diagnosis system.
Service functions:
- Body
- Heating and air conditioning function
- Flap motors
- Readdress flap motors
Removing and installing/replacing servodrive for blending flap (right)
Necessary preliminary work:
- Remove RIGHT GLOVE BOX WITH HOUSING
Release screws (1).
Detach actuator drive for air mix flap (2).
Unlock associated plug connection and disconnect.
Servomotors must be readdressed in the event of replacement! Addressing can only be carried out with the BMW diagnosis system.
Service functions:
- Body
- Heating and air conditioning function
- Flap motors
- Readdress flap motors
Removing and installing/replacing servodrive for defrosting flap (right)
Necessary preliminary work:
- Remove SUPPORT FOR DASHBOARD
Release screws (1).
Remove actuator drive (2).
Release plug connection (3) and disconnect.
IMPORTANT: Servomotors must be readdressed in the event of replacement! Addressing can only be carried out with the BMW diagnosis system.
Service functions:
- Body
- Heating and air conditioning function
- Flap motors
- Readdress flap motors
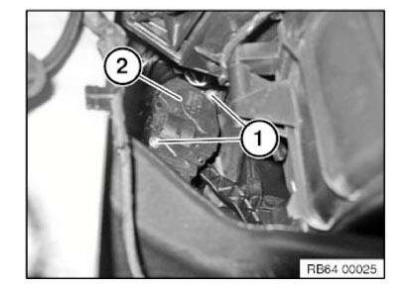
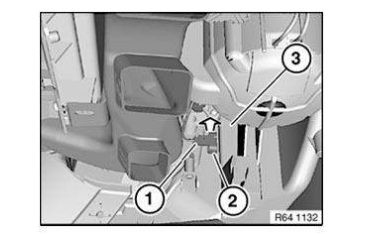
Removing and installing/replacing ventilation temperature sensor
Necessary preliminary work:
- Remove DECORATIVE STRIP ON DASHBOARD IN MIDDLE
Pull temperature sensor (1) out of retaining lug (2).
Installation note: Make sure rubber ring is correctly seated.

Disconnect plug connection (1) and remove temperature sensor (2).
Replacing actuator drive for rear compartment flap
Necessary preliminary tasks:
- Remove RIGHT GLOVE BOX WITH HOUSING
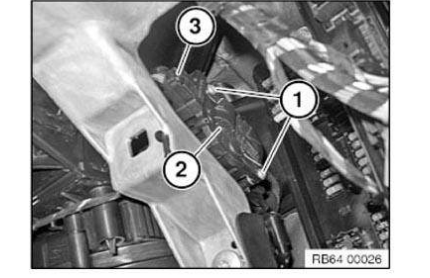
Release screws (1).
Detach actuator drive for rear compartment flap (2) from heating/air conditioning unit.
Unlock associated plug connection and disconnect.
IMPORTANT: Servomotors must be readdressed in the event of replacement! Addressing can only be carried out with the BMW diagnosis system.
Service functions:
- Body
- Heating and air conditioning function
- Flap motors
- Readdress flap motors
Replacing actuator drive of ventilation flaps
Necessary preliminary work:
- Remove SUPPORT FOR DASHBOARD
Release screws (1).
Release plug connection (3) and disconnect.
Detach servodrive for ventilation flaps (2) in direction of arrow from heater/air conditioner.
Replacement:
Servomotors must be readdressed in the event of replacement! Addressing can only be carried out with the BMW diagnosis system.
Service functions:
- Body
- Heating and air conditioning function
- Flap motors
- Readdress flap motors
Replacing controller for heating and air conditioning system blower
Necessary preliminary work:
- Remove TRIM FOR INSTRUMENT PANEL, BOTTOM LEFT
Removal:
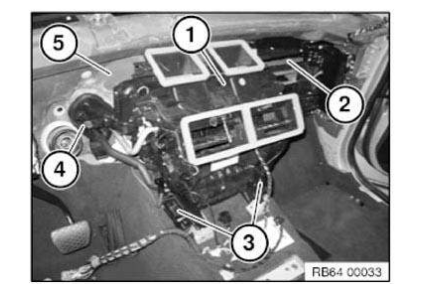
Release screws (1).
Unlock and disconnect connector (2).
Remove controller (3) downwards.
Installation:
Position controller (3) correctly.
Tighten down the screws (1).
Connect connector (2).
Required reworking:
- Install BOTTOM RIGHT INSTRUMENT PANEL TRIM
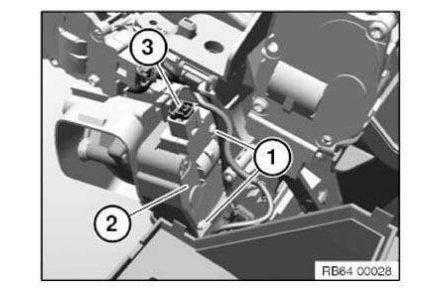
Replacing evaporator temperature sensor
Necessary preliminary tasks:
- Remove TRIM FOR INSTRUMENT PANEL, BOTTOM LEFT
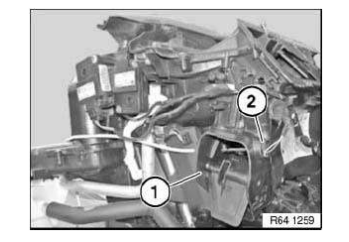
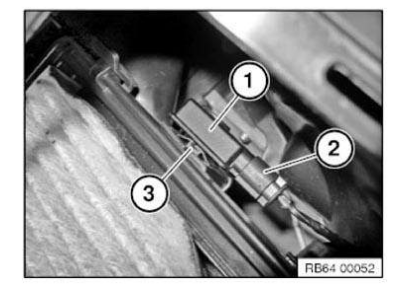
Disconnect plug connection (1).
Pull evaporator temperature sensor (2) in direction of arrow out of heater/air conditioner (3) and remove.
Installation note:
Ensure evaporator temperature sensor (2) is correctly seated.
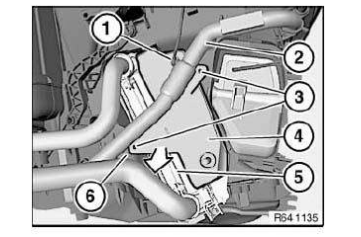
Replacing heat exchanger
Necessary preliminary work:
- Remove HEATER
IMPORTANT: Before ordering spare parts, determine manufacturer of the installed heater!
Installation note:
Pipes are included in the repair kit! Release screws (1).
Slide rubber grommet (2) with foam seal forward slightly.
Carefully feed pipe holder (3) with pipes (4) past rubber grommet (2).
Installation note:
If necessary, replace rubber grommet (2) and/or foam seal.
Make sure rubber grommet (2) is fitted correctly on pipe holder (3).
If necessary, remove coolant hose (2).
Release screws (3) and remove cover.
NOTE: Diesel version only:
Unfasten plug connection (1) and disconnect.
Withdraw electric auxiliary heater (4) in direction of arrow.
Remove heat exchanger (5) from heater/air conditioner (6).
Replacing servodrive for blending flap
Necessary preliminary work:
- Remove SUPPORT FOR DASHBOARD
Release screws (1).
Detach actuator drive for stratification flap (2) from heating/air conditioning unit (4).
Unlock plug connection (3) and disconnect.

Servomotors must be readdressed in the event of replacement! Addressing can only be carried out with the BMW diagnosis system.
Service functions:
- Body
- Heating and air conditioning function
- Flap motors
- Readdress flap motors
Replacing servodrive for footwell flap (automatic a/c)
Necessary preliminary work:
- Remove RIGHT GLOVE BOX WITH HOUSING
Release screws (1).
Detach actuator drive for footwell flap (2).
Release plug connection (3) and disconnect.
IMPORTANT: Servomotors must be readdressed in the event of replacement! Addressing can only be carried out with the BMW diagnosis system.
Service functions:
- Body
- Heating and air conditioning function
- Flap motors
- Readdress flap motors
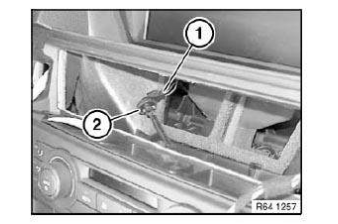
Replacing the button caps of the heating and air conditioning system control panel
Special tools required:
- 00 9 340
Tape area (1) around the button caps with adhesive tape.
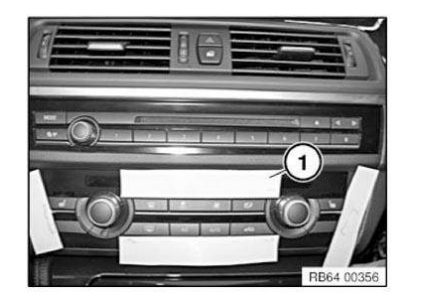
Press blower rocker switch (1) on one side and pry it off on the other side with special tool 00 9 340 .
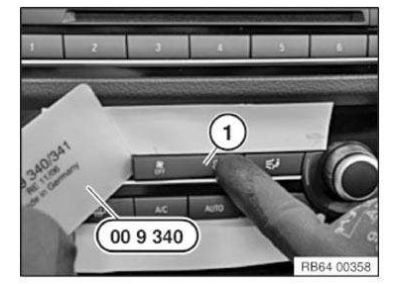
Pry off remaining button caps (1) with special tool 00 9 340 .
Clip in button caps (1) into operating unit.
Remove adhesive tape.
Check function of the air conditioning.


Other materials:
BMW X3 (F25) Service & Repair Manual > HVAC: Cabin air filter
NOTE: Manufacturer's terminology for this filter is Microfilter.
REMOVAL & INSTALLATION
Replacing microfilter for interior ventilation
Turn toggle (1) through approx. 90º and remove cover (2) towards front.
Remove microfilter element (1).
Replacing microfilter for interior ventilatio ...
