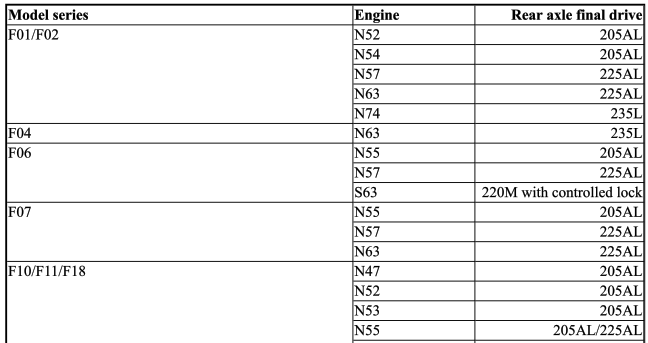
BMW X3 (F25) Service & Repair Manual: Final drive
REAR AXLE FINAL DRIVE: ASSIGNMENT TO MODEL SERIES
- Removing and installing/replacing rear differential
- Replacing shaft seal(s) for output shaft(s) in rear axle final drive
Removing and installing/replacing rear differential
Special tools required:
- 33 5 206
- 33 5 200
- 33 5 120
- 33 5 125
- 33 5 123
- 33 5 121
- 33 5 124
- 33 5 126
- 33 5 122
- 33 5 127
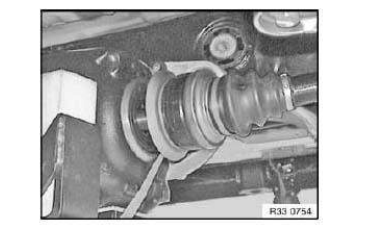
WARNING: Danger of injury! Rear axle differential must be lashed with tensioning strap 33 5 206 to prevent it from dropping down when pressing the output shafts off.
IMPORTANT: When removing/reinstalling the rear axle final drive, both OUTPUT SHAFT RADIAL SHAFT SEALS and the circlip on both output shafts must be replaced.
After completing repair work, CHECK GEARBOX OIL LEVEL.
Necessary preliminary work:
- Remove PROPELLER SHAFT ON REAR AXLE FINAL DRIVE .
- Disconnect propeller shaft at rear axle differential.
- Release center mount.
- Tie up propeller shaft to underbody.
NOTE: Bending the propeller shaft by an excessive angle can cause premature damage to the joint/propeller shaft!
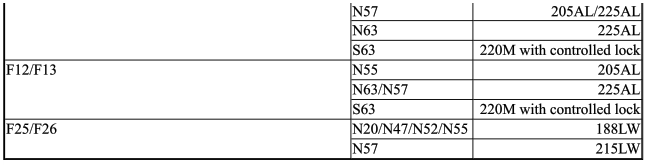
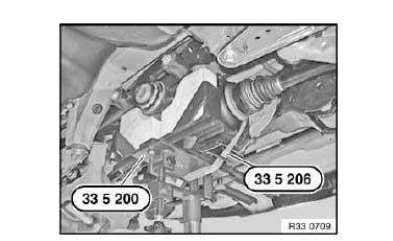
Position special tool 33 5 200 on workshop jack.
Support rear axle final drive 33 5 200 with special tool.
Lash rear axle final drive with tensioning strap 33 5 206 to special tool 33 5 200 .
IMPORTANT: Tensioning strap 33 5 206 must be pass through between output shafts and rear axle final drive cover!
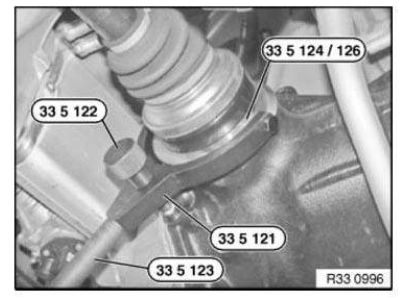
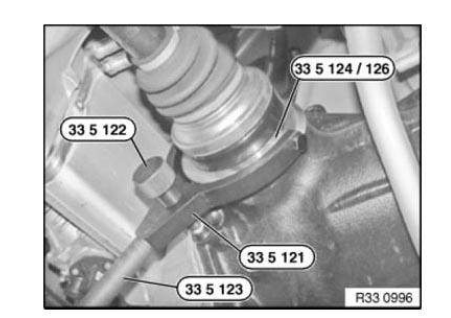
IMPORTANT: Special tools 33 5 120 and 33 5 125 must be inserted in all-round slot (1) on output shaft!
Press only left output shaft out of rear axle final drive with jerking and jolting motions using special tool 33 5 123 , 33 5 121 , 33 5 124 /33 5 126 .
Here, synchronising key of bolt 33 5 122 must rest on rear axle final drive.
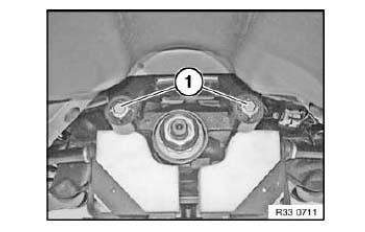
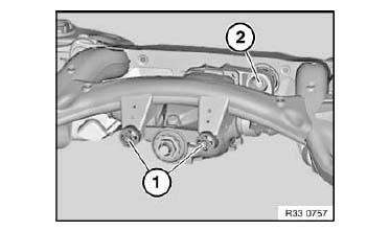
Release screws (1).
Installation note: Adhere to the installation sequence at the end of the document in order to prevent distortion of the rear axle final drive during installation and thereby avoid potential complaints about noise.
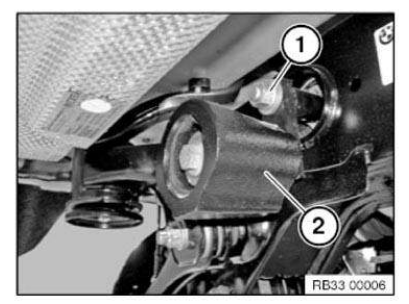
Slacken nut (1).
N47 only: Remove vibration absorber (2) with holder.
Installation note: Adhere to the installation sequence at the end of the document in order to prevent distortion of the rear axle final drive during installation and thereby avoid potential complaints about noise.
Lower rear axle final drive with special tool 33 5 200 .
Press (tilt) rear axle final drive on right upwards.
Feed out left output shaft in downward direction and tie up.
Swing rear axle final drive towards left side.
Press right output shaft out of rear axle final drive with jerking and jolting motions using special tool 33 5 123 , 33 5 121 , 33 5 124 /33 5 126 . Here, synchronising key of bolt 33 5 122 must rest on rear axle final drive.
Feed out output shaft and tie up.
Remove rear axle final drive.
IMPORTANT: High installation forces indicate that the output shaft spline teeth are damaged or deformed!
Check gearing and replace components if damaged.
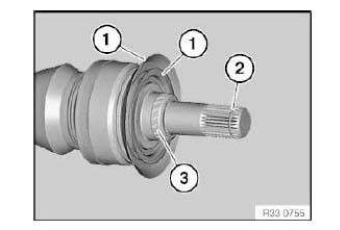
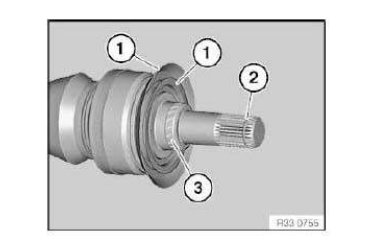
Check dust plate (1) for damage, renew if necessary.
Circlip (2) must be replaced.
Coat highlighted contact surface (3) of output shaft with approved final drive oil.
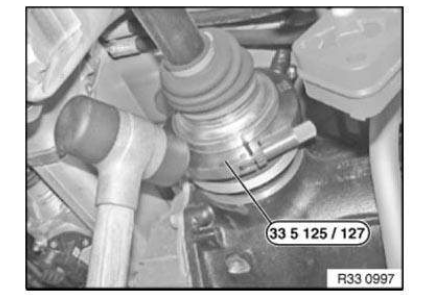
Installation note: Insert output shaft into rear axle final drive.
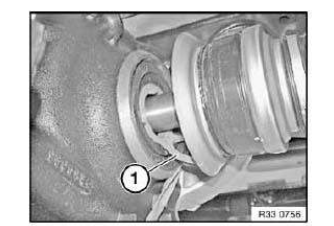
Pull out assembly protection ring at lug (1) until one of the two predetermined breaking points gives.
Drive output shaft into rear axle final drive using special tool 33 5 125 33 5 127 and a rubber mallet.
Assembly sequence:
- Install rear axle final drive with workshop jack and special tool 33 5 200 in rear axle support
- Insert bolts (1) (do not tighten down)
- Insert bolt from rear and replace nut (2) (do not tighten down)
- Release tensioning strap, lower special tool 33 5 200 and move away
- Tighten down screws (1)
- Tighten nut (2)
After installation:
- Check TRANSMISSION OIL LEVEL, correct if necessary.
Replacing shaft seal(s) for output shaft(s) in rear axle final drive
Special tools required:
- 00 5 010
- 32 1 060
- 33 1 308
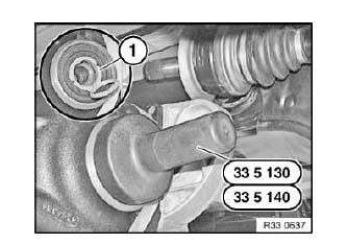
- 33 5 130
- 33 5 140
Necessary preliminary work:
- Remove REAR AXLE FINAL DRIVE.
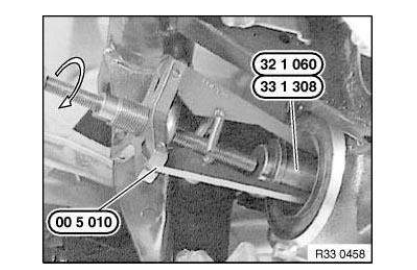
Use special tools 00 5 010 and 32 1 060 /33 1 308 to remove radial shaft seal
Installing new shaft seal:
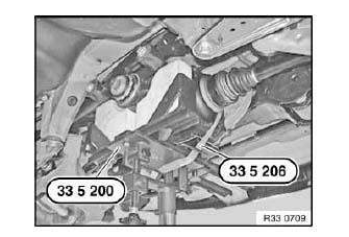
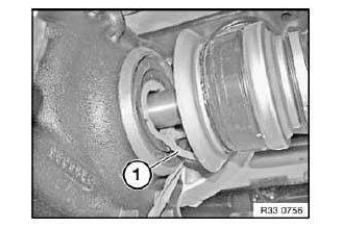
NOTE: The installation protective ring (1) serves to protect the sealing lips of the radial shaft seal (2) when installing the output shaft.
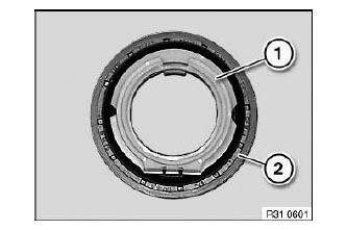
IMPORTANT: Installation protective ring (1) must not slip out of radial shaft seal!
Coat housing plate flange of new shaft seal with approved rear differential oil. Drive in radial shaft seal as far as it will go with following special tools (depending on rear axle final drive/outer diameter).
- 33 5 130
- 33 5 140
Remove special tool.
Open installation protective ring (1).
IMPORTANT: High installation forces indicate that the output shaft spline teeth are damaged or deformed! Check gearing, replace damaged components if necessary.
Check dust plate (1) for damage, renew if necessary.
Replace circlip (2).
Coat highlighted contact surface (3) of output shaft with approved final drive oil.
Insert output shaft into rear axle final drive.
Pull out assembly protection ring at lug (1) until one of the two predetermined breaking points gives.
After installation:
- Check FINAL DRIVE OIL LEVEL, correct if necessary.


Other materials:
BMW X3 (F25) Service & Repair Manual > Electrical: Preheater plugs
REPLACING ALL GLOW ELEMENTS (N47 D20 O1)
Special tools required:
11 6 050
12 2 300
NOTE:
When one or more glow elements are replaced, the preheating control service
function must be started with the BMW diagnosis system before replacement
and the "Security data record in the preheating ...
