BMW X3 (F25) Owners Manual: Displays
Vehicle features and options
This chapter describes all standard, country-specific and optional features offered with the series. It also describes features that are not necessarily available in your car, e. g., due to the selected options or country versions. This also applies to safety-related functions and systems. The respectively applicable country provisions must be observed when using the respective features and systems.
- Overview, instrument cluster
- Electronic displays
- Check Control
- Fuel gauge
- Engine oil temperature
- Odometer and trip odometer
- External temperature
- Range
- Current fuel consumption
- Service requirements
- Gear shift indicator
- Speed limit detection
- Selection lists in the instrument cluster
- On-board computer
- Sport displays
- Settings on the Control Display
- Head-up Display
Overview, instrument cluster
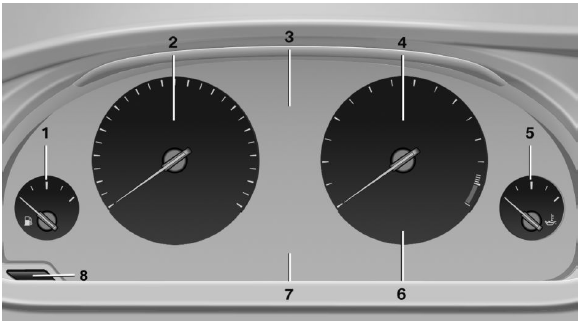
- Fuel gauge
- Speedometer
- Messages, e.g. Check Control
- Tachometer
- Engine oil temperature
- Current fuel consumption
- Electronic displays
- Reset miles
Electronic displays
- Selection lists
- External temperature
- On-board computer
- Date
- Energy recovery
- Transmission display
- Miles/trip miles
- Messages, e.g. Check Control
- Navigation display, see User's manual for Navigation, Entertainment and Communication.
- Range
- Status, Driving Dynamics Control
- Service requirements
- Speed limit detection
- Time
Check Control
The concept
The Check Control system monitors functions in the vehicle and notifies you of malfunctions in the monitored systems.
A Check Control message is displayed as a combination of indicator or warning lights and text messages in the instrument cluster and in the Head-up Display.
In addition, an acoustic signal may sound and a text message may appear on the Control Display.
Indicator/warning lights
General information The indicator and warning lights in the instrument cluster can light up in a variety of combinations and colors.
Several of the lights are checked for proper functioning and light up temporarily when the engine is started or the ignition is switched on.
Red lights
Safety belt reminder
 Flashing or illuminated: safety
belt on
the driver or passenger side is not
buckled. The safety belt reminder can also be activated if objects are placed on
the
front passenger seat.
Flashing or illuminated: safety
belt on
the driver or passenger side is not
buckled. The safety belt reminder can also be activated if objects are placed on
the
front passenger seat.
Make sure that the safety belts are positioned correctly.
Airbag system
 Airbag system and belt
tensioner are
defective.
Airbag system and belt
tensioner are
defective.
Have the vehicle checked by the service center immediately.
Parking brake
 The parking brake is set.
For additional information, refer to Release parking brake.
Brake system

Continue to drive moderately.
Have the vehicle checked by the service center immediately.

Front-end collision warning
 Illuminated: advance warning is
issued,
e.g., when there is the impending danger
of a collision or the distance to the
vehicle ahead is too small.
Illuminated: advance warning is
issued,
e.g., when there is the impending danger
of a collision or the distance to the
vehicle ahead is too small.
Increase distance.
Flashing: acute warning of the imminent danger of a collision when the vehicle approaches another vehicle at a relatively high differential speed.
Intervention by braking or make an evasive maneuver.
Pedestrian warning
 Symbol in the instrument
cluster.
Symbol in the instrument
cluster.
If a collision with a person detected in this way is imminent, the symbol lights up and a signal sounds.
Orange lights
Active Cruise Control
 The number bars shows the
selected
distance from the vehicle driving
ahead.
The number bars shows the
selected
distance from the vehicle driving
ahead.
For additional information, refer to Active Cruise Control with Stop & Go function, ACC.
Vehicle detection, Active Cruise Control
 Illuminated: vehicle driving
ahead detected.
Illuminated: vehicle driving
ahead detected.
Flashing: the conditions are not adequate for operating the system.
The system was deactivated but applies the brakes until you actively resume control by pressing on the brake pedal or accelerator pedal.
Yellow lights
Anti-lock Braking System ABS

Avoid abrupt braking if possible. Braking force boost in some cases defective.
Stop carefully. Take into account longer brake travel. Have this checked by the service center immediately.

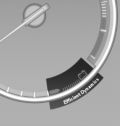
DSC Dynamic Stability Control
 Flashing: DSC controls the
drive and
braking forces. The vehicle is stabilized.
Flashing: DSC controls the
drive and
braking forces. The vehicle is stabilized.
Reduce speed and adapt driving profile to the driving circumstances.
Illuminated: DSC failed. Have the system checked by the service center.
For additional information, refer to Dynamic Stability Control DSC.
DSC Dynamic Stability Control is deactivated or DTC Dynamic Traction Control is activated
 Dynamic Stability Control DSC
is
switched off or Dynamic Traction Control
DTC is switched on.
Dynamic Stability Control DSC
is
switched off or Dynamic Traction Control
DTC is switched on.
For additional information, refer to Dynamic Stability Control, and Dynamic Traction Control.
Flat Tire Monitor FTM
 The Flat Tire Monitor signals a
loss of
tire inflation pressure in a tire.
The Flat Tire Monitor signals a
loss of
tire inflation pressure in a tire.
Reduce your speed and stop cautiously.
Avoid sudden braking and steering maneuvers.
For more information, see Flat Tire Monitor.
Tire Pressure Monitor TPM
 Illuminated: the Tire Pressure
Monitor
signals a loss of tire inflation pressure
in a tire.
Illuminated: the Tire Pressure
Monitor
signals a loss of tire inflation pressure
in a tire.
Reduce your speed and stop cautiously. Avoid sudden braking and steering maneuvers.
Flashing and then continuously illuminated: no flat tire or loss of tire inflation pressure can be detected.
- Interference through systems or devices with the same radio frequency: after leaving the area of the interference, the system automatically becomes active again.
- TPM could not conclude the reset: perform the reset of the system again.
- A wheel without TPM electronics is fitted: have the service center check it if needed.
- Malfunction: have the system checked by your service center.
For more information, see Tire Pressure Monitor.
Steering system
 Steering system in some cases
defective.
Steering system in some cases
defective.
Have the steering system checked by the service center.
Engine functions
 Have the vehicle checked by the
service
center.
Have the vehicle checked by the
service
center.
For additional information, refer to Onboard Diagnostics socket.
Lane departure warning
 System is switched on and under
certain
circumstances warns if a detected
lane is left without flashing beforehand.
System is switched on and under
certain
circumstances warns if a detected
lane is left without flashing beforehand.
For additional information, refer to Lane departure warning.
Green lights
Turn signal
 Turn signal on.
Unusually rapid flashing of the indicator lamp indicates that a turn signal bulb has failed.
For additional information, refer to Turn signal.
Parking lights, headlight control
 Parking lights or headlights
are activated.
Parking lights or headlights
are activated.
For additional information, refer to Parking lights/low beams, headlight control.
Front fog lights
 Front fog lights are activated.
High-beam Assistant
 High-beam Assistant is switched
on.
High-beam Assistant is switched
on.
High beams are activated and off automatically as a function of the traffic situation.
For additional information, refer to High-beam Assistant.
Cruise control
 The system is switched on. It
maintains
the speed that was set using the control
elements on the steering wheel.
The system is switched on. It
maintains
the speed that was set using the control
elements on the steering wheel.
Automatic Hold
 The vehicle is automatically
held in
place when it is stationary.
The vehicle is automatically
held in
place when it is stationary.
On inclines, the system prevents the vehicle from rolling backward when driving off.
For more information, see Automatic Hold.
Blue lights
High beams
 High beams are activated.
For additional information, refer to High beams.
General lamps
Check Control
 At least one Check Control
message is
displayed or is stored. The symbol is
shown in the display of the instrument
cluster.
At least one Check Control
message is
displayed or is stored. The symbol is
shown in the display of the instrument
cluster.
Text messages
Text messages in combination with a symbol in the instrument cluster explain a Check Control message and the meaning of the indicator and warning lights.
Supplementary text messages
Additional information, such as on the cause of an error or the required action, can be called up via Check Control.
With urgent messages the added text will be automatically displayed on the Control Display.
Symbols Within the supplementary text, the following functions can be selected independent of the check control message.
 Display additional
information about
the Check Control message in the
Integrated Owner's Manual.
Display additional
information about
the Check Control message in the
Integrated Owner's Manual. "Service request"
Contact your service center. "Roadside
Assistance"
"Roadside
Assistance"
Contact Roadside Assistance.
Hiding Check Control messages
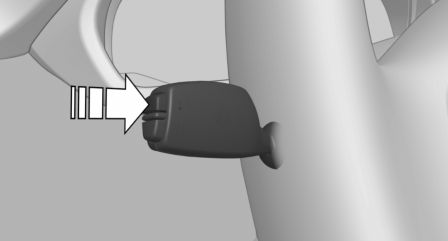
Press the onboard computer button on the turn signal lever.
- Some Check Control messages are displayed continuously and are not cleared until the malfunction is eliminated. If several malfunctions occur at once, the messages are displayed consecutively. These messages can be faded for approx. 8 seconds. After this time, they are displayed again automatically.
- Other Check Control messages are faded
automatically after approx. 20 seconds.
They are stored and can be displayed again later.
Displaying stored Check Control messages
On the Control Display:
1. "Vehicle info"
2. "Vehicle status"
3.  "Check Control"
4. Select the text message.
Messages after trip completion
Special messages displayed while driving are displayed again after the ignition is switched off.
Fuel gauge
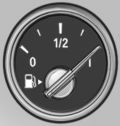 Vehicle tilt position may cause
the display to vary.
Vehicle tilt position may cause
the display to vary.
Depending on the equipment version, the arrow beside the fuel pump symbol shows which side of the vehicle the fuel filler flap is on.
Hints on refueling.
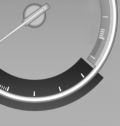
Tachometer
Always avoid engine speeds in the red warning field. In this range, the fuel supply is interrupted to protect the engine.
Engine oil temperature
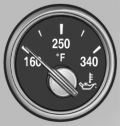
- Cold engine: the pointer is at the low temperature end. Drive at moderate engine and vehicle speeds.
- Normal operating temperature: the pointer is in the middle or in the left half of the temperature display.
- Hot engine: the pointer is at the high end of the temperature range. A Check Control message is also displayed.
Coolant temperature
If the coolant along with the engine becomes too hot, a Check Control message is displayed.
Odometer and trip odometer
Display
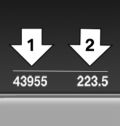
- Odometer, arrow 1.
- Trip odometer, arrow 2.
Show/reset kilometers
 Press the knob.
- When the ignition is switched off, the time, the external temperature and the odometer are displayed.
- When the ignition is switched on, the trip odometer is reset.
External temperature
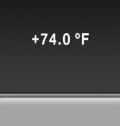 If the indicator drops to
+37 ºF/+3 ºC
or lower, a signal
sounds.
If the indicator drops to
+37 ºF/+3 ºC
or lower, a signal
sounds.
A Check Control message is displayed.
There is an increased risk of ice on roads.
Ice on roads
Even at temperatures above +37 ºF/+3 ºC, roads might be icy.
Therefore, drive carefully on bridges and shaded roads, e.g., to avoid the increased risk of an accident.
Time
 The time is displayed in the
instrument
cluster.
The time is displayed in the
instrument
cluster.
Setting the time on the Control Display.
Date
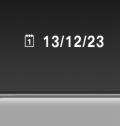 The date is displayed in the
instrument
cluster.
The date is displayed in the
instrument
cluster.
Set the date on the Control Display.
Range
Display
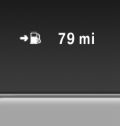 With a low remaining range:
- A Check Control message is displayed briefly.
- The remaining range is shown on the computer.
- With a dynamic driving style - e.g., taking curves aggressively - engine operation might vary.
The Check Control message appears continuously below a range of approx. 30 miles/50 km.
Refuel promptly
Refuel no later than at a range of 30 miles/50 km or engine operation might fail and damage might occur.
Displaying the cruising range
Depending on your vehicle's optional features, the range can also be displayed as bar in the instrument cluster.
On the Control Display:
1. "Settings"
2. "Instrument cluster"
3. "Additional indicators"
With navigation system: range with destination guidance active
 If respective equipment is
fitted
and destination guidance is active,
the remaining range is displayed
when the destination is
reached.
If respective equipment is
fitted
and destination guidance is active,
the remaining range is displayed
when the destination is
reached.
Current fuel consumption
Display
 Depending on your vehicle's
optional
features, the current fuel
consumption can be displayed
as scale with mechanical pointer
or as digital bar display in the
lower area of the tachometer.
Depending on your vehicle's
optional
features, the current fuel
consumption can be displayed
as scale with mechanical pointer
or as digital bar display in the
lower area of the tachometer.
The current consumption displays the current fuel consumption. Check whether you are currently driving in an efficient and environmentally- friendly manner.
Displaying the current fuel consumption
Depending on your vehicle's optional features, the current fuel consumption can also be displayed as bar in the instrument cluster.
1. "Settings"
2. "Instrument cluster"
3. "Additional indicators"
Energy recovery
Display
 The kinetic energy of the
vehicle
is converted to electrical energy
while coasting. The vehicle battery
is partially charged and fuel
consumption can be reduced.
The kinetic energy of the
vehicle
is converted to electrical energy
while coasting. The vehicle battery
is partially charged and fuel
consumption can be reduced.
Service requirements
The concept
After the ignition is turned on the instrument cluster briefly displays available driving distance or time to the next scheduled maintenance.
Your service specialist can read the current service requirements from your remote control.
Display
Data regarding the service status or legally mandated vehicle inspections are automatically transmitted to your service center before a service due date.
Detailed information on service requirements More information on the scope of service required can be displayed on the Control Display.
On the Control Display:
1. "Vehicle info"
2. "Vehicle status"
3.  "Service required"
Required maintenance procedures and legally mandated inspections are displayed.
4. Select an entry to call up detailed information.
Symbols
Symbols
 No service is currently
required.
No service is currently
required.
 The deadline for scheduled
maintenance
or a legally mandated inspection
is approaching.
The deadline for scheduled
maintenance
or a legally mandated inspection
is approaching.
 The service deadline has
already
passed.
The service deadline has
already
passed.
Entering appointment dates
Enter the dates for the required inspections.
Make sure that the vehicle's date and time are set correctly.
On the Control Display:
1. "Vehicle info"
2. "Vehicle status"
3.  "Service required"
4. " Vehicle inspection"
5. "Date:"
6. Adjust the settings.
7. Confirm.
The entered date is stored.
Automatic Service Request
Data regarding the service status or legally mandated vehicle inspections are automatically transmitted to your service center before a service due date.
You can check when your service center was notified.
On the Control Display:
1. "Vehicle info"
2. "Vehicle status"
3. Open "Options".
4. "Last Service Request"
Gear shift indicator
The concept
The system recommends the most fuel efficient gear for the current driving situation.
Depending on the vehicle's features and country version of the vehicle, the gear shift indicator is active in the manual mode of the Steptronic transmission and with manual transmission.
Suggestions to shift gear up or down are displayed in the instrument cluster.
On vehicles without a gear shift indicator, the engaged gear is displayed.
Steptronic transmission: displays
 Fuel efficient gear is set.
 Shift into fuel efficient gear.
Speed limit detection
The concept
Speed limit detection Speed limit detection uses a symbol in the shape of a traffic sign to display the currently detected speed limit. The camera in the area of the interior rearview mirror detects traffic signs at the edge of the road as well as variable overhead sign posts. Traffic signs with extra symbols for wet road conditions, etc. are also detected and compared with the vehicle's onboard data, such as for the rain sensor, and will be displayed depending on the situation.
The system takes into account the information stored in the navigation system and also displays speed limits present on routes without signs.
Hints
Personal judgment
The system cannot serve as a substitute for the driver's personal judgment of the traffic situation.
The system assists the driver and does not replace the human eye.
At a glance
Camera
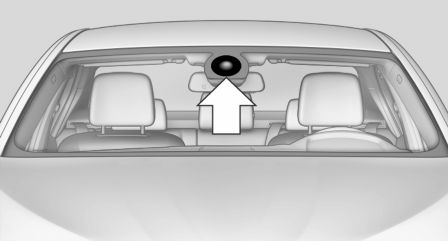
The camera is found near the interior rearview mirror.
Keep the windshield in the area behind the interior rearview mirror clean and clear.
Switching on/off
On the Control Display:
1. "Settings"
2. "Instrument cluster"
3. "Speed limit information"
If speed limit detection is switched on, it can be displayed on the info display in the instrument cluster via the computer.
Display
The following is displayed in the instrument cluster:
Speed limit detection
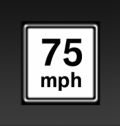 Current speed limit.
 Speed limit detection is not
available.
Speed limit detection is not
available.
Speed limit detection can also be displayed in the Head-up Display.
System limits
The system may not be fully functional and may provide incorrect information in the following situations:
- In heavy fog, rain or snowfall.
- When signs are concealed by objects.
- When driving very close to the vehicle in front of you.
- When driving toward bright lights.
- When the windshield behind the interior rearview mirror is fogged over, dirty or covered by a sticker, etc.
- In the event of incorrect detection by the camera.
- If the speed limits stored in the navigation system are incorrect.
- In areas not covered by the navigation system.
- When roads differ from the navigation, such as due to changes in road routing.
- When passing buses or trucks with a speed sticker.
- If the traffic signs are non-conforming.
- During calibration of the camera immediately after vehicle shipment.
Selection lists in the instrument cluster
The concept
Depending on your vehicle's optional features, the following can be displayed or operated using the buttons and the thumbwheel on the steering wheel as well as the displays in the instrument cluster and the Head-up Display:
- Current audio source.
- Redial phone feature.
- Turn on voice activation system.
Display
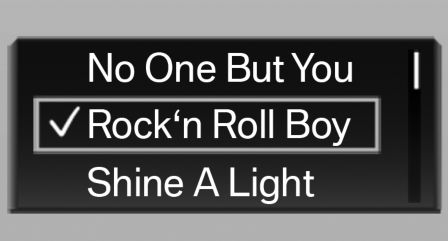
Depending on your vehicle's optional features, the list in the instrument cluster can differ from the illustration shown.
Activating a list and adjusting the setting
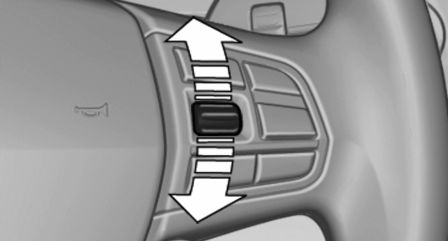
On the right side of the steering wheel, turn the thumbwheel to activate the corresponding list.
Using the thumbwheel, select the desired setting and confirm it by pushing the thumbwheel.
On-board computer
Calling up information on the info display

Press the onboard computer button on the turn signal lever.
Information is displayed in the info display of the instrument cluster.
Information at a glance
Info display
 Repeatedly pressing the button
on the turn signal lever calls up
the following information in the
info display:
Repeatedly pressing the button
on the turn signal lever calls up
the following information in the
info display:
- Range.
- ECO PRO bonus range.
- Average fuel consumption.
- Average speed.
- Date.
- Speed limit detection.
- Time of arrival.
When destination guidance is activated in the navigation system.
- Distance to destination.
When destination guidance is activated in the navigation system.
- Arrow view of navigation system.
When destination guidance is activated in the navigation system.
When the arrow view in the Head-up Display is inactive. - Compass display in the navigation system.
Adjusting the info display
Depending on the vehicle equipment version, you can select what information from the computer is to be displayed on the info display of the instrument cluster.
On the Control Display:
1. "Settings"
2. "Instrument cluster"
3. Select the desired displays.
Information in detail
Range Displays the estimated cruising range available with the remaining fuel.
It is calculated based on your driving style over the last 20 miles/30 km.
Average fuel consumption The average fuel consumption is calculated for the period while the engine is running.
The average fuel consumption is calculated for the distance traveled since the last reset by the on-board comupter.
Average speed Periods in which the vehicle is parked with the engine manually stopped are not included in the calculation of the average speed.
Resetting average values Press and hold the onboard computer button on the turn signal lever.
Distance to destination The distance remaining to the destination is displayed if a destination is entered in the navigation system before the trip is started.
The distance to the destination is adopted automatically.
Time of arrival
 The estimated time of arrival
is
displayed if a destination is entered
in the navigation system
before the trip is started.
The estimated time of arrival
is
displayed if a destination is entered
in the navigation system
before the trip is started.
The time must be correctly set.
Speed limit detection Description of the speed limit detection, function.
Compass
 With a navigation system:
compass
display for the driving direction.
With a navigation system:
compass
display for the driving direction.
Trip computer
The vehicle features two types of board computers.
- "Onboard info": the values can be reset as often as necessary.
- "Trip computer": the values provide an overview of the current trip.
Resetting the trip computer
On the Control Display:
1. "Vehicle info"
2. "Trip computer"
3. "Reset": all values are reset.
"Automatically reset": all values are reset approx. 4 hours after the vehicle came to a standstill.
Display on the Control Display
Display the computer or trip computer on the Control Display.
On the Control Display:
1. "Vehicle info"
2. "Onboard info" or "Trip computer"
Resetting the fuel consumption and speed
On the Control Display:
1. "Vehicle info"
2. "Onboard info"
3. "Consumpt." or "Speed"
4. "Yes"
Sport displays
The concept On the Control Display, the current values for performance and torque can be displayed if the vehicle is appropriately equipped.
Displaying sport displays on the Control Display
1. "Vehicle info"
2. "Sport displays"
Speed warning
The concept Displays a speed, when reached, should cause a warning to be issued.
The warning is repeated if the vehicle speed drops below the set speed once by at least 3 mph/5 km/h.
Displaying, setting or changing the speed warning
On the Control Display:
1. "Settings"
2. "Speed"
3. "Warning at:"
4. Turn the controller until the desired speed is displayed.
5. Press the controller.
Speed warning is stored.
Activating/deactivating the speed warning
On the Control Display:
1. "Settings"
2. "Speed"
3. "Warning"
4. Press the controller.
Setting your current speed as the speed warning
On the Control Display:
1. "Settings"
2. "Speed"
3. "Select current speed"
4. Press the controller.
The current vehicle speed is stored as the speed warning.
Settings on the Control Display
Time
Setting the time zone
1. "Settings"
2. "Time/Date"
3. "Time zone:"
4. Select the desired time zone.
The time zone is stored.
Setting the time
1. "Settings"
2. "Time/Date"
3. "Time:"
4. Turn the controller until the desired hours are displayed.
5. Press the controller.
6. Turn the controller until the desired minutes are displayed.
7. Press the controller.
The time is stored.
Setting the time format
1. "Settings"
2. "Time/Date"
3. "Format:"
4. Select the desired format.
The time format is stored.
Automatic time setting
Depending on your vehicle's optional features, the time, date and, if needed, the time zone are updated automatically.
1. "Settings"
2. "Time/Date"
3. "Auto time set"
Date
Setting the date
1. "Settings"
2. "Time/Date"
3. "Date:"
4. Turn the controller until the desired day is displayed.
5. Press the controller.
6. Make the necessary settings for the month and year.
The date is stored.
Setting the date format
1. "Settings"
2. "Time/Date"
3. "Format:"
4. Select the desired format.
The date format is stored.
Language
Setting the language To set the language on the Control Display:
1. "Settings"
2. "Language/Units"
3. "Language:"
4. Select the desired language.
Settings are stored for the profile currently in use.
Setting the voice dialog Voice dialog for the voice activation system.
Units of measure
Setting the units of measure To set the units for fuel consumption, route/ distance and temperature:
1. "Settings"
2. "Language/Units"
3. Select the desired menu item.
4. Select the desired unit.
Settings are stored for the profile currently in use.
Brightness
Setting the brightness To set the brightness of the Control Display:
1. "Settings"
2. "Control display"
3. "Brightness"
4. Turn the controller until the desired brightness is set.
5. Press the controller.
Settings are stored for the profile currently in use.
Depending on the light conditions, the brightness settings may not be clearly visible.
Head-up Display
The concept
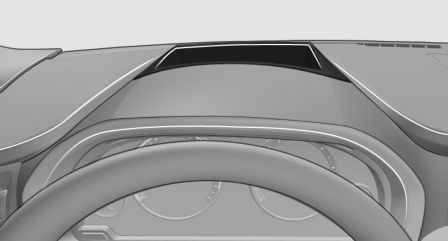
This system projects important information into the driver's field of vision, e.g., the speed.
The driver can get information without averting his or her eyes from the road.
Display visibility
The visibility of the displays in the Head-up Display is influenced by the following factors:
- Certain sitting positions.
- Objects on the cover of the Head-up Display.
- Sunglasses with certain polarization filters.
- Wet roads.
- Unfavorable light conditions.
If the image is distorted, check the basic settings.
Switching on/off
1. "Settings"
2. "Head-Up Display"
3. "Head-Up Display"
Display
Overview
- Speed.
- Navigation system.
- Check Control messages.
- Selection list from the instrument cluster.
- Driver assistance systems.
- Some of this information is only displayed briefly as needed.
Selecting displays in the Head-up Display
On the Control Display:
1. "Settings"
2. "Head-Up Display"
3. "Displayed information"
4. Select the desired displays in the Head-up Display.
Settings are stored for the profile currently in use.
Setting the brightness The brightness is automatically adjusted to the ambient brightness.
The basic setting can be adjusted manually.
On the Control Display:
1. "Settings"
2. "Head-Up Display"
3. "Brightness"
4. Turn the controller.
When the low beams are activated, the brightness of the Head-up Display can be additionally influenced using the instrument lighting.
Settings are stored for the profile currently in use.
Adjusting the height
On the Control Display:
1. "Settings"
2. "Head-Up Display"
3. "Height"
4. Turn the controller.
Settings are stored for the profile currently in use.
Setting the rotation
On the Control Display:
1. "Settings"
2. "Head-Up Display"
3. "Rotation"
4. Turn the controller.
Settings are stored for the profile currently in use.
Special windshield
The windshield is part of the system.
The shape of the windshield makes it possible to display a precise image.
A film in the windshield prevents double images from being displayed.
Therefore, have the special windshield replaced by a service center only.
 Driving
Vehicle features and options
This chapter describes all standard, country-specific
and optional features offered with the
series. It also describes ...
 Lights
Vehicle features and options
This chapter describes all standard, country-specific
and optional features offered with the
series. It also describes ...
Other materials:
BMW X3 (F25) Service & Repair Manual > Brakes: Front brake
FRONT BRAKE SPECIFICATION
IMPORTANT:
Installation of new brake pads is approved only provided that the brake disc thickness exceeds the
specified dimension for "MIN TH" (see table).
Brake discs must be replaced when they reach the nominal thickness (see table) minus 2.4 mm!(Not
...
