BMW X3 (F25) Service & Repair Manual: Final drive with cover
- Checking/topping up oil level in rear differential
- Replacing radial shaft seal for input flange of rear axle differential
- Replacing rear cover gasket on rear axle final drive
- Replacing rear cover gasket on rear differential (188LW)
- Replacing rear cover gasket on rear differential (215LW)
Checking/topping up oil level in rear differential
WARNING: DANGER OF POISONING if oil is ingested/absorbed through the skin! RISK OF INJURY if oil comes into contact with eyes and skin!
IMPORTANT: Risk of damage! To avoid serious damage to the rear axle differential, it is essential to use only approved transmission oils in the rear axle differential.
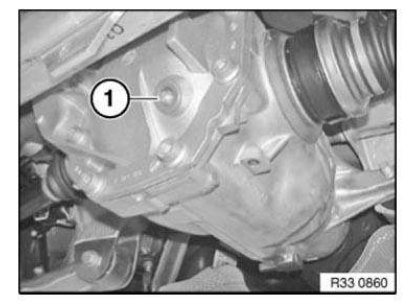
Undo oil filler plug (1).
Check oil level.
If necessary, pour in rear differential oil up to lower edge of opening for oil filler plug (1).
Installation:
Replace oil filler plug (1) with O-ring.
Replacing radial shaft seal for input flange of rear axle differential
Special tools required:
- 33 5 050
- 33 5 070
- 33 5 060
- 00 5 010
- 33 5 080
- 33 0 150
IMPORTANT: Use only approved gearbox oils. Failure to comply with this instruction will result in serious damage to the rear axle final drive!
Necessary preliminary tasks:
- Remove PROPELLER SHAFT AT FINAL DRIVE .
Remove retaining clip (1) and insert nut (2) with diaphragm seal.
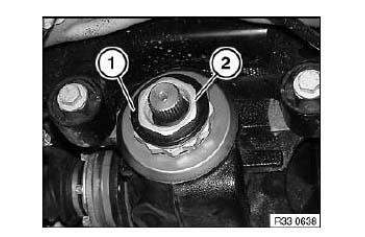
Mark position of flange nut (1) to bevel pinion (2).
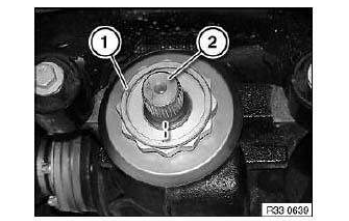
Release flange nut anticlockwise with special tools 33 5 050 and 33 5 070 by gripping the bevel pinion with special tools 33 5 060 and 33 5 070 .
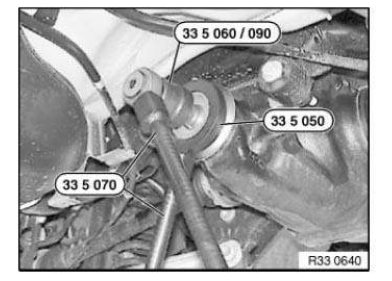
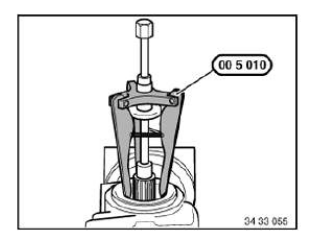
Pull out radial shaft seal with special tool 00 5 010 .
Coat sealing lips of new radial shaft seal and sealing surface of bevel pinion with final drive oil.
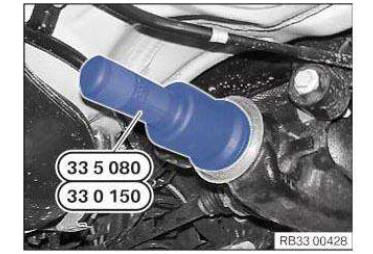
Drive in radial shaft seal with special tool 33 5 080 or 33 0 150 .
Clean bevel pinion thoroughly to remove remnants of screw locking agent.
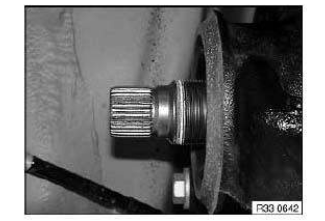
Check dust plate for damage, replace if necessary.
IMPORTANT: Clean flange nut thoroughly to remove remnants of grease and screw locking agent.
Pack collar insert (1) of flange nut with grease.
Apply a thin coating of grease to shaded area (2) of flange nut.
Coat at least four thread turns of flange nut with "Drei Bond adhesive type 1385".
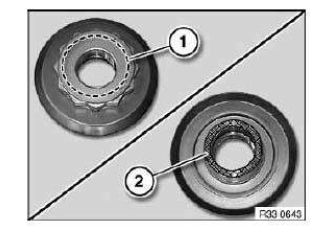
IMPORTANT: In order to avoid damaging the rear axle final drive, do not under any circumstances tighten down the flange nut (1) beyond the marker point of the bevel pinion (2).
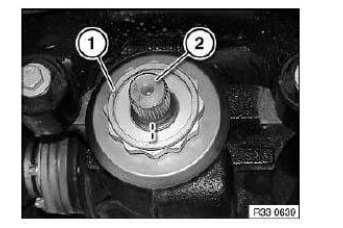
Place insert nut (2) with diaphragm seal in flange nut.
Introduce retaining clip (1).
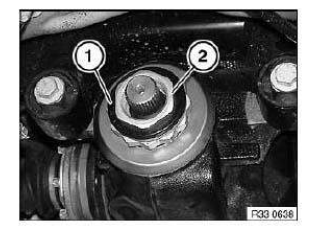
After installation:
- Check OIL LEVEL IN REAR AXLE DIFFERENTIAL and correct if necessary.
Replacing rear cover gasket on rear axle final drive
IMPORTANT: In event of oil loss, always check rear differential for traces of wear and damage.
Necessary preliminary tasks:
- Remove REAR AXLE FINAL DRIVE.
NOTE: Read and comply with REAR AXLE FINAL DRIVE: ASSIGNMENT TO MODEL SERIES.
Select rear axle final drive:
- 188LW
- 215LW
- 205AL/225AL
- 235L
After installation:
- Add FINAL DRIVE OIL.
Replacing rear cover gasket on rear differential (188LW)
WARNING: DANGER OF POISONING if oil is ingested/absorbed through the skin! RISK OF INJURY if oil comes into contact with eyes and skin!
IMPORTANT: In event of oil loss, always check rear differential for traces of wear and damage.
To avoid leaks from the rear differential cover, do not use a paper gasket in cars with liquid sealing compounds! To prevent the final drive oil from foaming over, make sure that no remnants of the liquid sealing compound are pressed into the rear axle final drive housing.
Necessary preliminary tasks:
- Catch or draw off final drive oil.
- Remove REAR AXLE FINAL DRIVE.
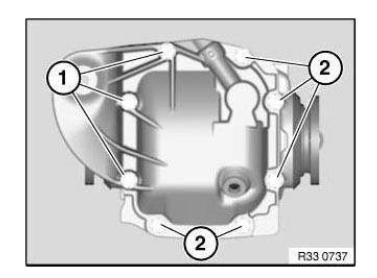
Release screws (1).
Unfasten screws (2).
Remove cover.
If necessary, remove remnants of liquid sealing compound with scraper.
Clean sealing face on cover and rear differential.
Installation note: If a paper gasket was fitted, a paper gasket or liquid sealing compound can be used.
After installation:
- Add FINAL DRIVE OIL.
Replacing rear cover gasket on rear differential (215LW)
WARNING: DANGER OF POISONING if oil is ingested/absorbed through the skin! RISK OF INJURY if oil comes into contact with eyes and skin!
IMPORTANT: In event of oil loss, always check rear differential for traces of wear and damage.
To avoid leaks from the rear differential cover, do not use a paper gasket in cars with liquid sealing compounds! To prevent the final drive oil from foaming over, make sure that no remnants of the liquid sealing compound are pressed into the rear axle final drive housing.
Necessary preliminary tasks:
- Catch or draw off final drive oil.
- Remove REAR AXLE FINAL DRIVE.
NOTE: Read and comply with REAR AXLE FINAL DRIVE: ASSIGNMENT TO MODEL SERIES.
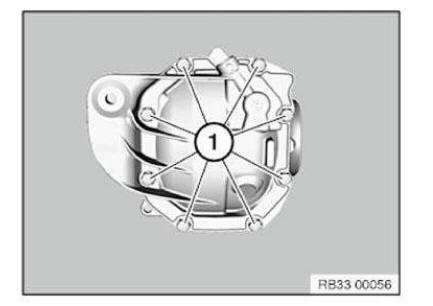
Release screws (1).
Remove cover.
If necessary, remove remnants of liquid sealing compound with scraper.
Clean sealing face on cover and rear differential.
Installation note: If a paper gasket was fitted, a paper gasket or liquid sealing compound can be used.
After installation:
- Add FINAL DRIVE OIL.
Other materials:
BMW X3 (F25) Service & Repair Manual > Driveline+Axles: Final drive oil for bmw m1 motorsport coupe
3.0 FINAL DRIVE OIL FOR BMW M1 MOTORSPORT COUPE
The final drive of a BMW M1 is integrated into the manual transmission and the oil supply is accomplished
with a mutual oil filling.
Use reputable brand SAE 80 manual transmission oil conforming with specifications MIL-L-2105 A or API-
GL 4.
4 ...


