BMW X3 (F25) Service & Repair Manual: Output shafts
- Pressing output shaft out of drive flange and drawing in
- Removing and installing/replacing both output shafts
Pressing output shaft out of drive flange and drawing in
Necessary preliminary tasks:
- Remove REAR WHEEL .
- Remove REAR AXLE FINAL DRIVE.
IMPORTANT: Always place a new circlip on the output shaft reinstalling!
If necessary, remove visual protection cap (1).
IMPORTANT: Expand anti-twist lock sufficiently to avoid damaging thread when releasing collar nut (1).
Activate parking brake and release collar nut (1).
Installation note: Lightly oil the gearing at the shaft journal.
No oil permitted on thread of shaft journal or collar nut.
Replace collar nut (1) by positive peening at flat areas of output shaft.
Special Tools:
- Hydraulic unit - 81 64 2 155 744
- Adapter kit 1 - 81 64 2 155 745
- Adapter kit 2 - 81 64 2 155 746
The following work steps describe pressing out the output shaft:
The following tools are required to press out the output shaft from the drive flange, see Fig. 60 for arrangement:
Vehicle components:

Required components for all models and types:
- Secure output shaft against falling out.
- Press out output shaft with hydraulic unit.
The following work steps describe drawing in the output shaft:
The following tools are required to fit the output shaft in the drive flange.
Vehicle components:

Required components for all models and types:

Components specific to model and type (thread diameter, output shaft):

IMPORTANT: Risk of damage!
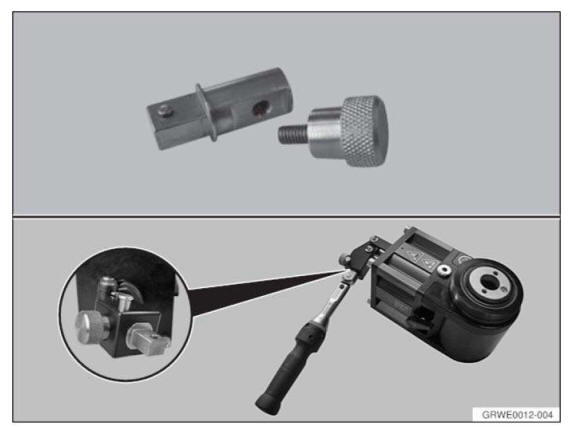
Due to the technical requirements, the special tool used, sleeve G, is relatively thin-walled. To ensure that the load limit of the tensioning sleeve is not exceeded when drawing in the output shaft, it is essential to use adapter 81 64 2 318 661 in combination with a torque wrench.
Fit adapter with torque wrench to hydraulic unit.
Set torque wrench to 20 Nm.
Draw in output shaft with hydraulic tool until the torque wrench is activated.
Tighten collar nut (1), activate parking brake for this purpose.
Installation note: Renew collar nut (1), apply a light coating of oil to collar nut contact surface and tighten.
No oil permitted on thread of shaft journal or collar nut.
Secure collar nut (1) by positive peening at flat areas of output shaft.
Removing and installing/replacing both output shafts
IMPORTANT:
- The RADIAL SHAFT SEAL FOR THE OUTPUT SHAFT should be renewed every time the output shaft is removed and installed.
- The circlip of the output shaft must be replaced after re-installation.
NOTE: The procedure is described in PRESSING OUTPUT SHAFT OUT OF DRIVE FLANGE AND DRAWING IN.
After installation:
- Check FINAL DRIVE OIL LEVEL, correct if necessary.
REMOVING AND INSTALLING/REPLACING LEFT OR RIGHT OUTPUT SHAFT
IMPORTANT: The RADIAL SHAFT SEAL FOR THE OUTPUT SHAFT should be renewed every time the output shaft is removed and installed.
The circlip of the output shaft must be replaced after re-installation.
NOTE: The procedure is described in REMOVING AND INSTALLING STEERING STUB/WHEEL CARRIER.
After installation:
- Check FINAL DRIVE OIL LEVEL, correct if necessary.

 Rear sub-frame
...
Other materials:
BMW X3 (F25) Service & Repair Manual > Body and Frame: Dash cowl
REPLACE THE A-PILLAR ON THE OUTSIDE LEFT IN THE AREA OF THE
WINDSCREEN
Read contents of BODY, GENERAL.
Remove or cover those vehicle components in the repair area which are susceptible to heat or dust.
Use only approved SPOT-WELDING APPARATUS for repairs.
IMPORTANT:
Operations on pyrot ...
