BMW X3 (F25) Service & Repair Manual: Compressor
- (removing and installing) Replacing a/c system compressor (N47N)
- Instructions for opening and part replacement in refrigerant circuit
- Notes for changing the air conditioning compressor (amount of refrigerant oil of new air conditioning compressor known)
- Notes for changing the air conditioning compressor (amount of refrigerant oil of new air conditioning compressor not known)
- Replacing a/c system compressor (N52)
- Replacing air conditioning compressor (N20)
- Replacing air conditioning system compressor (N55) (version 1)
- Replacing air conditioning system compressor (N55) (version 2)
(removing and installing) Replacing a/c system compressor (N47N)
Special tools required:
- 32 1 270
WARNING: Danger of injury! Refrigerant circuit is under high pressure! Observe the safety information for handling the R 134a refrigerant . Avoid contact with refrigerant and refrigerant fluid.
FOLLOW SAFETY INSTRUCTIONS FOR HANDLING REFRIGERANT OIL !
IMPORTANT: Risk of damage! Restart engine only when A/C system has been correctly filled.
Read and comply with notes on compressor replacement .
If Air conditioning is opened for more than 24 h: REPLACE DESICCANT INSERT FOR HEATING AND AIR CONDITIONING SYSTEM
Necessary preliminary tasks:
- DRAIN OFF AIR CONDITIONING SYSTEM
- REMOVE COMPRESSOR DRIVE BELT
IMPORTANT: Seal openings or lines on compressor with special tool 32 1 270 to prevent escape of media and fouling.
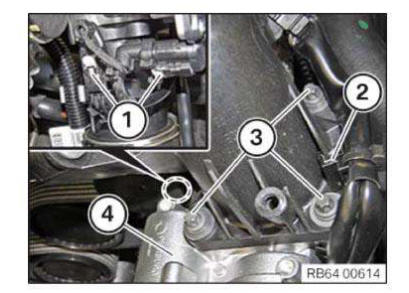
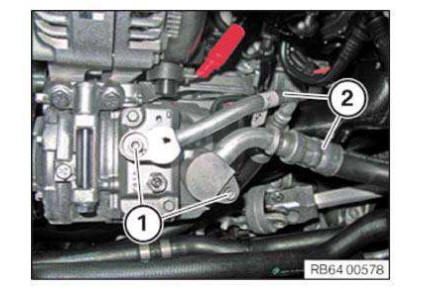
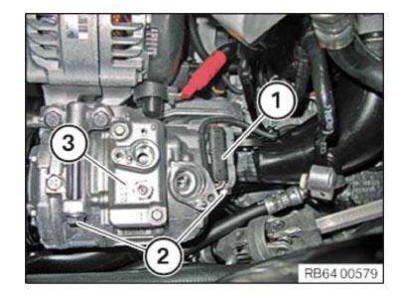
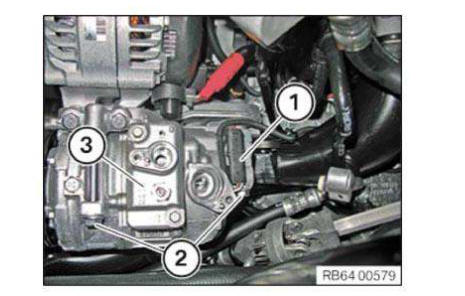
Release screws (1) on refrigerant lines (3).
Open brackets (4).
Disconnect refrigerant lines (3) and lay to one side.
Unfasten plug connection (2) and disconnect.
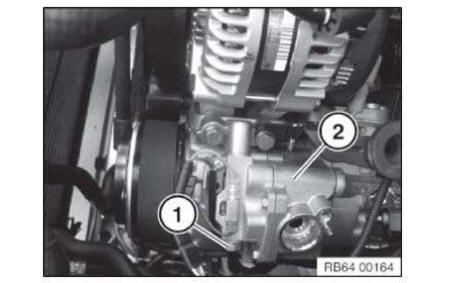
Unlock plug connections (1) and disconnect.
Unclip cable clip (2).
Release screws (3) and place throttle valve (4) to one side.
Release screws (2) on compressor (1).
Feed out compressor (1) in direction of arrow.
Replacement:
- Adjust the amount of refrigerant oil in the new compressor .
IMPORTANT:
Danger of compressor damage! Danger of customer complaints due to reduced cooling power of the Air conditioning! Before the installation of the new compressor, it is absolutely necessary to adjust the amount of refrigerant oil in the new compressor! Compliance with safety information is mandatory .
After installation:
- EVACUATE AND FILL A/C SYSTEM
Instructions for opening and part replacement in refrigerant circuit
Special tools required:
- 00 9 030
- 32 1 270
WARNING:
- Avoid contact with refrigerant and refrigerant oil
- Follow safety informations for handling refrigerant .
- Follow safety information for HANDLING REFRIGERANT OIL
Attention!
- Always use new O-rings each time A/C connections are opened.
They must not be coated.
Use special tool 00 9 030 to install sealing rings without damaging them.
- Open the refrigerant circuit for as short of a period as possible.
- Close all components and lines in the refrigerant circuit and return parts immediately following the removals at openings with special tool 32 1 270 to prevent penetration of moisture or foreign objects.
- If the refrigerant circuit was closed at the openings with special tool 32 1 270 but it remains open for more than 24 h, the dryer insert for the air conditioning must be replaced.
I. Part replacement as preliminary work fur further repair work and part replacement based on gradual leakage.
(minor leak, e.g. hairline crack)
Procedure:
- Draw off HEATING AND AIR CONDITIONING SYSTEM, then determine drawn-off amount of refrigerant oil
- Carry out part replacement
-
Replace removed refrigerant oil and additionally top up with new refrigerant oil according to
components replaced:
- Compressor: refer to NOTES ON COMPRESSOR REPLACEMENT
- Evaporator: 10 ml
- Capacitor: 20 ml
- Desiccant insert/dryer flask: 20 ml
- Each replaced refrigerant line: 10 ml
- Condenser with integrated dryer flask: 40 ml
- Safety pressure switch and gasket: no additional refrigerant oil
- Only I01: Radiator, high-voltage battery unit: 20 ml
- EVACUATE AND FILL AIR CONDITIONING SYSTEM
II. Part replacement due to sudden leakage (major leak, e.g. pipe break due to accident)
Procedure:
- Draw off HEATING AND AIR CONDITIONING SYSTEM, then determine drawn-off amount of refrigerant oil
- Carry out part replacement
-
Replace removed refrigerant oil and additionally top up with new refrigerant oil according to
components replaced:
- Compressor: refer to NOTES ON COMPRESSOR REPLACEMENT
- Evaporator: 35 ml
- Capacitor: 35 ml
- Desiccant insert/dryer flask: 55 ml
- Each replaced refrigerant line: 35 ml
- Condenser with integrated dryer flask: 55 ml
- Safety pressure switch and gasket: no additional refrigerant oil
- Only I01: Radiator, high-voltage battery unit: 35 ml
- EVACUATE AND FILL A/C SYSTEM
Notes for changing the air conditioning compressor (amount of refrigerant oil of new air conditioning compressor known)
Special tools required:
- 00 9 030
NOTE: This procedure only applies if the new air conditioning compressor has a label with the amount of refrigerant oil .
A DIFFERENT PROCEDURE applies for air conditioning compressors without a label indicating the amount of refrigerant oil .
IMPORTANT: Risk of damage! Remove the air conditioning compressor without damaging and without the use of force!
Air conditioning compressors with plastic belt pulleys:
- Avoid impacts/knocks to plastic belt pulley (caused by tools, contact with base).
- Return faulty air conditioning compressors in their original packaging only and with sealed connected branches.
IMPORTANT: When starting up a new air conditioning compressor for the first time, it is absolutely essential to carry out the following breaking-in procedure:
- Switch on Air conditioning system
- Set all air vents in the dashboard to "OPEN"
- Start engine and let it stabilize at idle speed
- Set blower output to min. 75% of max. blower output
- Switch on heating and air conditioning system and run for at least 2 minutes at idle speed
Risk of damage at increased engine speed!
In the event of a mechanical air conditioning compressor failure and the resulting ingress of chips into the refrigerant circuit, replace the following parts: All vehicles except I01:
- Air conditioning compressor.
IMPORTANT:
- Replace DESICCANT INSERT
- Line to the capacitor
- Refrigerant oil
I01 only:
- air conditioning compressor
- Capacitor with desiccant insert/dryer flask
- all expansion valves
Rinse the refrigerant circuit.
All vehicles without I01 with heat pump:
The new air conditioning compressor is filled at the factory with refrigerant oil.
The amount of refrigerant oil in the new air conditioning compressor corresponds to the amount of refrigerant oil for the entire new and unfilled refrigerant circuit.
Only I01 with heat pump:
The new air conditioning compressor and new dryer flask are filled at the factory with refrigerant oil.
The amount of refrigerant oil in the new air conditioning compressor and in the new dryer flask corresponds to the amount of refrigerant oil for the entire new and unfilled refrigerant circuit.
When replacing the air conditioning compressor it is absolutely essential to adapt the amount of refrigerant oil in accordance with the instructions below! An adaptation is also required for the replacement of the dryer flask.
An adaptation of the amount of refrigerant oil is not required in the following cases:
- Replacement of the complete refrigerant circuit.
- If the refrigerant circuit was rinsed (only I01) .
When EVACUATING THE HEATING AND AIR CONDITIONING SYSTEM refrigerant oil is also extracted and collected in the oil separator of the A/C service station.
This amount of refrigerant oil is displayed after the EXTRACTION OF THE HEATING AND AIR CONDITIONING SYSTEM on the display of the A/C service station.

Take a note of the amount of refrigerant oil displayed on the display of the A/C service station (= amount of refrigerant oil 1) .
Example:
30 nm read on the display of the A/C service station.
Amount of refrigerant oil 1 = 30 ml
Transfer the refrigerant oil remaining in the previous air conditioning compressor via the oil filler plug completely into a measuring cup.
Read the amount of refrigerant oil at the measuring cup. Add at least 10 ml extra to the amount of refrigerant oil read, but note an overall total of 50 ml (= amount of refrigerant oil 2) .
Example:
20 ml read at measuring cup:
20 ml + 10 ml extra = 30 ml < 50 ml
Amount of refrigerant oil 2 = 50 ml
Turn the belt pulley during the filling process.
This allows more refrigerant oil to flow out of the previous air conditioning compressor.
Determination of the amount of refrigerant oil to be filled in the refrigerant circuit: Amount of refrigerant oil to be filled = amount of refrigerant oil 1 + amount of refrigerant oil 2
Example:
Amount of refrigerant oil to be filled = 30 ml + 50 ml = 80 ml
Open oil filler plug. Drain the following amount of refrigerant oil from the new air conditioning compressor into a clean measuring cup: Amount of refrigerant oil to be drained = amount of refrigerant oil of new air conditioning compressor - amount of refrigerant oil to be filled
Example:
Amount of refrigerant oil of new air conditioning compressor: 150 ml
Amount of refrigerant oil to be drained = 150 ml - 80 ml = 70 ml
70 ml must be drained from the new air conditioning compressor .
Installation note:
Replace sealing rings.
Use special tool 00 9 030 to mount sealing rings without damaging them.
The drained new refrigerant oil can be filled into the expansion tank of the A/C service station after draining.
On account of its hygroscopic properties, refrigerant oil must not be stored in open containers.
If the new, drained refrigerant oil is not filled straight away into the expansion tank of the A/C service station, it must be disposed of properly.
The refrigerant oil drawn off from the oil separator of the A/C service station and from the previous air conditioning compressor must not be reused and must be correctly disposed of .
Observe country-specific waste disposal regulations.
Installation note:
If the refrigerant circuit is open for longer than 24 hours:
- Replace desiccant insert
Notes for changing the air conditioning compressor (amount of refrigerant oil of new air conditioning compressor not known)
Special tools required:
- 00 9 030
NOTE: This procedure only applies if the new air conditioning compressor does not have a label with the amount of refrigerant oil .
A DIFFERENT PROCEDURE applies for air conditioning compressors with a label indicating the amount of refrigerant oil.
IMPORTANT: Risk of damage! Remove the air conditioning compressor without damaging and without the use of force!
Air conditioning compressors with plastic belt pulleys:
- Avoid impacts/knocks to plastic belt pulley (caused by tools, contact with base).
- Return faulty air conditioning compressors in their original packaging only.
IMPORTANT: When starting up a new air conditioning compressor for the first time, it is absolutely essential to carry out the following breaking-in procedure:
- Switch on Air conditioning system
- Set all air vents in the dashboard to "OPEN"
- Start engine and let it stabilize at idle speed
- Set blower output to min. 75% of max. blower output
- Switch on heating and air conditioning system and run for at least 2 minutes at idle speed
Risk of damage at increased engine speed!
IMPORTANT: In the event of a mechanical air conditioning compressor failure and the resulting ingress of chips into the refrigerant circuit, replace the following parts: All vehicles except I01:
- Air conditioning compressor.
- Replace DESICCANT INSERT
- Line to the capacitor
- Refrigerant oil
I01 only:
- air conditioning compressor
- Capacitor with desiccant insert/dryer flask
- all expansion valves
Rinse the refrigerant circuit.
All vehicles without I01 with heat pump:
The new air conditioning compressor is filled at the factory with refrigerant oil.
The amount of refrigerant oil in the new air conditioning compressor corresponds to the amount of refrigerant oil for the entire new and unfilled refrigerant circuit.
Only I01 with heat pump:
The new air conditioning compressor and new dryer flask are filled at the factory with refrigerant oil.
The amount of refrigerant oil in the new air conditioning compressor and in the new dryer flask corresponds to the amount of refrigerant oil for the entire new and unfilled refrigerant circuit.
When replacing the air conditioning compressor it is absolutely essential to adapt the amount of refrigerant oil in accordance with the instructions below!
An adaptation is also required for the replacement of the dryer flask.
An adaptation of the amount of refrigerant oil is not required in the following cases:
- Replacement of the complete refrigerant circuit.
- If the refrigerant circuit was rinsed (only I01 ).
When evacuating the air conditioning system, refrigerant oil is also extracted and collected in the oil separator of the A/C service station.
After evacuation, the refrigerant must be filtered in the A/C service station as the oil separator could still contain a liquid refrigerant/oil mixture. The refrigerant completely gasifies through the cleaning operation.
Only the prior bound refrigerant oil remains in the oil separator. Measure and note down this quantity of refrigerant oil.
- REFER TO "DRAWING OFF AIR CONDITIONING SYSTEM"
Transfer the refrigerant oil remaining in the previous air conditioning compressor via the oil filler plug completely into a measuring cup.
Measure the amount of refrigerant oil collected from the previous air conditioning compressor.
Open oil filler plug and pour entire contents of air conditioning compressor into a clean collecting vessel.
Installation note:
Replace sealing rings.
Use special tool 00 9 030 to mount sealing rings without damaging them.
From the new air conditioning compressor, pour the same amount of refrigerant oil (as drained from the previous air conditioning compressor) + 10 ml extra into a clean measuring cup and pour again into the new air conditioning compressor. At least but a total of 50 g .
Remaining refrigerant oil can be poured into A/C service station tank.
- Refer to "EVACUATING AIR CONDITIONING SYSTEM".

Otherwise the excess refrigerant oil must be disposed of correctly.
On account of its hygroscopic properties, refrigerant oil must not be stored in open containers.
The refrigerant oil drawn off from the oil separator of the A/C service station and from the previous air conditioning compressor must not be reused and must be correctly disposed of.
Observe country-specific waste disposal regulations.
After installing the new air conditioning compressor, it is essential before filling the heating and air conditioning system to pour the same amount of the previously drawn off refrigerant oil into the system again.
- REFER TO "FILLING AIR CONDITIONING SYSTEM"
Installation note:
If the refrigerant circuit is open for longer than 24 hours:
- REPLACE DESICCANT INSERT
Replacing a/c system compressor (N52)
Special tools required:
- 00 9 030
- 32 1 270
WARNING: Danger of injury! Refrigerant circuit is under high pressure! Observe the safety information for handling the R 134a refrigerant . Avoid contact with refrigerant and refrigerant oil.
FOLLOW SAFETY INSTRUCTIONS FOR HANDLING REFRIGERANT OIL !
IMPORTANT: Risk of damage! Restart engine only when A/C system has been correctly filled.
Read and comply with notes on compressor replacement .
FOLLOW NOTES FOR OPENING AND REPLACING PARTS IN REFRIGERANT CIRCUIT .
If Air conditioning is opened for more than 24 h:
Replace desiccant insert for heating and air conditioning system
IMPORTANT: Aluminium-magnesium materials.
No steel screws/bolts may be used due to the threat of electrochemical corrosion! A magnesium crankcase requires aluminum screws/bolts exclusively! Aluminium screws/bolts must be replaced each time they are released! The end faces of aluminum screws/bolts are painted blue for the purposes of reliable identification.
Jointing torque and angle of rotation must be observed without fail (risk of damage)!
Necessary preliminary work:
- DRAIN OFF AIR CONDITIONING SYSTEM Remove alternator DRIVE BELT
- Remove coolant thermostat
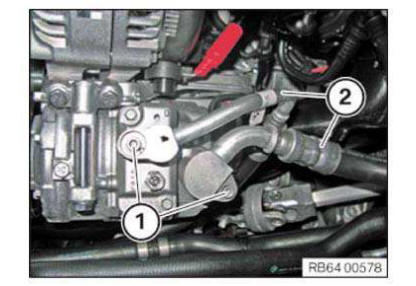
Release and disconnect plug connection (1) at A/C compressor.
Release screws (4).
Remove intake pipe (2) and pressure line (3).
Installation note:
Replace sealing rings.
Use special tool 00 9 030 to mount sealing rings without damaging them.
IMPORTANT: Seal openings or lines on compressor with special tool 32 1 270 to prevent escape of media and dirt contamination.
NOTE: Secure compressor (3) against falling out.
Release bolt (2) and if necessary remove with bush behind.
Release screw (1).
Remove compressor (3) towards front.
Installation note:
Make sure bushes are installed correctly.
If necessary, replace faulty bushes.
Replacement:
- Adjust the amount of refrigerant oil in the new compressor.
IMPORTANT: Danger of compressor damage! Danger of customer complaints due to reduced cooling power of the Air conditioning! Before the installation of the new compressor, it is absolutely necessary to adjust the amount of refrigerant oil in the new compressor! The safety information must be observed .
After installation:
- EVACUATE AND FILL HEATING AND AIR CONDITIONING SYSTEM
Replacing air conditioning compressor (N20)
Special tools required:
- 00 9 030
- 32 1 270
WARNING: Danger of injury! Refrigerant circuit is under high pressure! Observe the safety information for handling the R 134a refrigerant . Avoid contact with refrigerant and refrigerant fluid.
FOLLOW SAFETY INSTRUCTIONS FOR HANDLING REFRIGERANT OIL !
IMPORTANT: Risk of damage! Restart engine only when A/C system has been correctly filled.
Read and comply with notes on compressor replacement .
If Air conditioning is opened for more than 24 h:
REPLACE DESICCANT INSERT FOR HEATING AND AIR CONDITIONING SYSTEM
IMPORTANT: Aluminium-magnesium materials.
No steel screws/bolts may be used due to the threat of electrochemical corrosion! A magnesium crankcase requires aluminum screws/bolts exclusively! Aluminium screws/bolts must be replaced each time they are released! The end faces of aluminum screws/bolts are painted blue for the purposes of reliable identification.
Jointing torque and angle of rotation must be observed without fail (risk of damage) !
Necessary preliminary tasks:
- DRAIN OFF AIR CONDITIONING SYSTEM
- Remove alternator DRIVE BELT
- Remove left CHARGE AIR DUCT
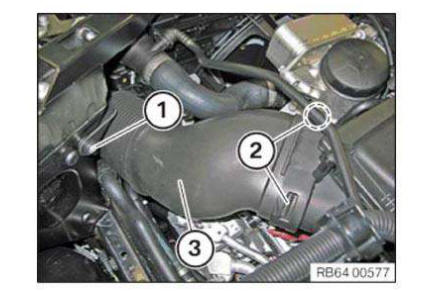
Release and disconnect plug connection (2) at A/C compressor.
Release screws (1).
Remove refrigerant lines (3).
Installation note:
Replace sealing rings.
Use special tool 00 9 030 to mount sealing rings without damaging them.
IMPORTANT: Seal openings or lines on compressor with special tool 32 1 270 to prevent escape of media and dirt contamination.
NOTE: Secure compressor (2) against falling out.
Release screw (1).
Feed out compressor (2) upwards to the front.
Replacement:
- Adjust the amount of refrigerant oil in the new compressor .
IMPORTANT: Danger of compressor damage! Danger of customer complaints due to reduced cooling power of the Air conditioning! Before the installation of the new compressor, it is absolutely necessary to adjust the amount of refrigerant oil in the new compressor! The safety information must be observed .
After installation:
- EVACUATE AND FILL HEATING AND AIR-CONDITIONING SYSTEM
Replacing air conditioning system compressor (N55) (version 1)
Special tools required:
- 00 9 030
- 32 1 270
WARNING: Danger of injury! Refrigerant circuit is under high pressure! Avoid contact with refrigerant and refrigerant oil.
Read and comply with safety instructions:
- Handling R 134a refrigerant .
- HANDLING REFRIGERANT FLUID
IMPORTANT: Risk of damage! Restart engine only when A/C system has been correctly filled.
Read and comply with notes on compressor replacement.
FOLLOW NOTES FOR OPENING AND REPLACING PARTS IN REFRIGERANT CIRCUIT .
If Air conditioning is opened for more than 24 h:
Replace desiccant insert for air conditioning system.
Necessary preliminary work:
- DRAWING OFF, EVACUATING AND FILLING THE AIR CONDITIONING are not included in the time value given for this job item
- REMOVE COMPRESSOR DRIVE BELT
- Remove left CHARGE AIR DUCT
IMPORTANT: Seal openings or lines on compressor with special tool 32 1 270 to prevent escape of media and dirt contamination.
Unfasten plug connection (1) and disconnect.
Release screws (2) and remove refrigerant lines (3).
Installation note:
Replace sealing rings.
Use special tool 00 9 030 to mount sealing rings without damaging them.
Release screw (1) at holder for refrigerant lines (2) and pull out, including spacer sleeve.
Release screw (1).
NOTE: Shown with clearance for better clarity.
Release screw (1).
IMPORTANT: Seal openings or lines on compressor with special tool 32 1 270 to prevent escape of media and dirt contamination.
NOTE: Secure compressor (2) against falling off/down.
Release screw (1).
Lift out compressor (2).
Replacement:
- Adjust the amount of refrigerant oil in the new compressor .
IMPORTANT: Danger of compressor damage! Danger of customer complaints due to reduced cooling power of the Air conditioning! Before the installation of the new compressor, it is absolutely necessary to adjust the amount of refrigerant oil in the new compressor! The safety information must be observed .
After installation:
- EVACUATE AND FILL AIR CONDITIONING SYSTEM
Replacing air conditioning system compressor (N55) (version 2)
Special tools required:
- 00 9 030
- 32 1 270
WARNING: Danger of injury! Refrigerant circuit is under high pressure! Avoid contact with refrigerant and refrigerant fluid.
Read and comply with safety instructions:
- Handling R 134a refrigerant .
- HANDLING REFRIGERANT FLUID
IMPORTANT: Risk of damage! Restart engine only when A/C system has been correctly filled.
Read and comply with notes on compressor replacement.
FOLLOW NOTES FOR OPENING AND REPLACING PARTS IN REFRIGERANT CIRCUIT .
If Air conditioning is opened for more than 24 h:
REPLACE desiccant insert for heating and air conditioning system.
Necessary preliminary tasks:
- DRAWING OFF, EVACUATING AND FILLING THE AIR CONDITIONING are not included in the time value given for this job item
- REMOVE COMPRESSOR DRIVE BELT
Removal:
Release screw (1).
Undo latch mechanisms (2) on intake silencer housing.
Feed out intake port (3).
IMPORTANT: Seal openings or lines on compressor with special tool 32 1 270 to prevent escape of media and dirt contamination.
Release screws (1) and remove refrigerant lines (2).
Release screw (1).
IMPORTANT: Seal openings or lines on compressor with special tool 32 1 270 to prevent escape of media and dirt contamination.
NOTE: Secure compressor (3) against falling off/down!
Disconnect the connector (1).
Release screw (2).
Lift out compressor (3).
Replacement:
- Adjust the amount of refrigerant oil in the new compressor .
IMPORTANT: Danger of compressor damage! Danger of customer complaints due to reduced cooling power of the Air conditioning! Before the installation of the new compressor, it is absolutely necessary to adjust the amount of refrigerant oil in the new compressor! The safety information must be observed .
Installation:
Position compressor (3) correctly.
Tighten down screw (2).
Connect the connector (1).
Tighten down screw (1).
Position refrigerant lines (2) correctly.
Tighten down the screws (1).
NOTE: Renew sealing rings.
Use special tool 00 9 030 to mount sealing rings without damaging them.
Feed in intake port (3) correctly.
Engage latch mechanisms (2) on intake silencer housing.
Tighten down screw (1).
NOTE: Make sure intake port (3) is fitted correctly!

Required reworking:
- Install DRIVE BELT FOR COMPRESSOR
- EVACUATE AND FILL AIR CONDITIONING SYSTEM


Other materials:
BMW X3 (F25) Service & Repair Manual > Brakes: Brake pedal with linkage
REPLACING SPRING FOR BRAKE PEDAL
Necessary preliminary work:
Remove trim panel for pedal mechanism .
Disconnect return spring (1).
REPLACING SPRING FOR CLUTCH PEDAL
Necessary preliminary work:
Remove trim panel for pedal mechanism .
Disconnect return spring (1).
...
