BMW X3 (F25) Service & Repair Manual: Shift valves, parking lock
- Manually releasing parking lock (from vehicle underbody) transmission GA8HP
- Notes on mechatronics (GA8HP45Z, GA8HP70Z, GA8HP90Z)
- Replacing mechatronics (GA8HP45Z)
- Replacing sealing cup for transmission housing (GA8HP45Z)
- Unlock transmission lock electronically
Manually releasing parking lock (from vehicle underbody) transmission GA8HP
For various tasks, it is necessary to unlock and lock the parking lock.
This can be done from inside the passenger compartment or underneath the vehicle.
Before releasing the parking lock, secure the vehicle against rolling away.
In the event of a power supply interruption, e.g. flat battery or electrical fault, the parking lock must be manually released, otherwise the wheels will be locked and the vehicle cannot be moved.
Manual emergency release of parking lock from passenger compartment is not possible with GA8HP transmissions for:
- F01/F02/F03/F04 GA8HP from production date 09/2010
- F07 GA8HP from production date 03/2010
- F10/F11 GA8HP as from production date 06/2010
Before removing the underbody panel, always check inside the vehicle to be certain the parking lock emergency release is not fitted.
From the vehicle underbody: Raise vehicle.
Manual emergency release of parking lock
- Remove underbody protection
- Screw in screw (1) with hexagon socket (SW5) until parking lock is released by lever (2).
- It is imperative that bolt is always replaced.
- Clean thread with screw tap size M6X1, 0.
Screw new microencapsulated screw (1) into thread.
IMPORTANT: Screwing in and adjusting of screw to 1.5 to 2.5 mm above thread lip (A) must occur within 3 minutes.
The screw may no longer be turned after 3 minutes (hardening of adhesive), otherwise it must be replaced.
From passenger compartment:
- Refer to Manual emergency unlocking of parking lock.
From underneath vehicle with Bowden cable:
- Remove rear underbody protection.
- Press release lever (3) backwards.
If permanent release is desired, fix lever in position (e.g. with cable strap).
Locking:
- Let go of release lever (3) or undo means by which it is secured.

Notes on mechatronics (GA8HP45Z, GA8HP70Z, GA8HP90Z)
Special tools required:
- 24 2 390
IMPORTANT:
- Do not let skin come in contact with transmission oil and do not inhale fuel vapors.
- Wear protective gloves.
- Ensure adequate ventilation.
IMPORTANT: After completing work:
- Load specific data status with the BMW diagnosis system
- Check TRANSMISSION OIL LEVEL
- Use only approved TRANSMISSION OIL .
Failure to comply with this requirement will result in serious damage to the automatic transmission!
IMPORTANT: Read and comply with notes on PROTECTION AGAINST ELECTROSTATIC DISCHARGE (ESD PROTECTION) .
Unscrew connector (1) and disconnect.
Insert special tool 24 2 390 in sealing sleeve (1).
Replacing mechatronics (GA8HP45Z)
Special tools required:
- 24 1 430
- 24 2 390
IMPORTANT:
- Do not let skin come in contact with transmission oil and do not inhale transmission oil vapors.
- Wear protective gloves.
- Ensure adequate ventilation.
NOTE: After completing repair work:
- Load specific data status with the BMW diagnosis system
IMPORTANT: On vehicles with automatic start/stop, a hydraulic impulse storage is installed in the mechatronics.
After completion of repair work, check TRANSMISSION OIL LEVEL .
Use only approved GEARBOX OIL .
Failure to comply with this requirement will result in serious damage to the automatic transmission!
IMPORTANT: Read and comply with notes on PROTECTION AGAINST ELECTROSTATIC DISCHARGE (ESD PROTECTION) .
Necessary preliminary tasks:
- Remove REAR UNDERBODY PROTECTION .
- Remove exhaust bracket.
The graphic shows a vehicle with rear-wheel drive.
Remove panels (2).

IMPORTANT: Cable assembly is discontinued after 04/2010.
Release screw (2).
Disconnect cable (1).
Installation note:
Adjusting cable:
- Release screw (2).
- Bring release lever (3) into contact with selector shaft by pressing slightly. Distance B=0 mm.
- Adjust cable (1) by means of holder until distance A = 1 mm is obtained.
- Tighten down screw (2)
IMPORTANT: Mechatronics can be destroyed by static discharges. Therefore the contacts inside the connector must not be touched. Insert special tool immediately after operation.
Unscrew connector (1) and disconnect.
Insert special tool 24 2 390 in sealing cup (1).
Remove TRANSMISSION OIL SUMP.
Remove OIL RESERVOIR.
Release screw (1) and unlock sealing cup with slide (2).
Note position of sealing cup.
Pull out sealing cup (1).
Installation note:
Replace sealing cup (1).
Fit sealing cup in position (lug on inside). Turn until lug engages in groove of transmission. Slide in sealing cup.
Lug on sealing cup must not be damaged!
IMPORTANT: Only for vehicles without oil reservoir.
Release all screws (1 and 2).
- 1 = M6 x 59 mm
- 2 = M6 x 20 mm
Carefully remove mechatronics.
Installation note:
Replace all screws (1 and 2).
Replace O-rings for oil ducts on the mechatronics unit and wet with automatic transmission fluid.
IMPORTANT: Only for vehicles with oil reservoir.
Release all screws (1 and 2).
- 1 = M6 x 59 mm
- 2 = M6 x 20 mm
Carefully remove mechatronics.
Installation note:
Replace all screws (1 and 2).
Replace O-rings for oil ducts on the mechatronics unit and wet with automatic transmission fluid.
Installation note:
Replace gasket (1).
Coat new gasket with automatic transmission fluid and install.
Screw in guide pins 24 1 430 at screw position 4 and 9.
Fit mechatronics unit.
Fit shift claw (2) in gearshift shaft (3) by pressing release lever (1).
Screw down wing nuts as far as they will go on to the mechatronics unit.
Observe different screw lengths.
Failure to comply with this requirement will result in serious damage to the automatic transmission!
Installation note:
Insert screws 8 and 14 until screw heads make contact.
Remove guide pins and fit remaining screws.
Tighten down screws in order 1...18.
IMPORTANT: In vehicles with an oil reservoir, the screw 17 (M6 x 59 mm) must be secured with the oil reservoir.
Tighten in the order of 1...16 and 18.
Installation note: Install OIL RESERVOIR if necessary.
Replacing sealing cup for transmission housing (GA8HP45Z)
Special tools required:
- 24 2 390
IMPORTANT:
- Do not let skin come in contact with transmission oil and do not inhale fuel vapors.
- Wear protective gloves.
- Ensure adequate ventilation.
IMPORTANT: After completion of repair work, check TRANSMISSION OIL LEVEL .
Use only approved TRANSMISSION OIL .
Failure to comply with this requirement will result in serious damage to the automatic transmission!
Necessary preliminary tasks:
- Remove TRANSMISSION OIL SUMP.
- IF REQUIRED, REMOVE OIL ACCUMULATOR.
- Remove CROSS MEMBER .
IMPORTANT: Support transmission with workshop jack.
Unlock and disconnect connector (1) by turning.
Insert special tool 24 2 390 in sealing sleeve (1).
Release screw (1) and unlock sealing cup with slide (2).
NOTE: Make a note of installation position of sealing sleeve.
Pull out sealing cup (1).
Installation note:
Fit sealing sleeve in position (lug on inner surface). Turn until lug engages in groove of transmission. Slide in sealing cup.
Lug on sealing cup must not be damaged!
Unlock transmission lock electronically
For various tasks, it is necessary to unlock and lock the parking lock.
Before releasing the parking lock, secure the vehicle against rolling away.
- The emergency release is only possible if the engine does not start and the starter is turning.
- If the emergency release must be activated although the engine starts, the fuse for the electrical fuel pump may be pulled.
- The emergency release is active for 15 minutes.
- As soon as a wheel speed signal is recorded, this period will be extended by another 15 minutes.
- After this period of time, the transmission lock will be engaged without a message.
- The chronological information depends on the battery capacity.
- Only specially trained Service personnel are permitted to operate both the MECHANICAL as well as the electronic emergency transmission release system.
- The vehicle must be raised and the underbody panelling removed in order to operate the MECHANICAL emergency transmission release system.
IMPORTANT: To operate the electronic emergency transmission release system the vehicle must not be towed but rather only pushed.
In the case of misuse, a corresponding fault is entered in the fault memory.
Unlock transmission lock electronically
- Switch the ignition on.
- Apply the brake pedal and hold it down during the entire procedure.
- Press start/stop button.
- The starting operation may last for some seconds in low ambient temperatures and for diesel engines.
- As soon as the starter motor can be heard to operate
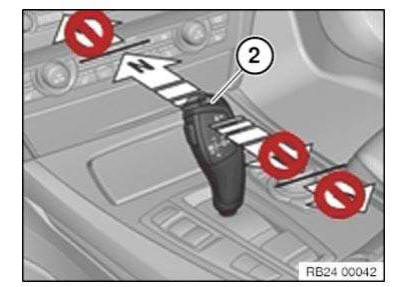
- Press and hold down the release button (1)
- The specified time must necessarily be complied with!
- Push selector lever (2) forward up to point of resistance and hold for 2 seconds.
- Release the selector lever and quickly move it forward by another level again.
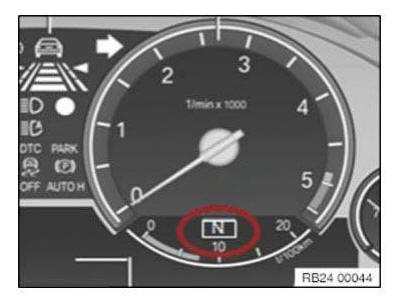
- The selector lever position N is displayed in the instrument cluster.
- The transmission lock is now electronically unlocked.
- Release the brake pedal after the transmission lock has been successfully unlocked.
- Leave the ignition switched on in order to subsequently move the vehicle.
- The transmission automatically shifts into P when the ignition is turned off.
IMPORTANT: The transmission lock is reactivated without a message when the start/stop button is pressed again.
If the gearbox cannot be released, turn the ignition off and on again and repeat the previous steps.
Allow the starter to cool down for approx. 10 minutes after unsuccessful attempts.
 Oil pump
REPLACING TORQUE CONVERTER RADIAL SHAFT SEAL (GA8HP45Z)
Special tools required:
00 1 450
13 5 250
24 0 200
24 1 420
24 2 410
24 1 410
...
 Torque converter
...
Other materials:
BMW X3 (F25) Owners Manual > Notes: Event Data Recorder EDR
This vehicle is equipped with an event data recorder
EDR. The main purpose of an EDR is to
record, in certain crash or near crash-like situations,
such as an air bag deployment or hitting
a road obstacle, data that will assist in understanding
how a vehicle's systems performed.
The EDR is de ...
