BMW X3 (F25) Service & Repair Manual: Transfer box
- Installing distributor exchange transmission (atc 450)
- Installing exchange transfer box (atc 45l)
- Removing and installing transfer box (atc 450)
- Removing and installing transfer box (atc 45l)
- Replacing output flange for front axle output (atc 450)
- Replacing output flange on rear transfer box (atc 45l)
- Replacing output flange on transfer box at rear (atc450)
- Replacing radial shaft seal for actuator shaft (atc 450)
- Replacing radial shaft seal for actuator shaft (atc 45l)
- Replacing transfer box control unit (longitudinal torque module) (atc 450)
- Replacing transfer box control unit (longitudinal torque module) (atc 45l)
Installing distributor exchange transmission (atc 450)
IMPORTANT: Before and after replacement, execute the "Repair" service function with the BMW diagnosis system.
Recycling: Catch and dispose of escaping transmission oil. Observe country-specific waste disposal regulations
Necessary preliminary tasks:
- Drain transmission oil at oil drain plug
- Remove TRANSFER BOX
Modify following parts:
- Covers and protective caps
- Drive shaft transportation retainer
- Vent hose of transfer box
- If required, replace rubber mount .
IMPORTANT: After completing work, check transmission oil level and top up if necessary.
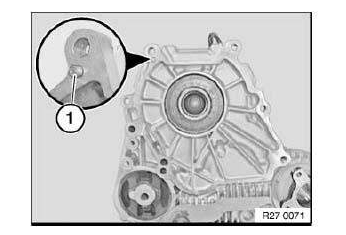
Release filler plug (1).
Check oil level.
Pour in transmission oil up to lower edge of opening for filler plug (1).
Use only the approved TRANSMISSION OIL .
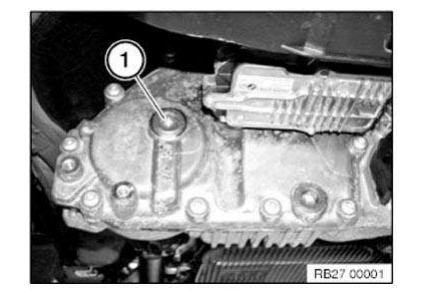
Failure to comply with this requirement will result in serious damage to the transfer box!
Installing exchange transfer box (atc 45l)
IMPORTANT: Before and after replacement, execute the "Repair" service function with the BMW diagnosis system.
Recycling: Catch and dispose of escaping transmission oil. Observe country-specific waste disposal regulations Necessary preliminary tasks:
- Drain GEAR OIL at oil drain plug.
- Remove TRANSFER BOX.
Remount the following parts:
- Covers and protective caps
- Drive shaft transportation retainer
- Vent hose of transfer box.
- REPLACE RUBBER MOUNT FOR TRANSFER BOX MOUNTING IF REQUIRED .
IMPORTANT: After completing work, check gear oil level and top up if necessary.
Undo oil filler plug (1).
Check oil level.
Top up transmission oil up to lower edge of opening for oil filler plugs (1).
Use only approved GEARBOX OIL .
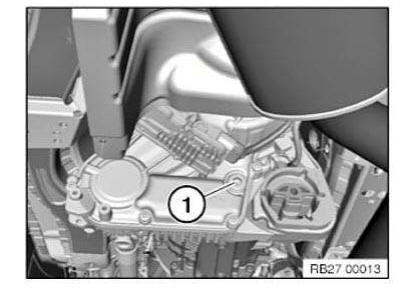
Failure to comply with this requirement will result in serious damage to the transfer box.
After replacement: Repair service function CARRY OUT PROGRAMMING/ENCODING .
Removing and installing transfer box (atc 450)
Special tools required:
- 00 2 030
- 23 4 050
IMPORTANT: Before and after replacement, execute the "Repair" service function with the BMW diagnosis system.
IMPORTANT: After completion of work, CHECK TRANSMISSION OIL LEVEL and top up if necessary.
Failure to comply with this requirement will result in serious damage to the transfer box!
Necessary preliminary work:
- Disconnect BATTERY EARTH LEAD
- Remove PROPELLER SHAFT
- Remove FRONT PROPELLER SHAFT
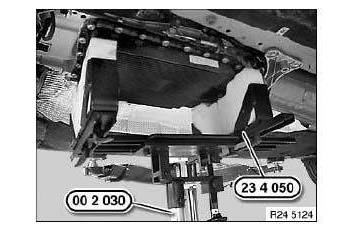
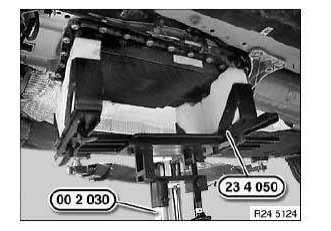
NOTE: Support transmission with special tools 00 2 030 , 23 4 050 .
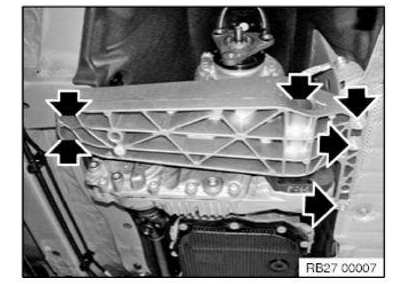
Release screws.
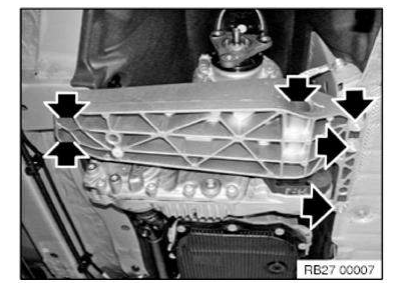
Remove transmission cross member.
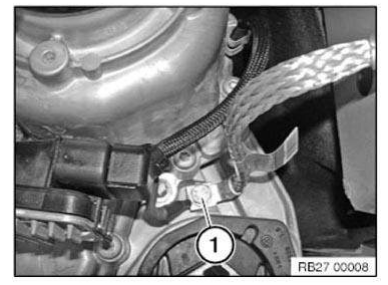
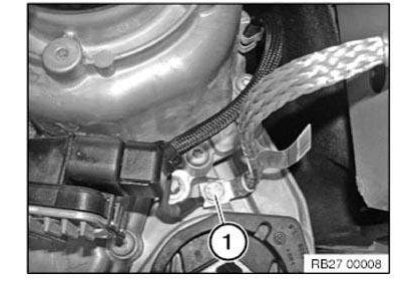
Release screw (1), detach earth strap.
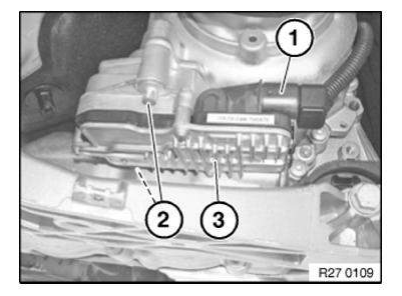
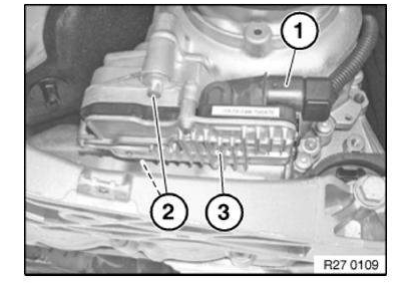
Unplug connector (1) from VTG control unit (linear force module) (3).
Release screw connection (1) of transfer box.
Take off transfer box (2).
Installation note:
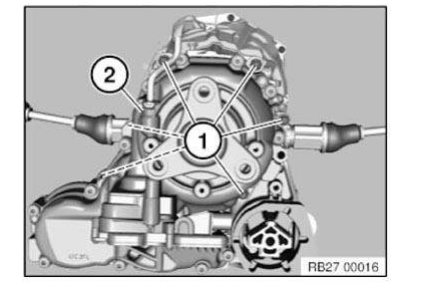
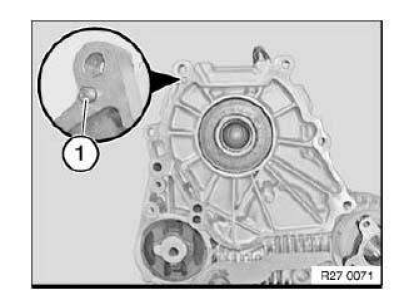
Pay attention to dowel pin (1).
Grease dowel pin (1).
Apply a thin coat of grease to gearing.
Grease: WEICON ANTI-SEIZE.
Removing and installing transfer box (atc 45l)
Special tools required:
- 00 2 030
- 23 4 050
IMPORTANT: Before and after replacement, execute the "Repair" service function with the BMW diagnosis system.
IMPORTANT: After completion of work, CHECK TRANSMISSION OIL LEVEL and top up if necessary. Failure to comply with this requirement will result in serious damage to the transfer box!
Necessary preliminary tasks:
- Disconnect NEGATIVE BATTERY CABLE .
- Remove PROPELLER SHAFT .
- Remove FRONT PROPELLER SHAFT .
NOTE: Support transmission with special tools 00 2 030 , 23 4 050 .
Release screws.
Remove transmission cross member.
Release screw (1), detach earth strap.
Unplug connector (1) from VTG control unit (linear force module) (3).
Release screw connection of transfer box.
Remove transfer box.
Installation note:
Pay attention to dowel pin (1).
Grease dowel pin (1).
Apply a thin coat of grease to gearing.
Grease: WEICON ANTI-SEIZE.
Replacing output flange for front axle output (atc 450)
IMPORTANT: Do not move vehicle with drive power once propeller shaft has been removed.
Replace output flange only together with a new radial shaft seal.
After completion of work, check gearbox oil level.
Use only the approved TRANSMISSION OIL .
Failure to comply with this requirement will result in serious damage to the transfer box!
Operation is identical to REPLACING RADIAL SHAFT SEAL FOR FRONT AXLE OUTPUT.
REPLACING OUTPUT FLANGE FOR OUTPUT TO THE FRONT AXLE (ATC 45L)
IMPORTANT: Do not move vehicle with drive power once propeller shaft has been removed.
Replace output flange only together with a new radial shaft seal.
After completion of work, check GEARBOX OIL LEVEL.
Use only the approved TRANSMISSION OIL .
Failure to comply with this requirement will result in serious damage to the transfer box!
Operation is identical to REPLACING RADIAL SHAFT SEAL FOR FRONT AXLE OUTPUT.
Replacing output flange on rear transfer box (atc 45l)
IMPORTANT: After completing work, check TRANSMISSION OIL LEVEL and top up if necessary.
Use only the approved TRANSMISSION OIL .
NOTE: Replace output flange only together with a new radial shaft seal.
Procedure for removing output flange is identical to replacing RADIAL SHAFT SEAL.
Installation note:
- Thickness of new shim must be determined before output flange is installed.
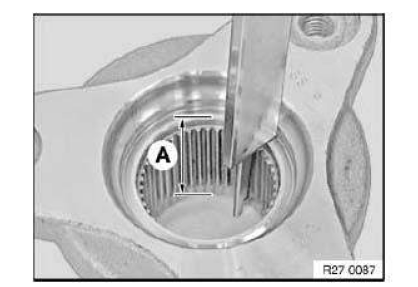
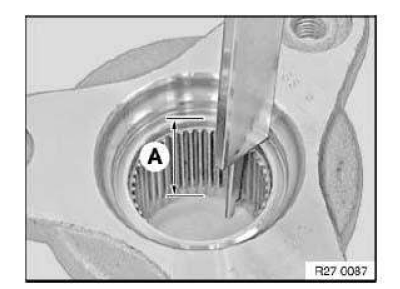
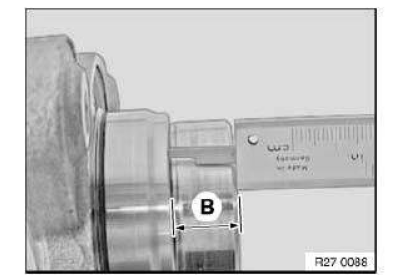
Determine and note down dimension A of output flange (old and new).
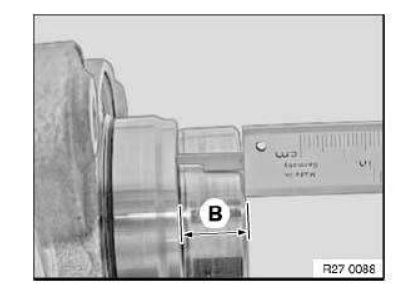
Determine and note down dimension B of output flange (old and new).
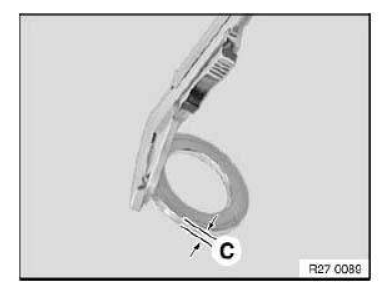
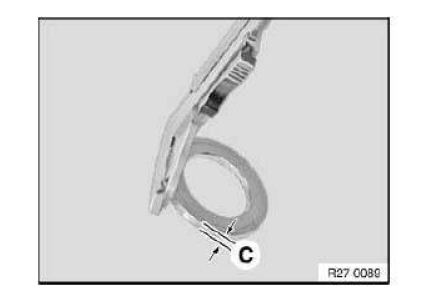
Determine old dimension C, thickness of shim.
Installation note:
Calculate thickness of new shim:
1. Add old dimension A of output flange (previous) and old dimension C of shim Then subtract old dimension B from old result A+C 2. Subtract dimension B from dimension A of output flange (new) 3. Then subtract result of step 2 from result of step 1.
Replacing output flange on transfer box at rear (atc450)
IMPORTANT: After completing work, check transmission oil level and top up if necessary.
Use only the approved TRANSMISSION OIL .
NOTE:
- Replace output flange only together with a new radial shaft seal.
- Operations for removing output flange are identical to replacing RADIAL SHAFT SEAL
Installation note:
- Thickness of new shim must be determined before output flange is installed
Determine and note down dimension A of output flange (old and new).
Determine and note down dimension B of output flange (old and new).
Determine old dimension C, thickness of shim.
Installation note:
Calculate thickness of new shim:
1. Add old dimension A of output flange (previous) and old dimension C of shim Then subtract old dimension B from old result A+C.
2. Subtract dimension B from dimension A of output flange (new).
3. Then subtract result of step 2 from result of step 1.
Replacing radial shaft seal for actuator shaft (atc 450)
Special tools required:
- 11 1 200
- 11 1 380
- 23 0 490
IMPORTANT: Read and comply with notes on protection against electrostatic discharge (ESD protection).
After completion of the repair work, CHECK TRANSMISSION OIL LEVEL and top up if necessary.
Use only the approved TRANSMISSION OIL .
Necessary preliminary tasks:
- Disconnect NEGATIVE BATTERY CABLE
- Remove CROSS MEMBER .
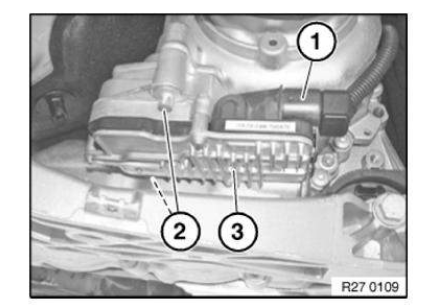
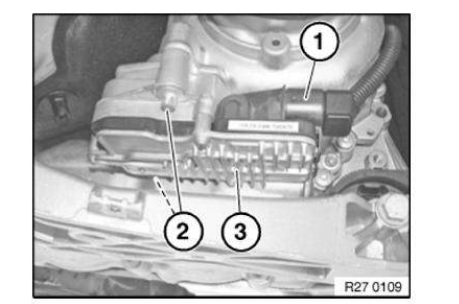
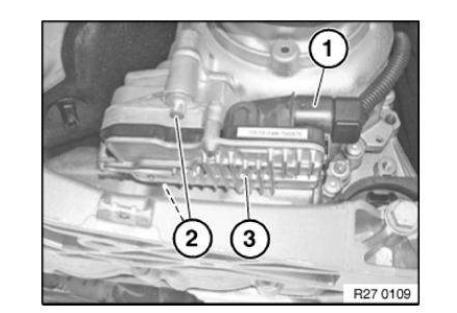
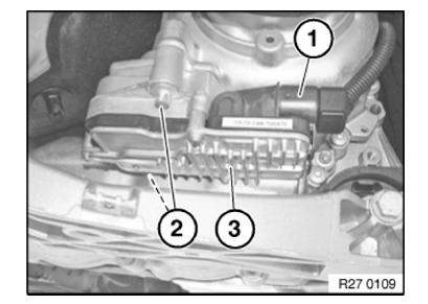
Disconnect connector (1).
Release screws (2) and remove transfer box from control unit (longitudinal torque module) (3).
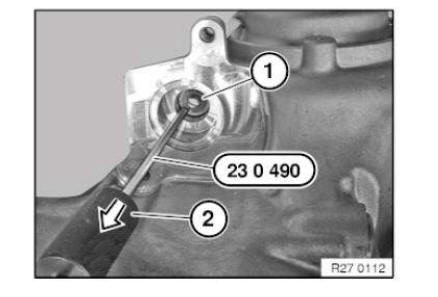
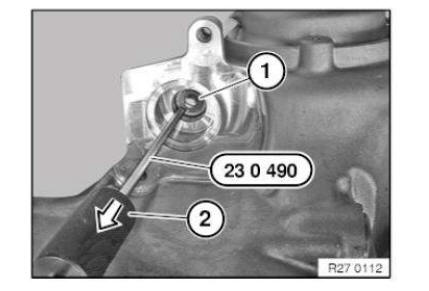
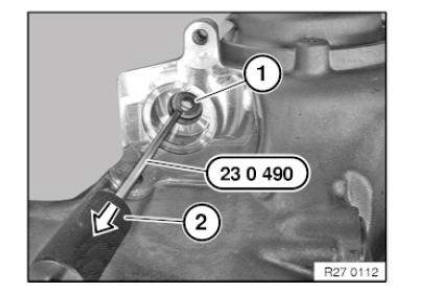
Screw special tool 23 0 490 into radial shaft seal.
Drive out radial shaft seal (1) with impact weight (2).

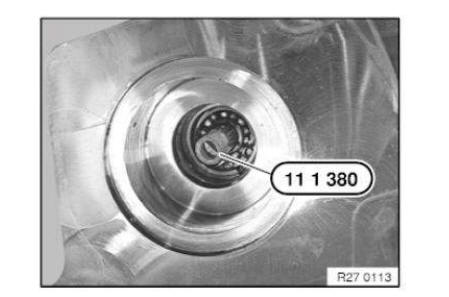
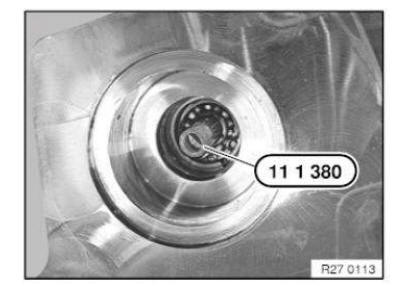
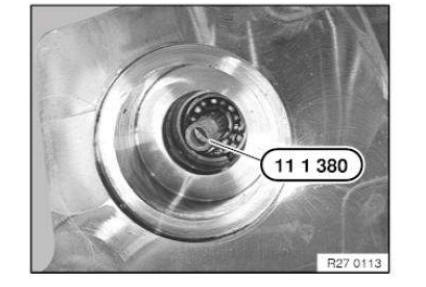
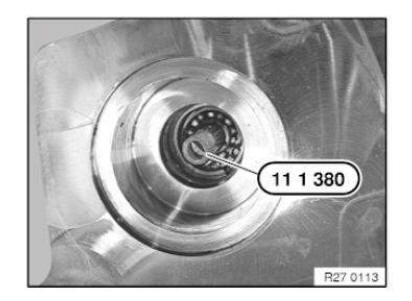
Push the assembly sleeve 11 1 380 over the actuator shaft.
IMPORTANT: Nonobservance involves a risk of damage to the radial shaft seal.
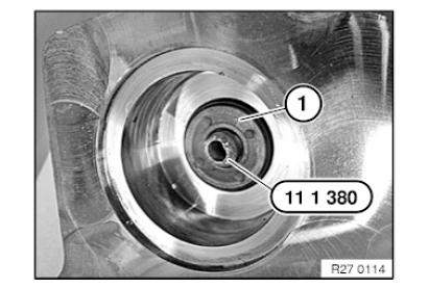
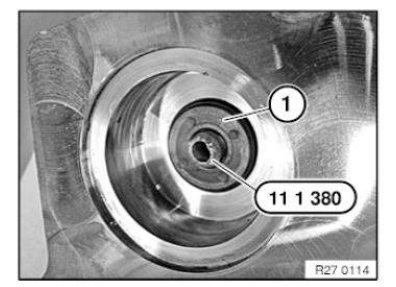
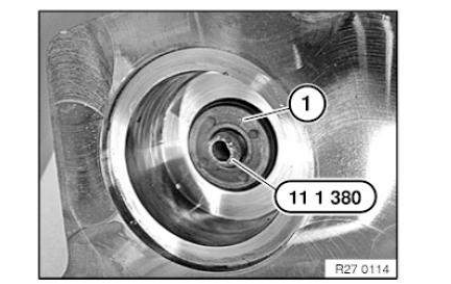
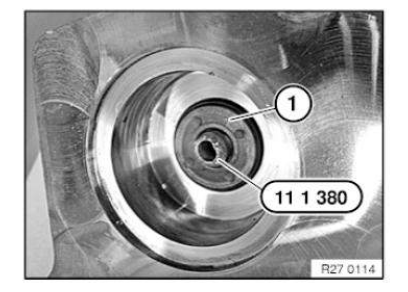
Slide the new radial shaft seal (1) over the assembly sleeve (2) onto the actuator shaft.
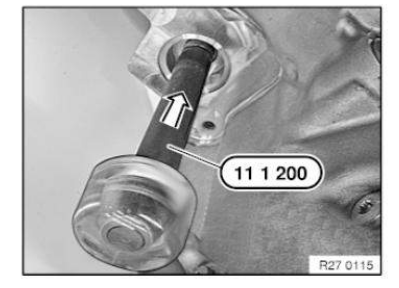
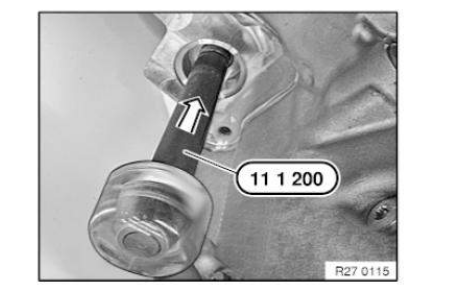
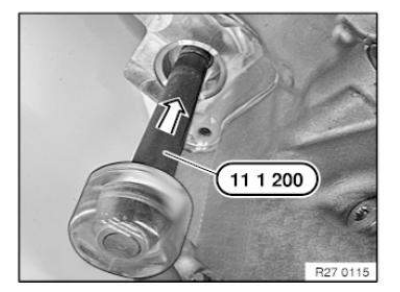
Drive radial shaft seal fully home using special tool 11 1 200 and plastic hammer.
Remove the assembly sleeve.
Replacing radial shaft seal for actuator shaft (atc 45l)
Special tools required:
- 11 1 200
- 11 1 380
- 23 0 490
IMPORTANT: Read and comply with notes on protection against electrostatic discharge (ESD protection).
After completion of the repair work, CHECK TRANSMISSION OIL LEVEL and top up if necessary.
Use only the approved TRANSMISSION OIL .
Necessary preliminary tasks:
- Disconnect BATTERY EARTH LEAD .
- Remove CROSS MEMBER .
Disconnect connector (1).
Release screws (2) and remove transfer box from control unit (longitudinal torque module) (3).
Screw special tool 23 0 490 into radial shaft seal.
Drive out radial shaft seal (1) with impact weight (2).
Push the assembly sleeve 11 1 380 over the actuator shaft.
IMPORTANT: Nonobservance involves a risk of damage to the radial shaft seal.
Slide the new radial shaft seal (1) over the assembly sleeve (2) onto the actuator shaft.
Drive radial shaft seal fully home using special tool 11 1 200 and plastic hammer.
Remove the assembly sleeve.

Replacing transfer box control unit (longitudinal torque module) (atc 450)
Special tools required:
- 11 1 200
- 11 1 380
- 23 0 490
IMPORTANT: Before and after replacement, execute the "Repair" service function with the BMW diagnosis system.
READ AND COMPLY WITH NOTES ON PROTECTION AGAINST ELECTROSTATIC DISCHARGE (ESD PROTECTION) .
Necessary preliminary tasks:
- Disconnect NEGATIVE BATTERY CABLE
- Remove CROSS MEMBER .
Disconnect connector (1).
Release screws (2) and remove transfer box from control unit (longitudinal torque module) (3).
NOTE: Radial shaft seal of actuator shaft must be replaced as well.
Thread special tool 23 0 490 into radial shaft seal (1).
Drive out radial shaft seal (1) with impact weight (2).
Push the assembly sleeve 11 1 380 over the actuator shaft.
IMPORTANT: Nonobservance involves a risk of damage to the radial shaft seal.
Slide the new radial shaft seal (1) over the assembly sleeve (2) onto the actuator shaft.
Drive radial shaft seal fully home using special tool 11 1 200 and plastic hammer.
Remove the assembly sleeve.
After replacement: CARRY out programming/encoding.
Replacing transfer box control unit (longitudinal torque module) (atc 45l)
Special tools required:
- 11 1 200
- 11 1 380
- 23 0 490
IMPORTANT: Before and after replacement, execute the "Repair" service function with the BMW diagnosis system.
READ AND COMPLY WITH NOTES ON PROTECTION AGAINST ELECTROSTATIC DISCHARGE (ESD PROTECTION) .
Necessary preliminary tasks:
- Disconnect BATTERY NEGATIVE LEAD .
- Remove transmission cross member .
Disconnect connector (1).
Release screws (2) and remove transfer box from control unit (longitudinal torque module) (3).
NOTE: Radial shaft seal of actuator shaft must be replaced as well.
Thread special tool 23 0 490 into radial shaft seal (1).
Drive out radial shaft seal (1) with impact weight (2).
Push the assembly sleeve 11 1 380 over the actuator shaft.
IMPORTANT: Nonobservance involves a risk of damage to the radial shaft seal.
Slide the new radial shaft seal (1) over the assembly sleeve (2) onto the actuator shaft.
Drive radial shaft seal fully home using special tool 11 1 200 and plastic hammer.
Remove the assembly sleeve.
After replacement: CARRY out programming/encoding.


Other materials:
BMW X3 (F25) Service & Repair Manual > Brakes: Pedal mounting block
REMOVING AND INSTALLING (REPLACING) COMPLETE BEARING SUPPORT FOR
FOOT PEDAL
IMPORTANT:
When the repair work is complete, please pay attention to the following:
Bleed clutch hydraulic system.
Carry out functional check.
Necessary preliminary work:
Remove left footwell trim ...
