BMW X3 (F25) Service & Repair Manual: Transmission shafts
- Renewing radial shaft seal for drive flange (atc 45l)
- Replacing output flange on rear transfer box (atc 45l)
- Replacing output flange on transfer box at rear (atc450)
- Replacing radial shaft seal for actuator shaft (atc 450)
- Replacing radial shaft seal for actuator shaft (atc 45l)
- Replacing radial shaft seal for drive flange (atc 450)
- Replacing radial shaft seal for output flange (atc 450)
- Replacing radial shaft seal for output flange (atc 45l)
- Replacing radial shaft seal for output to the front axle (atc 450)
- Replacing radial shaft seal for output to the front axle (atc 45l)
Renewing radial shaft seal for drive flange (atc 45l)
Special tools required:
- 23 0 490
- 27 1 430
IMPORTANT: After completion of work, CHECK TRANSMISSION OIL LEVEL and top up if necessary.
For this transfer box, use approved TRANSMISSION OIL only.
Necessary preliminary tasks:
- Remove TRANSFER BOX.
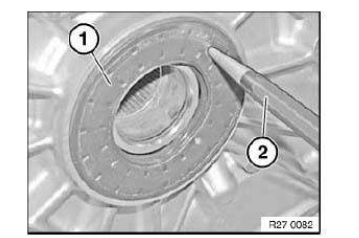
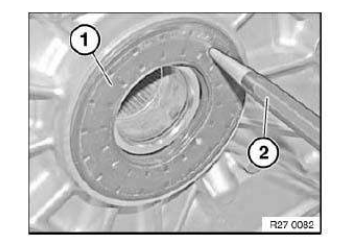
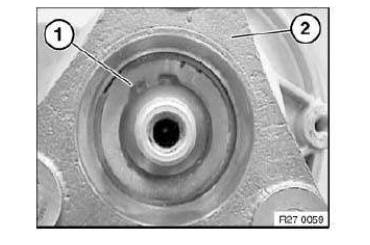
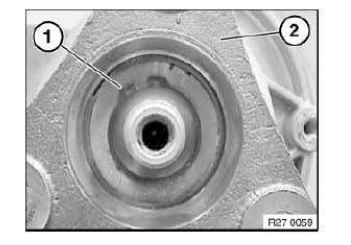
Drive a hole into radial shaft seal (1) using a center punch (2).
IMPORTANT: Do not use a drill as swarf may result in transmission failure.
Courtesy of BMW OF NORTH AMERICA, INC.
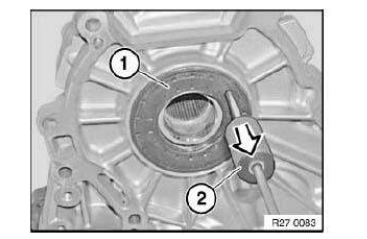
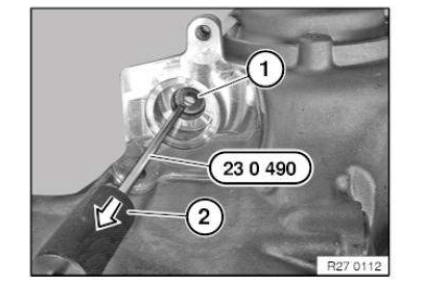
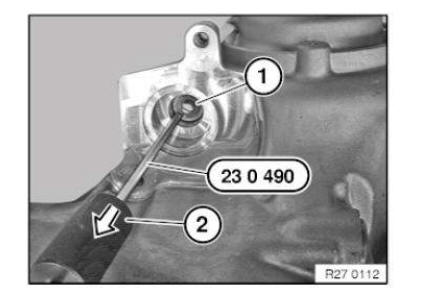
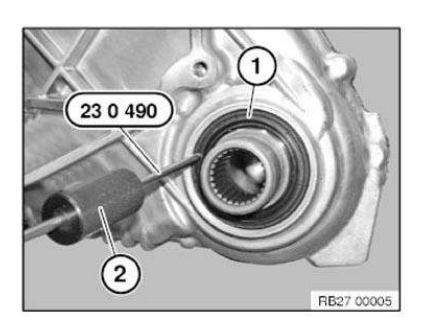
Screw special tool 23 0 490 into radial shaft seal.
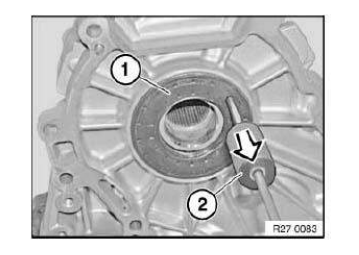
Drive out radial shaft seal (1) with impact weight (2).
Installation note:
Coat sealing lips of new radial shaft seal with clean transmission oil.
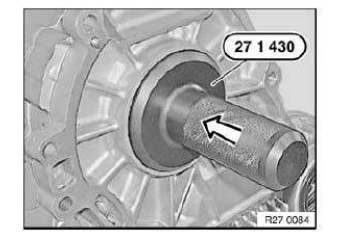
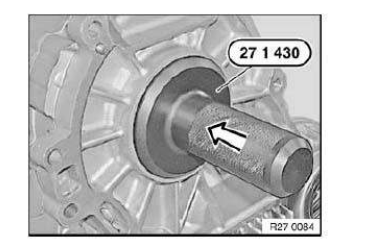
Drive in radial shaft seal with special tool 27 1 430 .
Reassemble the vehicle.
Check oil level.
Check transmission for leaks.
Replacing output flange on rear transfer box (atc 45l)
IMPORTANT: After completing work, check TRANSMISSION OIL LEVEL and top up if necessary.
Use only the approved TRANSMISSION OIL .
NOTE:
- Replace output flange only together with a new radial shaft seal.
- Procedure for removing output flange is identical to replacing RADIAL SHAFT SEAL.
Installation note:
- Thickness of new shim must be determined before output flange is installed.
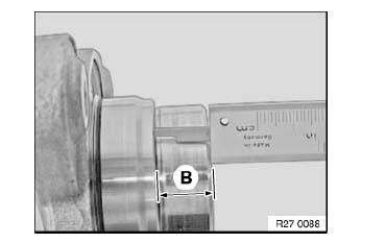
Determine and note down dimension A of output flange (old and new).
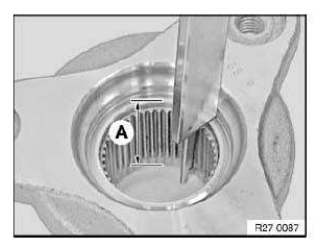
Determine and note down dimension B of output flange (old and new).
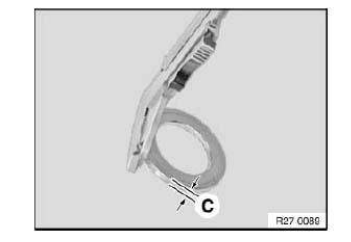
Determine old dimension C, thickness of shim.
Installation note:
Calculate thickness of new shim:
1. Add old dimension A of output flange (previous) and old dimension C of shim Then subtract old dimension B from old result A+C.
2. Subtract dimension B from dimension A of output flange (new).
3. Then subtract result of step 2 from result of step 1.
Replacing output flange on transfer box at rear (atc450)
IMPORTANT: After completing work, check transmission oil level and top up if necessary.
Use only the approved TRANSMISSION OIL .
NOTE:
- Replace output flange only together with a new radial shaft seal.
- Operations for removing output flange are identical to replacing RADIAL SHAFT SEAL
Installation note:
- Thickness of new shim must be determined before output flange is installed
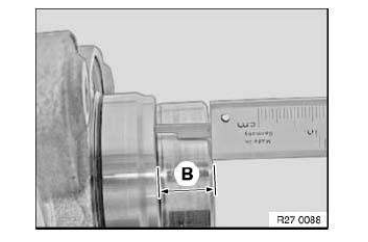
Determine and note down dimension A of output flange (old and new).

Determine and note down dimension B of output flange (old and new).
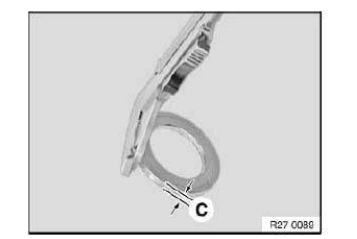
Determine old dimension C, thickness of shim.
Installation note:
Calculate thickness of new shim:
1. Add old dimension A of output flange (previous) and old dimension C of shim Then subtract old dimension B from old result A+C.
2. Subtract dimension B from dimension A of output flange (new).
3. Then subtract result of step 2 from result of step 1.
Replacing radial shaft seal for actuator shaft (atc 450)
Special tools required:
- 11 1 200
- 11 1 380
- 23 0 490
IMPORTANT:
Read and comply with notes on protection against electrostatic discharge (ESD protection).
After completion of the repair work, CHECK TRANSMISSION OIL LEVEL and top up if necessary.
Use only the approved TRANSMISSION OIL .
Necessary preliminary tasks:
- Disconnect NEGATIVE BATTERY CABLE
- Remove CROSS MEMBER .
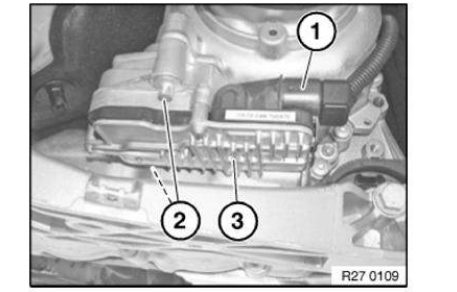
Disconnect connector (1).
Release screws (2) and remove transfer box from control unit (longitudinal torque module) (3).
Screw special tool 23 0 490 into radial shaft seal.
Drive out radial shaft seal (1) with impact weight (2).
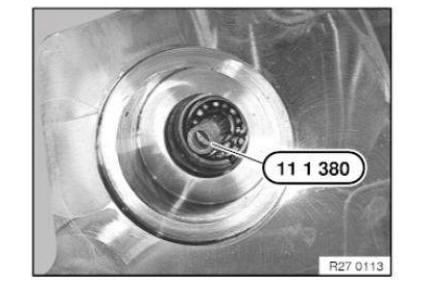
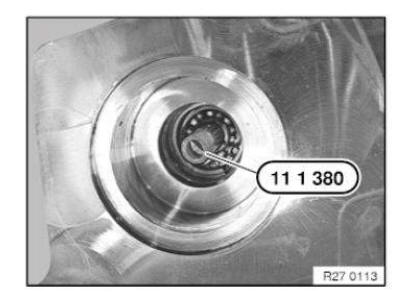
Push the assembly sleeve 11 1 380 over the actuator shaft.
IMPORTANT: Nonobservance involves a risk of damage to the radial shaft seal.
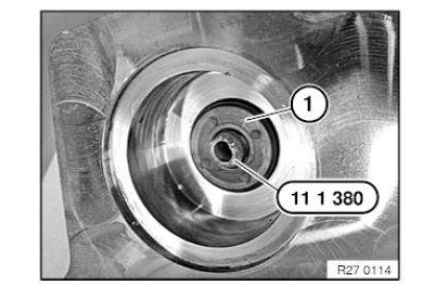
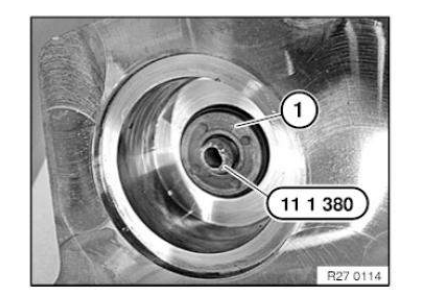
Slide the new radial shaft seal (1) over the assembly sleeve (2) onto the actuator shaft.
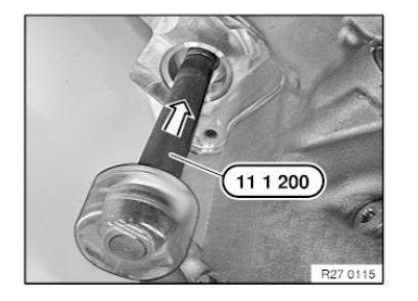
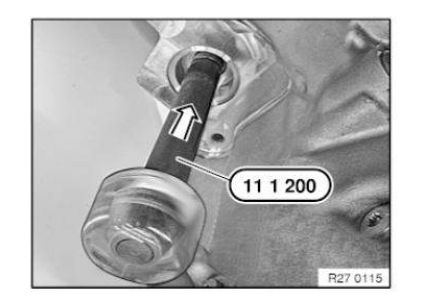
Drive radial shaft seal fully home using special tool 11 1 200 and plastic hammer.
Remove the assembly sleeve.
Replacing radial shaft seal for actuator shaft (atc 45l)
Special tools required:
- 11 1 200
- 11 1 380
- 23 0 490
IMPORTANT: Read and comply with notes on protection against electrostatic discharge (ESD protection).
After completion of the repair work, CHECK TRANSMISSION OIL LEVEL and top up if necessary.
Use only the approved TRANSMISSION OIL .
Necessary preliminary tasks:
- Disconnect BATTERY EARTH LEAD
- Remove CROSS MEMBER .
Disconnect connector (1).
Release screws (2) and remove transfer box from control unit (longitudinal torque module) (3).

Screw special tool 23 0 490 into radial shaft seal.
Drive out radial shaft seal (1) with impact weight (2).
Push the assembly sleeve 11 1 380 over the actuator shaft.
IMPORTANT: Nonobservance involves a risk of damage to the radial shaft seal.
Slide the new radial shaft seal (1) over the assembly sleeve (2) onto the actuator shaft.
Drive radial shaft seal fully home using special tool 11 1 200 and plastic hammer.
Remove the assembly sleeve.
Replacing radial shaft seal for drive flange (atc 450)
Special tools required:
- 23 0 490
- 27 1 430
IMPORTANT: After completion of work, CHECK TRANSMISSION OIL LEVEL and top up if necessary.
For this transfer box, use approved TRANSMISSION OIL only.
Necessary preliminary tasks:
- Remove TRANSFER BOX.
Drive a hole into radial shaft seal (1) using a center punch (2).
IMPORTANT: Do not use a drill as drillings may result in transmission malfunction.
Screw special tool 23 0 490 into radial shaft seal.
Drive out radial shaft seal (1) with impact weight (2).
Installation note:
Coat sealing lips of new radial shaft seal with clean transmission oil.
Drive in radial shaft seal with special tool 27 1 430 .
Reassemble the vehicle.
Check oil level.
Check transmission for leaks.
Replacing radial shaft seal for output flange (atc 450)
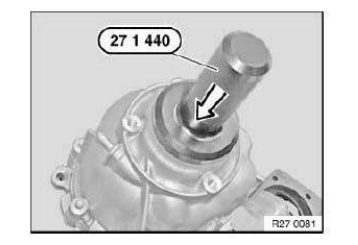
Special tools required:
- 27 1 440
IMPORTANT: After completing repair work, check transmission oil level and top up if necessary.
For this transfer box, use approved TRANSMISSION OIL only.
Necessary preliminary tasks:
- Remove PROPELLER SHAFT
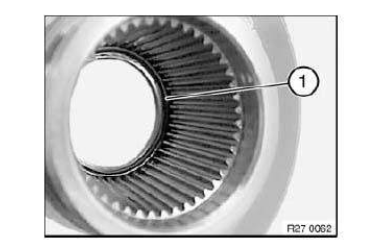
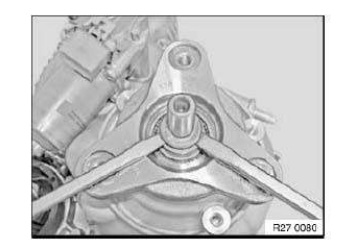
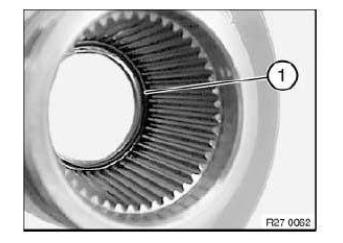
Release circlip (1).
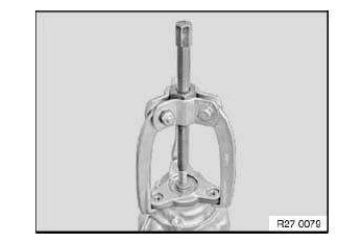
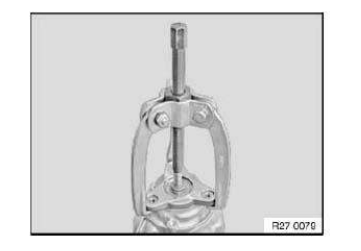
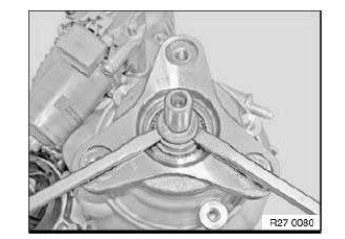
Release output flange with three-claw extractor tool.
Lever radial shaft seal out of housing with a suitable tool.
IMPORTANT: Do not damage housing.
Installation note:
Replace O-ring in output flange.
Check that O-ring is in correct position.
Installation note:
Coat sealing lips of new radial shaft seal with clean transmission oil.
Drive in radial shaft seal with special tool 27 1 440 .
Installation note:
- Push on output flange
- Press down output flange using 2 screwdrivers
- Shim
- Continue pressing output flange down until retaining groove is completely visible
- Fit circlip
Replacing radial shaft seal for output flange (atc 45l)
Special tools required:
- 27 1 440
IMPORTANT: After completing repair work, check TRANSMISSION OIL LEVEL and top up if necessary.
For this transfer box, use approved TRANSMISSION OIL only.
Necessary preliminary tasks:
- Remove PROPELLER SHAFT .
Release circlip (1).
Release output flange with three-claw extractor tool.
Lever radial shaft seal out of housing with a suitable tool.
IMPORTANT: Do not damage housing.
Installation note:
Replace O-ring in output flange.
Check that O-ring is in correct position.
Installation note:
Coat sealing lips of new radial shaft seal with clean transmission oil.
Drive in radial shaft seal with special tool 27 1 440 .

Installation note:
- Push on output flange
- Press down output flange using 2 screwdrivers
- Shim
- Continue pressing output flange down until retaining groove is completely visible
- Fit circlip
Replacing radial shaft seal for output to the front axle (atc 450)
Special tools required:
- 23 0 490
- 27 1 470
- 83 30 2 318 114
IMPORTANT: After completion of the repair work, check gearbox oil level.
For these transfer boxes, use approved TRANSMISSION OIL only.
Necessary preliminary tasks:
- Remove front PROPELLER SHAFT .
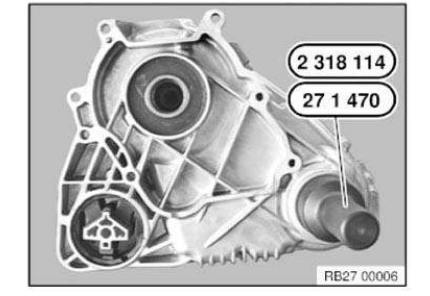
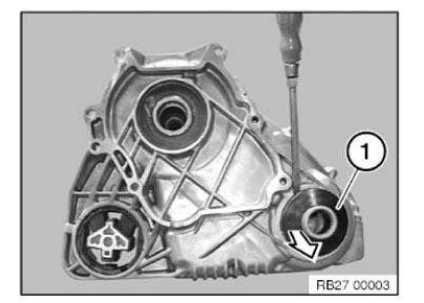
Remove protective cap (1) with a screwdriver.
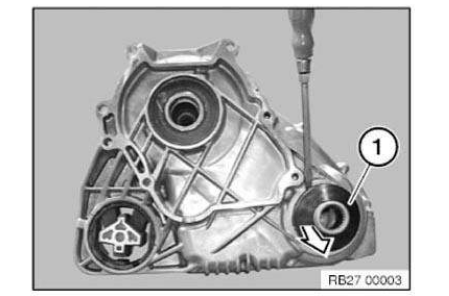
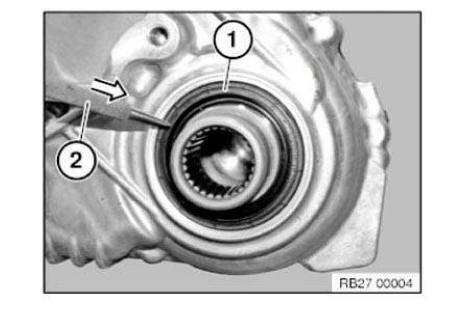
Drive a hole into radial shaft seal (1) using a center punch (2).
IMPORTANT: Do not use a drill as swarf may result in transmission malfunction.
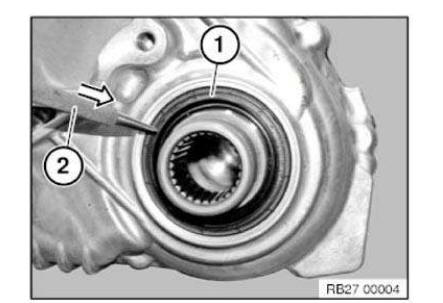
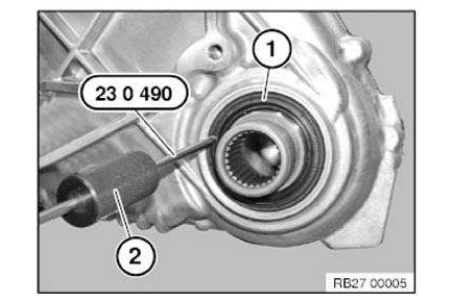
Screw in special tool 23 0 490 .
Drive out radial shaft seal (1) with impact weight (2).
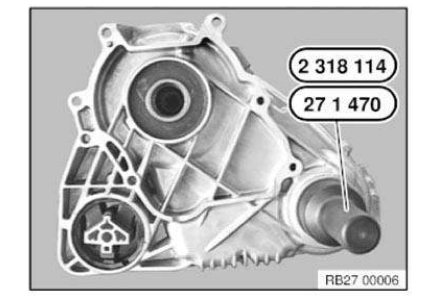
Drive in radial shaft seal with special tool 27 1 470 or 83 30 2 318 114. (Observe diameter of radial shaft seal)
Reassemble the vehicle.
Check oil level.
Check gearbox for leaks
Replacing radial shaft seal for output to the front axle (atc 45l)
Special tools required:
- 23 0 490
- 27 1 470
- 2 318 114
IMPORTANT: After completion of the repair work, CHECK GEARBOX OIL LEVEL.
For these transfer boxes, use approved TRANSMISSION OIL only.
Necessary preliminary tasks:
- Remove front PROPELLER SHAFT .
Remove protective cap (1) with a screwdriver.
Drive a hole into radial shaft seal (1) using a center punch (2).
IMPORTANT: Do not use a drill as drillings may result in transmission malfunction.
Screw in special tool 23 0 490 .
Drive out radial shaft seal (1) with impact weight (2).
Drive in radial shaft seal with special tool 2 318 114 .
Reassemble the vehicle.
Check oil level.
Check transmission for leaks.
 Transfer box
...

Other materials:
BMW X3 (F25) Service & Repair Manual > Transmission: Checking transmission fluid level
4.0 CHECKING TRANSMISSION FLUID LEVEL
Due to the substantial expansion of transmission fluid when heated it is only possible to measure the oil level
correctly at specified oil temperatures (after driving a distance of about 12 mi./20 km).
ZF 3HP AND 4HP
Due to the substantial expansion of t ...
