BMW X3 (F25) Service & Repair Manual: Rear trim panel
- Replace tail panel outer section and inner center section
- Replace tail panel outer section and inner section
- Replacing outer tail panel section
- Stripping operation - replacing outer part and inside middle part of tail panel
- Stripping operations - replacing outer and inner tail panel sections
- Stripping-down operations - replacing tail panel outer section
Replace tail panel outer section and inner center section
Read contents of BODY, GENERAL.
STRIP DOWN vehicle.
Observe procedure of REPAIR STAGE 3.
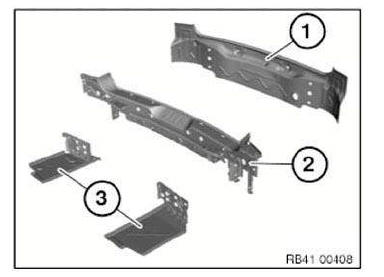
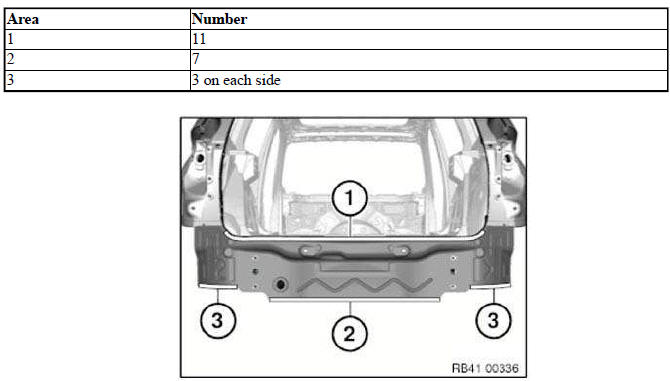
Following new body parts are required
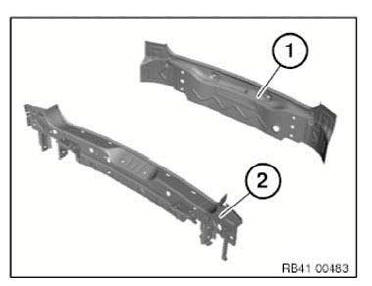
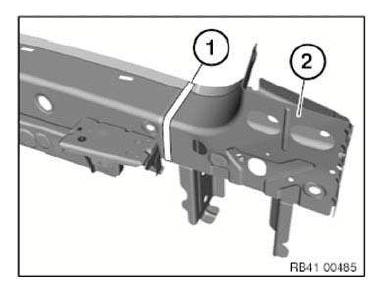
- (1) Rear trim, outer skin
- (2) Rear trim, inner
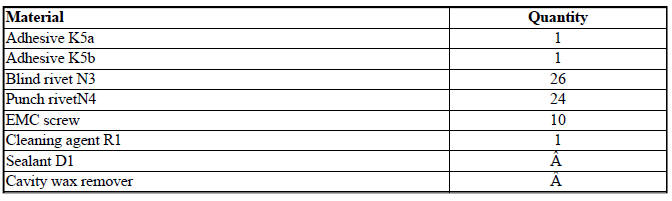
Following CONSUMABLES are required:
Removing the tail panel outer section and inside center section
Operation is partially described on the left side. Right side identical.
IMPORTANT: Cut outer panel only.
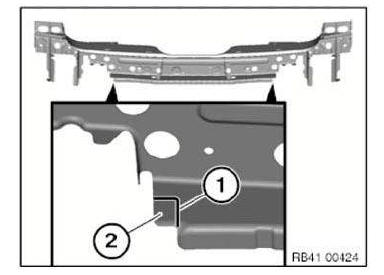
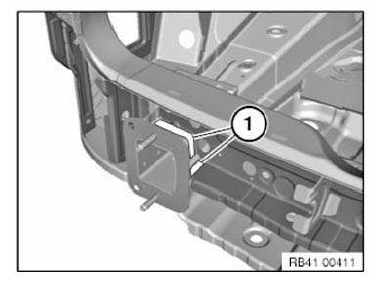
Cut severance cuts (1) 15 mm below the component edge of the rear bulb mount and separate.
Open welded connections in areas (2).
Remove rear trim panel outer skin.
NOTE: The new part is installed overlapping in the areas (1).
Open welded connections in areas (1).
Open welded connections in areas (1).
Remove tail panel center section.
New part preparation
Mark new part in accordance with severance cut on rear trim panel outer skin according to vehicle + 15 mm extra material and cut.
NOTE: The outer skin of the rear trim panel is bonded using the bonding riveting process.
The inner panel center section is bonded using the bonding riveting process as well as welded.
IMPORTANT:
Version with automatic tailgate actuation: Risk of damage to spindle drive: only move rear lid slowly by hand.
Mark severance cut (1) on both sides as pictured and cut.
Remove metal section (2).
Open welded connections in area (1).
Remove metal section (2) of center section.
Adjust new parts in combination with tailgate and rear lights to fit and secure.
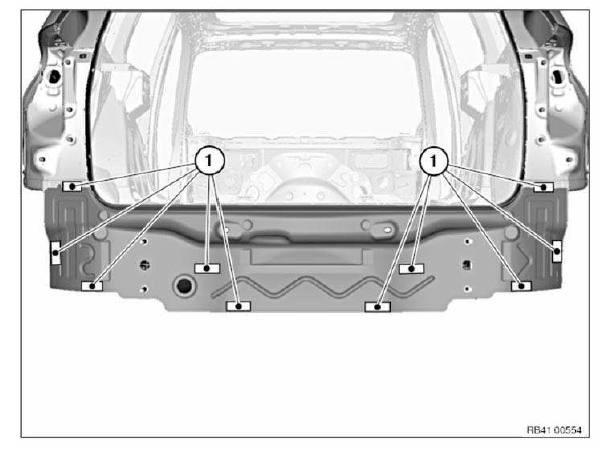
In area (1), set four Ø 4.2 mm bore holes for blind rivets.
In areas (1) to (4), drill Ø 4.2 mm bore holes for blind rivets.

Remove new part and deburr holes.
IMPORTANT: Do not grind new parts and body in area of bonding surfaces.
Installing tail panel and inner center section
Clean all bonding surfaces on new part and on vehicle with cleaning agent R1.
Apply adhesive to bonding surfaces.
When inserting rear trim panel, make sure there is sufficient adhesive on bonding surfaces.
Install new part and rivet with blind rivets.
In areas (1) weld new part.
Weld new part in area (1).
IMPORTANT: Risk of damage! Avoid applying excessive heat to the neighboring adhesive areas.
Installing the outer skin of the rear trim panel
Clean all bonding surfaces on new part and on vehicle with cleaning agent R1.
Apply adhesive to bonding surfaces.
When inserting rear trim panel, make sure there is sufficient adhesive on bonding surfaces.
Install rear trim panel and rivet with blind rivets.
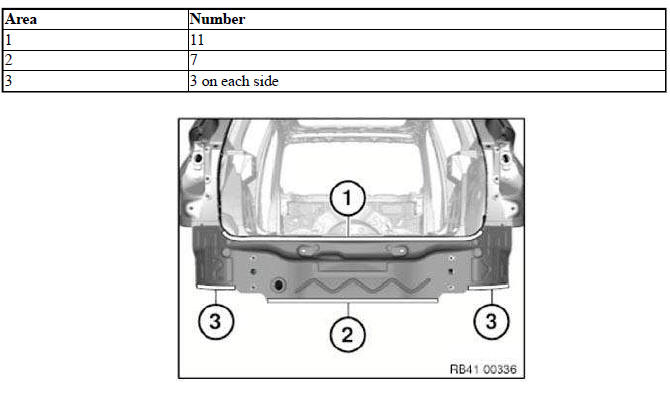
Use N4 punch rivets in areas (1) to (3).
Press rear trim panel in areas (1) and remove emerging adhesive.
Then install carrier for bumper trim to secure rear trim panel carrier.
IMPORTANT: Prevent emerging adhesive from coming into contact with support.
Do not use any cleaning agents containing solvents.
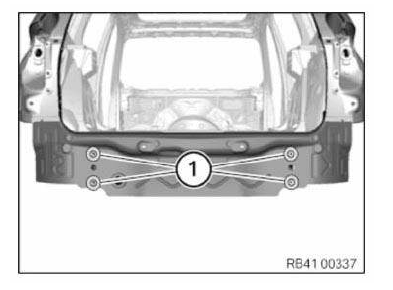
After hardening of the adhesive install 10 EMC SCREWS in the areas shown (1).
Replace tail panel outer section and inner section
Read contents of BODY, GENERAL.
STRIP DOWN vehicle Observe procedure of REPAIR STAGE 3.
Following new body parts are required:
- (1) Rear trim, outer skin
- (2) Rear trim, inner
- (3) Luggage compartment floor, left and right
Following CONSUMABLES are required:
Remove tail panel outer section and inner section
Operation is partially described on the left side. Right side identical.
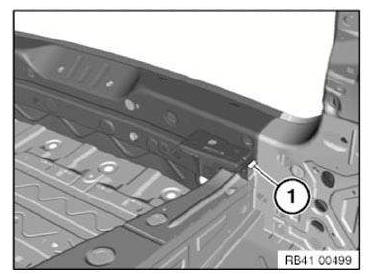
Open welded connections in area (1).
Completely drill through welded connections in these areas (2).
Roughly cut out tail panel outer section and inner section.
Open welded connections in areas (1).
Open welded connections in areas (1).
View from vehicle interior.
Open welded connections in areas (1).
Remove exterior and interior tail part.
New part preparation
NOTE: The outer skin of the rear trim panel is bonded using the bonding riveting process. All other components are welded.
IMPORTANT: Version with automatic tailgate actuation: Risk of damage to spindle drive: only move rear lid slowly by hand.
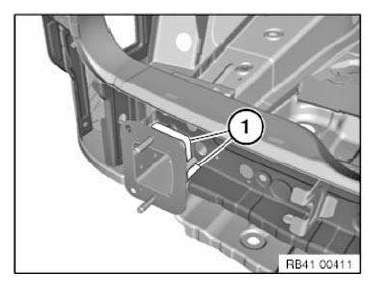
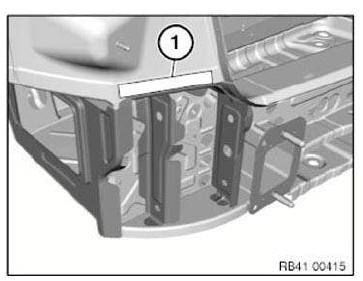
Undo welded connections and disconnect the rear trim panel support (1) from the luggage compartment floor.
Mark severance cut (1) as pictured and cut.
Remove metal section (2).
Shown on left side. Right side as mirror image.

Adjust new parts to fit and secure.
In areas (1) to (3), set 4.2 mm diameter bore holes for blind rivets.

Remove new part and deburr holes.
IMPORTANT: Do not grind new parts and body in area of bonding surfaces.
Installing inner rear trim panel and support of rear trim panel
Install and weld new parts.
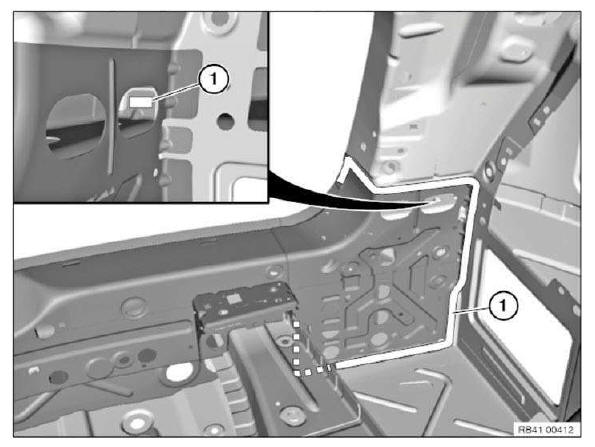
NOTE: The inner rear trim panel is welded to the outer skin of the rear trim panel in this area (1).
Installing the outer skin of the rear trim panel
Clean all bonding surfaces on new part and on vehicle with cleaning agent R1.
Apply adhesive to bonding surfaces.
When inserting rear trim panel, make sure there is sufficient adhesive on bonding surfaces.
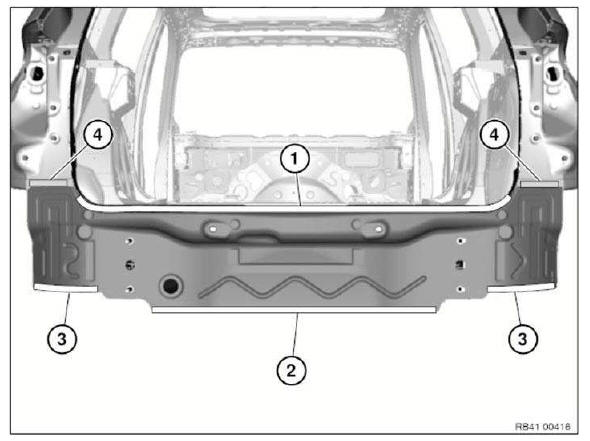
Install rear trim panel and rivet with blind rivets.
Use N4 punch rivets in areas (1) to (3).

Weld the outer skin of the rear trim panel and the inner rear trim panel to the side wall in these areas (4).
IMPORTANT: Risk of damage! Avoid exposing neighboring adhesive areas to excessive heat!
Press rear trim panel in areas (1) and remove emerging adhesive.
Then install carrier for bumper trim to secure rear trim panel carrier.
IMPORTANT: Prevent emerging adhesive from coming into contact with support.
Do not use any cleaning agents containing solvents.
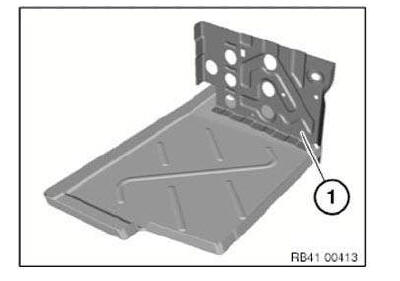
Replacing outer tail panel section
Read contents of BODY, GENERAL.
Observe (REPAIR STAGE 2) procedure! STRIP DOWN vehicle.
The following new body parts are required:
- (1) Rear trim panel
Following CONSUMABLES are required:


Removing rear trim panel
IMPORTANT: Cut outer panel only.
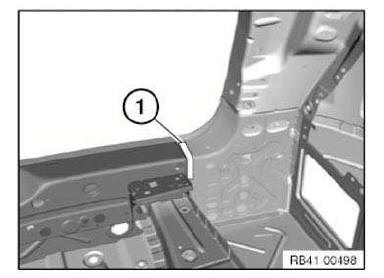
Cut severance cuts (1) 15 mm below the component edge of the rear bulb mount and separate.
Open welded connections in areas (2).
NOTE: The new part is installed overlapping in the areas (1).
New part preparation
Mark severance cuts on new part in accordance with severance cuts on vehicle + 15 mm extra material and cut.
Adjust rear trim panel in combination with rear lid and rear lights to fit and secure.
IMPORTANT: Version with automatic tailgate activation: Risk of damage to spindle drive: only move rear lid slowly by hand.

NOTE: In the areas (1) the new part may not overlap the rear lamp mounts! In areas (1) to (4), set 4.2 mm diameter bore holes for blind rivets.

Remove new part and deburr holes.
IMPORTANT: Do not grind/sand new part in area of bonding surfaces.
Installing rear trim panel:
Clean all bonding surfaces on new part and on vehicle with cleaning agent R1.
Apply adhesive to bonding surfaces.
Install rear trim panel and rivet with blind rivets.
Use N4 punch rivets in areas (1) to (3).
Press rear trim panel in areas (1) and remove emerging adhesive.
Then install carrier for bumper trim to secure rear trim panel carrier.
IMPORTANT: Prevent emerging adhesive from coming into contact with support.
Do not use any cleaning agents containing solvents.
After hardening of the adhesive install 10 EMC SCREWS in the areas shown (1).
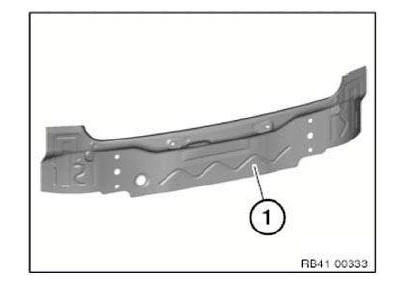
Stripping operation - replacing outer part and inside middle part of tail panel
NOTE: Owing to the different engine variants and equipment specifications, not all the components are taken into consideration.
The following list basically represents the removal sequence.
- Remove battery
- Remove bumper trim
- Remove bumper support
- Remove center bumper guide
- Remove guide for bumper on left and right
- Remove luggage compartment floor trim panel
- Tail panel cover
- Remove left luggage compartment wheel arch panel
- Remove right luggage compartment wheel arch panel
- Remove rear light on left and right
- Remove tailgate lock
- Release and lower rear silencer.
- Partially detach tailgate seal
- Remove control unit for air suspension
- Remove control unit for automatic luggage compartment lid actuation
Operation is described on the left side. Right side identical.
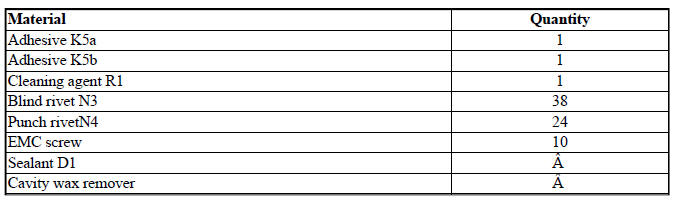
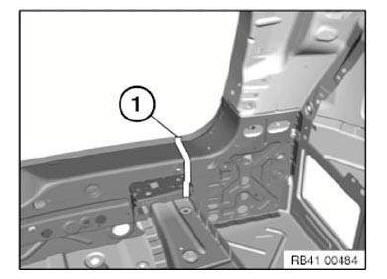
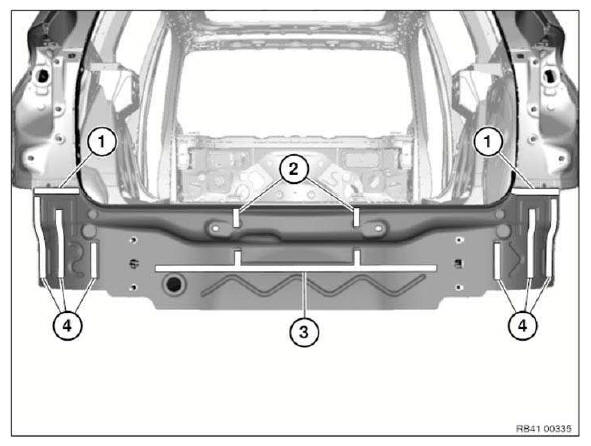
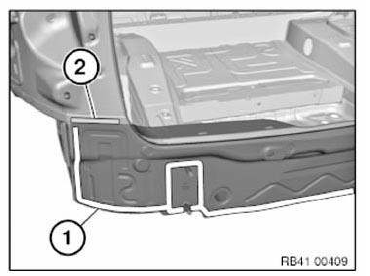
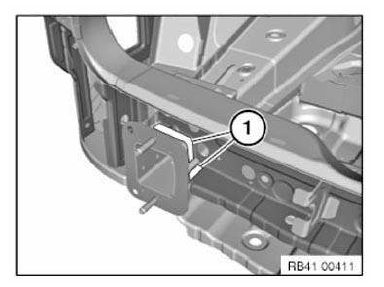
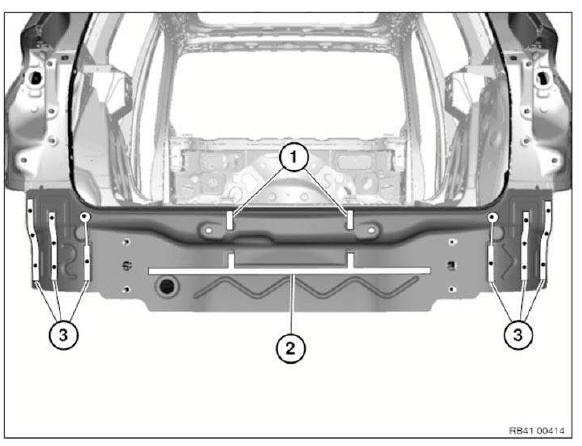
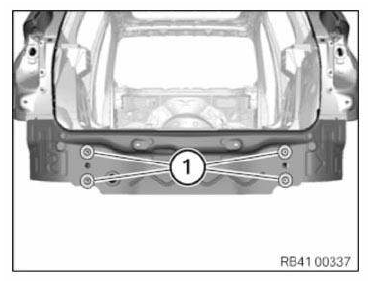
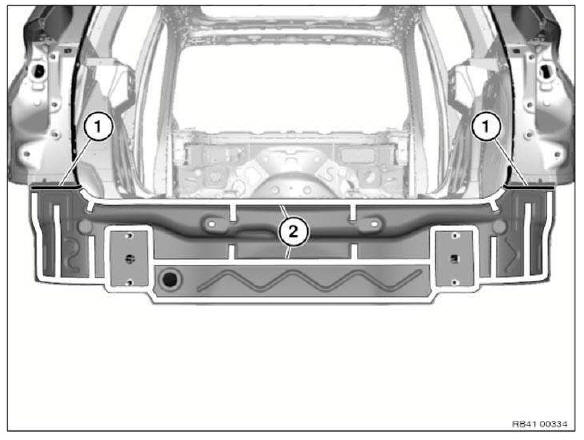
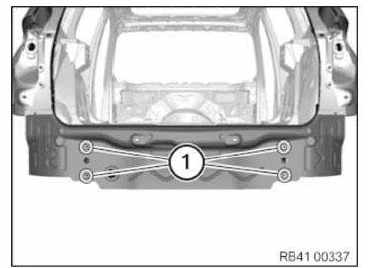
Release nut/expanding rivets and remove both supports (1) for floor panels.
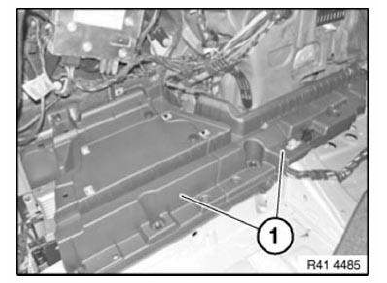
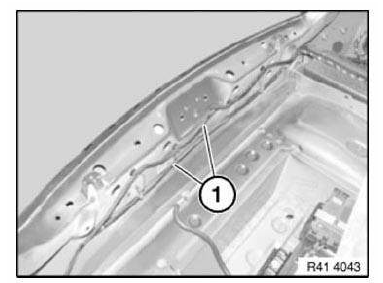
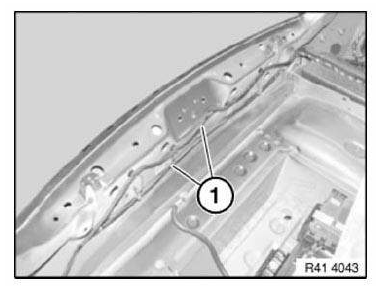
Release wiring harnesses (1) from rear trim panel and lay towards front.
Diagram similar.
Stripping operations - replacing outer and inner tail panel sections
NOTE: Owing to the different engine variants and equipment specifications, not all the components are taken into consideration.
The following list basically represents the removal sequence.
- Remove luggage compartment floor trim panel
- Remove battery
- Remove bumper trim
- Remove bumper support
- Remove center bumper guide
- Remove guide for bumper on left and right
- Remove left luggage compartment wheel arch panel
- Remove right luggage compartment wheel arch panel
- Tail panel cover
- Remove rear light on left and right
- Remove tailgate lock
- Partially detach tailgate seal
- Remove control unit for air suspension
- Remove control unit for automatic luggage compartment lid actuation
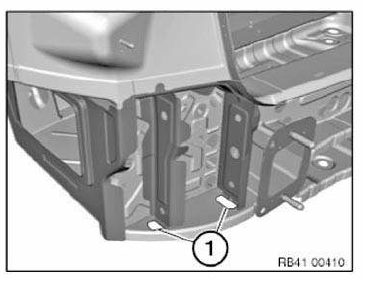
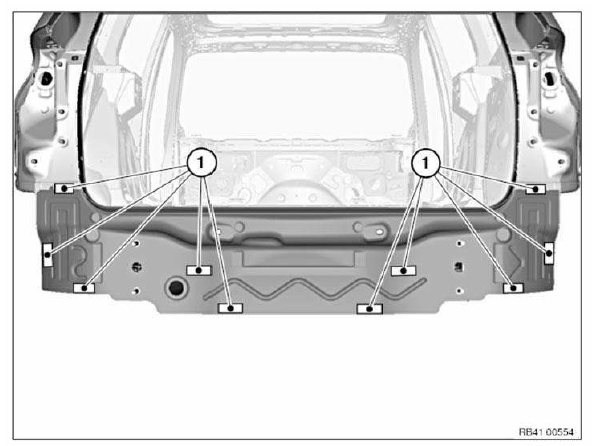
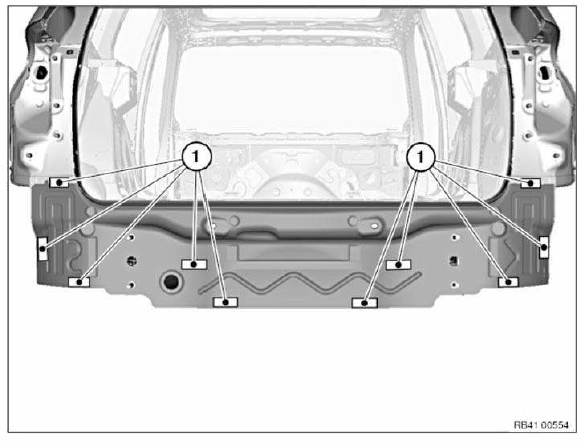
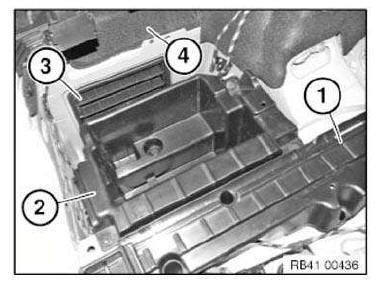
Lever out expanding rivets and remove side member facing (1).
Lever out expanding rivets and remove toolkit mounting (2).
Undo latch mechanisms and remove rear bleeder (3).
Remove sound insulation (4) of luggage compartment.
Shown on left side. Proceed in the same manner on the right side.
Release wiring harnesses (1) from rear trim panel and lay towards front.
Graphic representation similar.
Stripping-down operations - replacing tail panel outer section
NOTE: Owing to the different engine variants and equipment specifications, not all the components are taken into consideration.
The following list basically represents the removal sequence.
- Remove battery
- Remove bumper trim panel
- Bottom center cover
- Remove bumper support
- Remove guide for rear center bumper
- Remove guide for rear left bumper
- Remove tail panel cover
- Loosen holder, rear silencer
- Partially detach tailgate seal
 Front trim panel
NOTES ON THE REPAIR TECHNIQUE USED IN THE MAIN GROUP 41
Two different repair techniques are used in body repair.
These are welding and bonding/riv ...
 Side panels
...
Other materials:
BMW X3 (F25) Service & Repair Manual > Transmission: Automatic transmission fluid for zf-transmission
GA8HP45Z / GA8HP50Z / GA8HP70Z / GA8HP90Z / GA8P70H / GA8P75H /
GA8HP75Z
14.0 AUTOMATIC TRANSMISSION FLUID FOR ZF-TRANSMISSION
GA8HP45Z / GA8HP50Z / GA8HP70Z / GA8HP90Z / GA8P70H / GA8P75H /
GA8HP75Z
NOTE:
The automatic transmissions have a life-time oil filling. These transmissions
require no oil change for their entire service life.
The approved lifetime fluid ...
