BMW X3 (F25) Service & Repair Manual: Condenser and dryer with lines
- Instructions for desiccant insert replacement
- Instructions for replacement of air conditioning capacitors and radiator/coolers
- Removing and installing or replacing capacitor for heating and air conditioning system
- Replacing desiccant insert for air conditioning system
- Replacing safety pressure switch
Instructions for desiccant insert replacement
Special tools required:
- 32 1 270
A desiccant insert that is in a correctly functioning, sealed heating and air conditioning system does not have to be changed at regular service-inspection intervals.
However, the dryer flask or desiccant insert must absolutely be replaced in the event of:
- Contamination of the refrigerant with swarf (e.g. when the compressor is clamped).
- With depressurized and/or completely drained refrigerant circuit.
- With a refrigerant circuit, which was closed using special tool 32 1 270 but remains open for more than 24 hours.
The desiccant insert cannot be replaced in the following vehicles:
- 1-Series E8x, 3-Series E9x from 12/2008
- E84, E89
- 1-Series F2x, 3-Series F3x
- BMW i 01 without heat pump
In these vehicles, the condenser for the heating and air conditioning system must be replaced.
- BMW i 01 with heat pump
On this vehicle the low pressure battery must be replaced.
Instructions for replacement of air conditioning capacitors and radiator/coolers
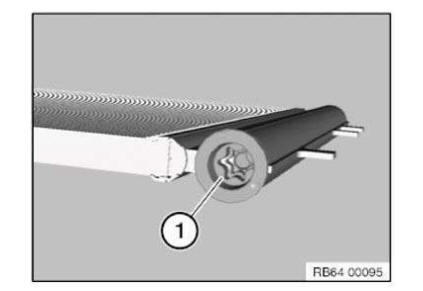
IMPORTANT: Even when they are correctly installed or due to normal driving, radiators (oil cooler, radiator, charge air cooler) or air conditioning condensers may show slight impressions or deformations on their discs (1).
A slight sag with a large radius for the air conditioning condenser is also permissible.
As long as tightness/function are not degraded and an adequate distance of a few mm between the radiator and air conditioning condenser remains in place, this is not damage in either case .
Radiators or air conditioning condensers are not to be replaced in these cases!
NOTE: The deformations shown can be bent back with a standard fin comb..
Damage to lines carrying media or on the flat pipe require exchange of the radiator or air conditioning condenser (2-6).
Dryer flask (integrated in the air conditioning condenser): Round dents/depressions are permitted.
The air conditioning condenser is not to be replaced in this case.
Removing and installing or replacing capacitor for heating and air conditioning system
Special tools required:
- 00 9 030
WARNING: Danger of injury! Refrigerant circuit is under high pressure! Avoid contact with refrigerant and refrigerant fluid.
Read and comply with safety instructions:
- Handling R 134a tetrafluorethane refrigerant .
- HANDLING REFRIGERANT FLUID
IMPORTANT: Risk of damage! Restart engine only when A/C system has been correctly filled.
Follow NOTES for opening and replacing parts in refrigerant circuit.
If air conditioning is open for longer than 24 hours: replace DESICCANT INSERT FOR AIR CONDITIONING
Necessary preliminary tasks:
- DRAIN OFF AIR CONDITIONING SYSTEM
- Remove fan cowl with electric fan .
Release screw (1).
Release screws (2) on refrigerant lines (3).
Remove refrigerant lines (3) from condenser.
Installation note:
Replace sealing rings.
Use special tool 00 9 030 to install sealing rings without damaging them.
Release screws (1).
Remove radiator (2) from guides.
IMPORTANT: Risk of damage! The fins on the radiator and condenser should not be damaged.
Position radiator (1) as illustrated.
Carefully feed out condenser (2) upwards.
After installation:
- EVACUATE AND FILL AIR CONDITIONING
Replacing desiccant insert for air conditioning system
WARNING: Danger of injury! Refrigerant circuit is under high pressure!
- Follow safety instructions for handling R 134a refrigerant .
- Avoid contact with refrigerant and refrigerant fluid.
IMPORTANT: Risk of damage! Restart engine only when A/C system has been correctly filled.
FOLLOW instructions for opening and replacing parts in refrigerant circuit.
If air conditioning system is opened for more than 24 hours: replace desiccant insert for air conditioning system
Follow INSTRUCTIONS ON REPLACING DESICCANT INSERT .
Necessary preliminary tasks:
- Remove CONDENSER
Undo the plastic screw connection (1).
Remove the desiccant insert (1).
Installation note: Replace the sealing ring (3) on the plastic screw connection (2).
After installation:
EVACUATE AND FILL A/C SYSTEM
Replacing safety pressure switch
WARNING: Danger of injury! Refrigerant circuit is under high pressure! Follow safety informations for handling R 134a refrigerant . Avoid contact with refrigerant and refrigerant fluid. Follow safety instructions for HANDLING REFRIGERANT OIL .
IMPORTANT: Risk of damage! Restart engine only when A/C system has been correctly filled.
Follow INSTRUCTIONS for opening and replacing parts in refrigerant circuit.
If air conditioning system is open for longer than 24 hours: replace DESICCANT INSERT FOR AIR CONDITIONING
Necessary preliminary tasks:
- DRAIN OFF AIR CONDITIONING SYSTEM
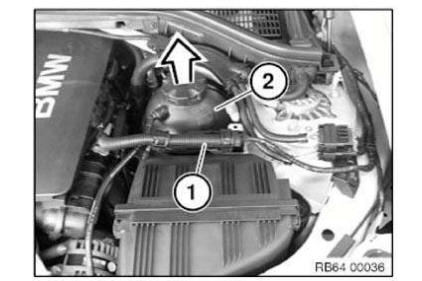
Unclip wiring harness (1).
Pull expansion tank (2) upward out of retaining bracket.
Unfasten plug connection (1) and disconnect.
Installation note: Guide pin (2) must be fit correctly in rubber guide (3).

Unfasten plug connection (1) and disconnect.
Release safety pressure switch (2) and remove.
After installation:
- EVACUATE AND FILL A/C SYSTEM
 Compressor
...

Other materials:
BMW X3 (F25) Service & Repair Manual > Driveline+Axles: Propeller shaft, general
PROPELLER SHAFT DEFLECTION ANGLES
IMPORTANT:
Specifications on propeller shaft deflection angles for the F series are only possible on request
with the vehicle identification number of the problem vehicle via PuMA.
REMOVING AND INSTALLING FRONT PROPELLER SHAFT
IMPORTANT:
Do not mov ...
