BMW X3 (F25) Service & Repair Manual: Rear sub-frame
- Lowering/raising rear axle support
- Removing and installing complete rear axle support
- Replacing rear axle support
Lowering/raising rear axle support
Special tools required:
- 31 5 251
- 00 2 030
- 31 5 255
- 31 5 253
- 33 5 206
WARNING: Danger of injury! Failure to comply with the following instructions may result in the vehicle slipping off the lifting platform and critically injuring other persons.
Load the luggage compartment with a minimum of 100 kg before lowering/removing the rear axle support. This prevents the vehicle from tilting or sliding off the vehicle hoist! When supporting components, make sure that:
- the vehicle can no longer be raised or lowered
- the vehicle does not lift off the locating plates on the vehicle hoist.
IMPORTANT: Before lowering/removing rear axle support: Observe SAFETY INFORMATION for raising the vehicle.
In order to avoid damage to vehicle hoist, perform weight compensation on vehicle.
Necessary preliminary tasks:
- Remove REAR WHEELS .
- Detach BOTH SPRING STRUTS ON CAMBER LINK.
- Release PROPELLER SHAFT ON REAR AXLE DIFFERENTIAL and tie up.
- Detach BOTH BRAKE-CALIPER SUPPORTS and tie up.
Unlock plug connection on ride height sensor and disconnect.
Unclip cable for pulse sensor and ride height sensor/brake pad wear sensor on camber link/wheel carrier.
Engage special tool 31 5 251 with a 2nd person helping completely on workshop jack 00 2 030 .
Insert special tools 31 5 255 in telescopic supports of a profile rail pair.
Insert special tools 31 5 253 in telescopic supports of other profile rail pair.
NOTE: In a profile rail pair, two profile rails are connected to one another by gearing.
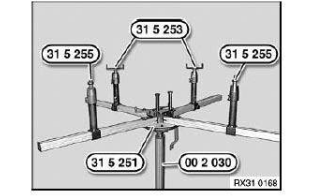
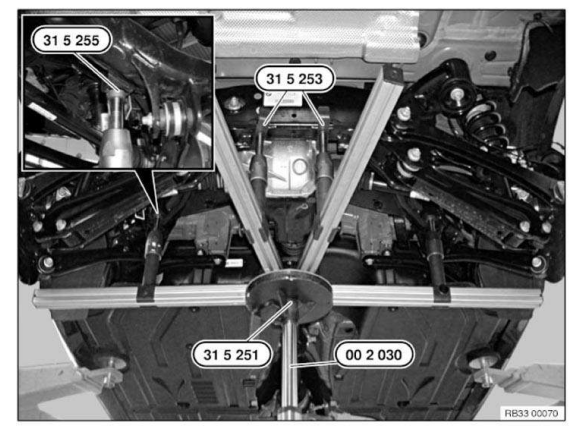
The jacking points on the left side are shown.
Align special tools 31 5 251 , 31 5 253 and 31 5 255 to rear axle support.
Support rear axle support by operating workshop jack 00 2 030 .
IMPORTANT: The center of gravity of the rear axle must be positioned centrally over the workshop jack.
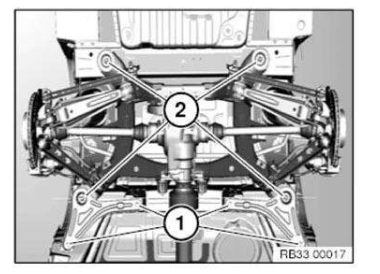
Use tensioning strap 33 5 206 to lash rear axle support to special tool 31 5 251 ! Release screws (1).
Release screws (2) and remove stop plate and compression strut.
Lower rear axle support.
Installation note: Check threads for damage; if necessary, repair with HELICOIL THREAD INSERTS .
Replace screws (2).
Turn in all screws, first tightening screws (2) and then tightening screws (1).
Removing and installing complete rear axle support
WARNING: Danger of injury! Failure to comply with the following instructions may result in the vehicle slipping off the vehicle hoist and critically injuring other persons.
Load the luggage compartment with a minimum of 100 kg before lowering/removing the rear axle support.
When supporting components, make sure that:
- the vehicle can no longer be raised or lowered
- the vehicle does not lift off the locating plates on the vehicle hoist.
IMPORTANT: Observe SAFETY INFORMATION for raising the vehicle.
In order to avoid damage to vehicle hoist, perform weight compensation on vehicle.
Necessary preliminary tasks:
- Remove PULSE GENERATOR .
NOTE: The subsequent procedure is described in 33 31 011 Replacing rear axle support.
IMPORTANT: Prior to installation, check sensor head and cable on pulse sensor and renew if necessary.
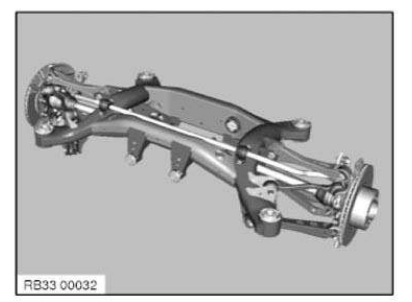
Replacing rear axle support
WARNING: Danger of injury! Failure to comply with the following instructions may result in the vehicle slipping off the vehicle hoist and critically injuring other persons.
Load the luggage compartment with a minimum of 100 kg before lowering/removing the rear axle support. This prevents the vehicle from tilting or sliding off the vehicle hoist! When supporting components, make sure that:
- the vehicle can no longer be raised or lowered
- the vehicle does not lift off the locating plates on the vehicle hoist.
IMPORTANT: Before lowering/removing rear axle support: Observe SAFETY INFORMATION for raising the vehicle.
In order to avoid damage to vehicle hoist, perform weight compensation on vehicle.
Necessary preliminary work:
- Remove REAR AXLE FINAL DRIVE.
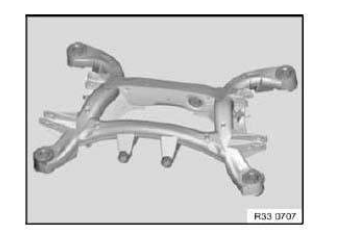
- Remove COMPLETE REAR AXLE CARRIER.
Release RIDE HEIGHT SENSOR WITH JOINTED ROD ON REAR AXLE SUPPORT .
Release both ANTI-ROLL BAR LINKS AT ANTI-ROLL BAR.
Release both CAMBER ARMS ON REAR AXLE CARRIER.
Release both TOE LINKS ON REAR AXLE CARRIER.
Release both TRAILING ARMS ON REAR AXLE CARRIER.
Release both CONTROL ARMS ON REAR AXLE CARRIER.
Release both WISHBONES ON REAR AXLE CARRIER.
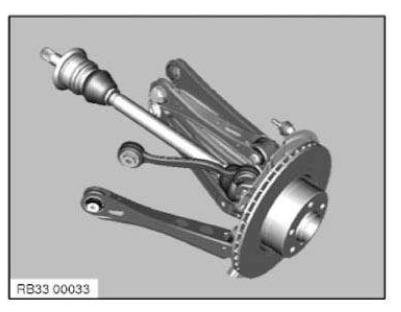
Remove both wheel carriers with output shaft, all arms, anti-roll bar link and brake disc.
Release ANTI-ROLL BAR.
Take rear axle support down from special tool with assistance of a 2nd person and set down on a suitable surface.
Installation note: Use previous rear axle support as a template for modifying or replacing small parts.
After installation:
- Carry out wheel alignment procedure .
 Output shafts
...
 Control arms and struts
OVERVIEW OF STEERING LINKS
...
Other materials:
BMW X3 (F25) Service & Repair Manual > Electrical: Switches and relays
REPLACING POWER DISTRIBUTION MODULE (N20, N52T, N55)
Necessary preliminary tasks:
Switch off ignition.
Disconnect BATTERY NEGATIVE LEAD .
Remove left service flap on cowl panel cover.
Unlock and pull off all connectors (1) from power distribution module.
Remove cover (2).
Release n ...
